Changing a Refrigerator Cooling Unit
Smell of Ammonia in the Refrigerator
by
Frank DeRemer
 |
I smelled ammonia in my 1990 refrigerator. Well, it did last for 17
years! But I really didn't want to spend $1300 plus tax and installation
for a new one. I checked out Howell's RV in Santee, CA, at Rick's
suggestion. They wanted about $525 for a refurbished cooling unit.
Next, I went to eBay and found RV
Repair. Their RM 3604 unit was $485 plus
$25 shipping with a $100 rebate upon return of my old unit, for a net total of
$410. I clicked the Buy It Now button and the rest is history. |
Here's the sales pitch that appealed to me:
| We do a high volume of cooling unit sales, as the high positive feedback
shows. A little info on the cooling units I sell. I do not
build the units. They are purchased from an Amish Refrigeration
Manufacturing Company. Not just a start-up company with a few years
experience. The Amish specialize in the home refrig's giving 25 to
50 years service. The RV units are not much different. There
is no patching, only new tubing, new foam pack, new backer, and extra
bracing. It also comes with thermal mastic.
The Amish pride is to give a dependable and long-lasting unit.
The warranty is for three years with an option to extend.
These units are built to get colder than the original refrig, from
years of testing. These units will hold a cold temp inside even when
the outside temp goes to 100 degrees. Most competitors units are
just charged standard and might hold 45 degrees at 100 degrees out side.
I have been in the RV Repair business for over 40 years and I know
that RV owners want their refrig to be dependable and
cold.
All the cooling units I sell are new remanufactured cooling
coils. There is never any match work done to the coils. New
steel tubing is welded in place with added brace reinforcements, making
them stronger than OEM units. New upper foam pack with foil
backer. All units are enamel coated after fabrication is
completed. Each unit is pressure tested and charged. Then the
cooling units are re-foamed in new FOAM-PAK. This gives you a unit
that is ready to install.
Our focus is serving RV Dealerships and Service Centers with product
and service. There is no charge for the return of the defective
core. A prepaid UPS or FedEx return label is sent with the
new coils. |
By talking to the actual supplier, I found out that what makes the units
fail is moisture that gets behind the aluminum fins inside the box and rusts
through the cooling pipes. Also, both Norcold and Dometic now use
thinner pipes in the new models, so they don't last as long as the older
refrigerators. Besides the cost savings, that is another advantage of
being a do-it-yourself-er! By the way, the wholesale-only supplier
contact information is at the bottom of the installation instructions.
They were helpful in answering my technical questions, as was David Force
of RV Repair,
by e-mail. David e-mailed the instructions to me before
the unit had arrived, so I could have the old one out and ready to ship back
immediately for the rebate. I had the rebate before I had finished
re-installing the refrigerator. It all went very smoothly.
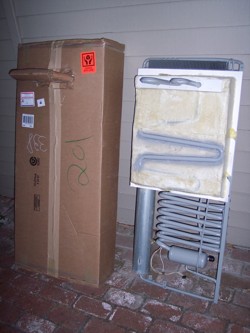
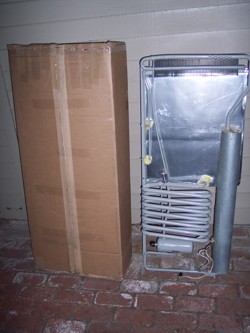
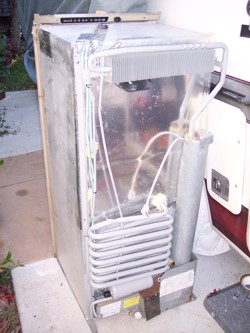
The two pictures below show, front and back, the shipping box I received
via FedEx with the new cooling unit beside it. I had already put the old
unit in the box for shipping back. Notice the pipes sticking out.
They protrude into the freezer compartment. Also, note the flat pipe
going from one side to the other and back. That is the contact point for
the aluminum fins that go into the refrigerator compartment. That pipe
is what normally rusts through, thus allowing ammonia to get inside the box.
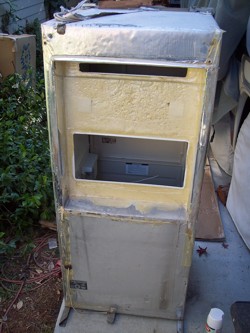
The next picture (left) shows the refrigerator box with the original
cooling unit removed. The slot at the top is where the cooling tubes go
into the freezer. The bigger opening is where the aluminum cooling fins
go into the refrigerator compartment. To the right is the box with the
new cooling unit inserted and attached to the back of the box, ready to put
back in the Aero Cruiser.
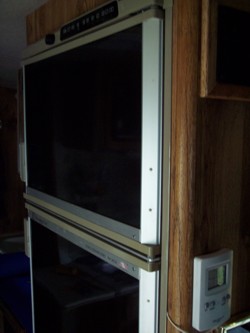
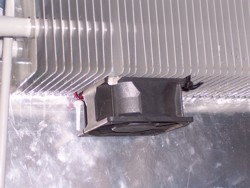 While I was at it, I thought I should add a fan to help cool the
heat-dissipation fins at the back when I am in very hot weather. I added
a switch on the control panel at the top of the refrigerator inside the
RV. The switch is powered through a light wire pair from the bottom
where I hooked it to the main ground and 12v wires going into the refrigerator
electronics box. You can see the switch on the control panel on top of
the box (loose, upside down, and facing backwards in the picture). You
can see the fan mounted below the fins at the top back. It is a standard
"muffin" cooling fan for a computer or other electronics: $5 on eBay.
Above is a close up of the fan and the cooling fins.
While I was at it, I thought I should add a fan to help cool the
heat-dissipation fins at the back when I am in very hot weather. I added
a switch on the control panel at the top of the refrigerator inside the
RV. The switch is powered through a light wire pair from the bottom
where I hooked it to the main ground and 12v wires going into the refrigerator
electronics box. You can see the switch on the control panel on top of
the box (loose, upside down, and facing backwards in the picture). You
can see the fan mounted below the fins at the top back. It is a standard
"muffin" cooling fan for a computer or other electronics: $5 on eBay.
Above is a close up of the fan and the cooling fins.
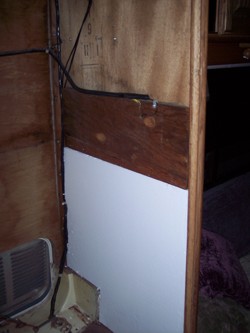
Before putting the refrigerator back in, I decided to
give it some help by insulating the cabinet it goes into. (Why didnt
they do that when they built the Aero Cruiser?) The interior of the
cabinet has some irregularities due to a board brace for the light over
the couch and due to wiring. So, I used ½ inch insulation slabs, cut to
fit. Then I added another layer, cut differently, as needed. Then I added
a third layer for a total of 1½ inches of insulation on each side. I also
put five layers over the top for 2½ inches there. Shown below is part of
the first layer of insulation, just to give you the idea.
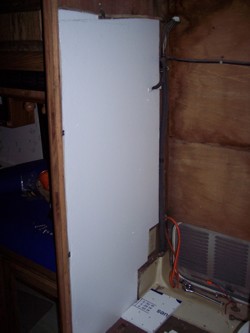
 Finally, just before sliding the box back into the cabinet, I mounted an indoor-outdoor
thermometer next to the refrigerator and ran the outdoor probe through a hole I drilled
in the frame at the hinging edge of the refrigerator- compartment door. The probe line
has to go between the door seal and the main box, so it makes a slight breach in the
seal, but it is small enough not to create a significant leak. I put enough line inside
the box that I can also run it up to check the temperature in the freezer compartment if
I want. The picture to the right shows the thermometer, its line that goes inside the box, and
the fan switch on the control panel that I added to activate the fan on the back. Of
course, the thermometer tells me room temperature and the temperature inside the refrigerator.
Finally, just before sliding the box back into the cabinet, I mounted an indoor-outdoor
thermometer next to the refrigerator and ran the outdoor probe through a hole I drilled
in the frame at the hinging edge of the refrigerator- compartment door. The probe line
has to go between the door seal and the main box, so it makes a slight breach in the
seal, but it is small enough not to create a significant leak. I put enough line inside
the box that I can also run it up to check the temperature in the freezer compartment if
I want. The picture to the right shows the thermometer, its line that goes inside the box, and
the fan switch on the control panel that I added to activate the fan on the back. Of
course, the thermometer tells me room temperature and the temperature inside the refrigerator.
Now, I skipped over the technical part: the removal of
the old cooling unit from the box and the re-installation of the new unit.
That process is described in a set of instructions provided by the seller
of the new units. With permission from the supplier, I have edited those
instructions to specialize them to the Aero Cruisers RM 3604. Mostly
that meant deleting some irrelevancies that relate to other models. The
simplified instructions are presented below.
If your refrigerator internals, burner, heating
elements, and electronics are in good shape, and if you like to save money
and get a superior product, you may want to do it yourself. This should
let you know what is involved.
Changing the RM 3604 Cooling Unit
 Pulling the
Refrigerator Pulling the
Refrigerator
The first step in
changing a cooling unit is to pull the refrigerator from its cabinet in
the RV. Start by turning off the propane at the main bottle(s) and burning
off any residual in the lines at a stovetop burner. Next, from the outside
access door for the refrigerator, disconnect the propane line to the
refrigerator, unplug the 120 volt cord, and disconnect the 12 volt wiring
to the refrigerator. Tape up the ends of the 12-volt wires with electrical
tape to prevent sparking. While back there locate two screws that are
usually at the bottom outside edges of the refrigerator, securing it to
the cabinet floor, and remove them.
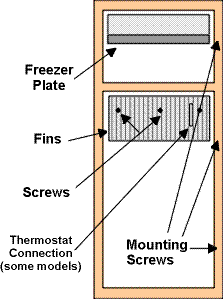
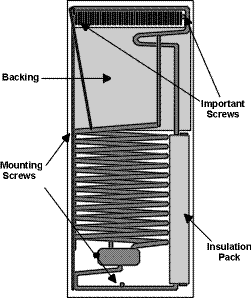
Next, remove the refrigerator doors. After that, remove four to six mounting screws
on the face of the refrigerator, possibly covered with plastic plugs. See graphic. Look for any other fasteners that might prevent removal of the refrigerator.
The RM 3604 has two mounting screws behind the plastic control strip at the top,
covered by plugs; either remove the plugs to access the screws or (better) loosen
the whole plastic molding by removing two small screws from its underneath.
Next, inside the RV, underneath the refrigerator, there may be a bead of silicone that
needs to be cut with a razor knife. The refrigerator should then be free to slide into
the RV. If it doesn't move, look around for something else holding the refrigerator
in. Sometimes RV manufacturers create their own ways of securing the refrigerator. If
possible, take the refrigerator out of the RV to a larger work area.
Removing the Cooling Unit
Begin by removing the aluminum freezer plate from the freezer. This is
held in by four bolts and nuts, with plastic protectors on the bottom
side. Remove the fasteners and pull off the freezer plate. This will
expose pipes from the cooling unit protruding into the freezer. In the
lower box, on the aluminum fins, there is a capillary tube from thermostat
held in place by a small plate. The capillary tube is the sensor from a
thermostat and resembles a wire. Loosen the plate and remove the capillary
from the fins. The fins will stay with the cooling unit until it is removed.
Once the work inside the refrigerator is done, lay an old blanket
or cardboard down to protect the refrigerator, then lay the refrigerator down on its face.
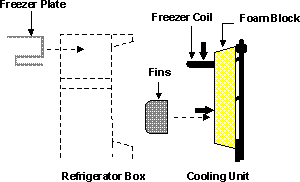
What we're after is the cooling unit. It's the set of coils on the
back of the refrigerator, extending from the top to the bottom. Obvious parts
such as the electronics box, burner assembly, heat elements, insulation pack, etc., must be
 removed from the unit. Anything else in the way of pulling the cooling unit must
also be removed.
removed from the unit. Anything else in the way of pulling the cooling unit must
also be removed.
Be
sure to keep track of which screws are removed from where. Replacing a
short screw with a longer screw can harm an underlying component. The
way I usually do that (and did) is to put them right back in the holes until I
am ready to put them back in permanently.
There is a handful of obvious screws holding the cooling unit to the refrigerator that must be removed. See graphic
(ignore the thermostat tube, as the RM 3604 does not have it, nor does it have the hidden screws).
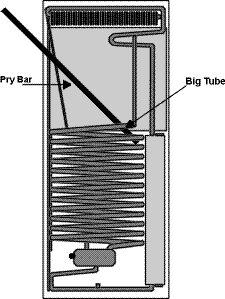 Once all fasteners have been removed, the cooling unit is ready to pull. A pry bar under the "big tube", as in the graphic, will usually do the job. The "big tube" is the only pipe that you should pry on. Since you will be prying against the refrigerator body, a board or some other protection is necessary between the pry bar and the refrigerator to prevent poking a hole in the box. Once all fasteners have been removed, the cooling unit is ready to pull. A pry bar under the "big tube", as in the graphic, will usually do the job. The "big tube" is the only pipe that you should pry on. Since you will be prying against the refrigerator body, a board or some other protection is necessary between the pry bar and the refrigerator to prevent poking a hole in the box.
This is usually enough to pull a cooling unit, but not always. If yours is stubborn, peel up the edges of the aluminum backing paper to expose a line between the foam of the cooling-unit head and the insulating foam of the refrigerator box. If the cooling unit has already been replaced before, the backing may be a piece of sheetmetal instead of paper. With some effort, the sheetmetal can be removed and slid out from the cooling unit. Running a large knife around the line between the two foams of the cooling unit and box (about 4" deep) and then prying as before will remove the more difficult units. If you're still having problems, go back and be sure you have removed all fasteners.
Once the cooling unit is out, remove the three screws from the aluminum fins and pry them off the cooling-unit head. Pull the baffle from the cooling unit chimney and remove any other parts (including the insulation pack) from the unit. These parts will be transferred to the replacement cooling unit.
Not transferring the baffle from the old unit to the new one is the most common mistake made by installers. The baffle is a twisted metal strip hanging down the chimney on a stiff wire.
You're now done with the removal.
Note: there is usually a clear plastic sheeting between the foam of the cooling-unit head and the foam of the box. This was there to keep the two foams separated when the foam of the cooling unit was poured while the cooling unit was already in place. This plastic can be discarded if it is torn or in bad shape. This is also why there can be a little difference between the foam heads of cooling units.
Installation
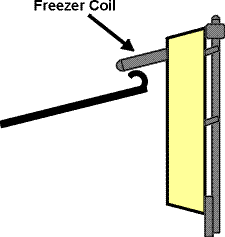
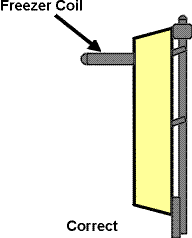
Inspect the rebuilt unit that you are going to install for freight damage. One common problem that is easier to fix before installation rather than after is a bent freezer coil. The freezer coil should be perpendicular to the back of the cooling unit. If the coil is bent, you can use a bar, as in the graphic below, to level the freezer coil.
The key to a successful cooling-unit installation is a snug fit between the cooling-unit head (foam block) and the box, with the head all the way into the cavity of the refrigerator and no air leaks. By all the way into the cavity, we're referring to the face of the foam block. Sometimes, because of refrigerator variations, the head is thicker than the cavity and protrudes a little out the back. This is OK, as long as the front of the head is flush with the inside of the refrigerator. The part sticking out will be taken care of later.
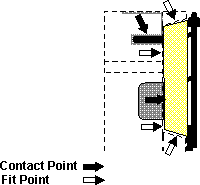
In the graphics below, the
 is a metal to metal contact point
that requires thermal mastic. The is a metal to metal contact point
that requires thermal mastic. The  refers to a fit point -- a point where the
cooling unit has to make good, snug contact with the refrigerator box. refers to a fit point -- a point where the
cooling unit has to make good, snug contact with the refrigerator box.
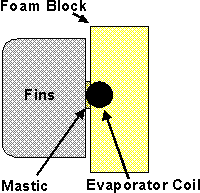 The first step in installing a cooling unit is to apply thermal mastic to the coils of the cooling unit that contact the aluminum fins of the refrigerator. Before doing that, be sure the cooling unit pipes are making contact with the fins, without the foam of the head preventing that contact. Sometimes the foam needs to be grated down to allow this contact. See graphic.
After the mastic has been applied, secure the aluminum fins to the cooling unit. Be sure to well tighten the screws that mount the fins and replace the plumbers putty around the baseplate so it will seal against the inside back of the box. There are brackets for the screws below the surface of the foam. On our rebuilt units the holes in these brackets are drilled a size too small, so that your screws will get a good bite. You should see the screws slightly pull the area around them inward. Getting the fins on tight with mastic is critical. Failure to do so will cause cooling problems in the lower box. (Later you will also put mastic on the freezer coils, before installing the freezer plate.)
 Next, before sealing the edges of the foam block of the cooling unit and permanently installing it into the refrigerator, it's a good idea to place the cooling unit into the refrigerator to see how well it fits. Sometimes the foam block is too big and needs to be trimmed. Don't get carried away with trimming. A rasp works well. Often, after a test fit, you can see marks on the side of the foam that indicate a high spot. Once comfortable with the fit of the cooling unit, put about a half inch bead of "Silicone or Latex Caulk" around the back edge of the foam block (on the inside face of the aluminized backing sheet) and place the cooling unit into the refrigerator. See graphic.
 Next, install the mounting screws for the cooling unit. It is important that the two top mounting screws line up with their corresponding holes in the refrigerator. Although all the mounting holes of the cooling unit should line up with the refrigerator, the top two are the most important because they set the angle of the condenser. Also, it is not unusual for this part of the cooling unit to get bent in shipping. If the cooling unit is bent in such a way, it can usually be straightened by running a pry bar through the top pipe of the cooling units big tube and over the edge of the refrigerator box and prying upward. Failure to get the top two screws in their respective holes may cause the cooling unit not to work.
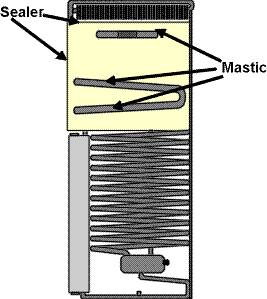
Fasten the lower half of the cooling unit to the refrigerator in such a way that the boiler (the pipe inside the insulation pack) is parallel to the side of the refrigerator. Normally lining up the cooling-unit holes with the holes of the refrigerator accomplishes this. But if it doesn't, it is permissible to move the lower half of the cooling unit (after the top half has been secured) so that the boiler is parallel to the edge of the refrigerator and start new mounting holes. Before the cooling-unit body is fastened down, use aluminum foil tape to secure the thin backing of the cooling unit in such a way that it is virtually impossible for air to get into the refrigerator from the back. If the head (foam block) protrudes above the surface of the refrigerator box, this is the time to take care of it. A good tape job along the edges will suffice. Now install, align, and tighten the screws that fasten down the cooling-unit frame.
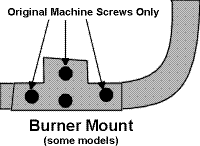 Install all the peripherals that you had removed earlier (heat elements, baffle, burners, insulation pack, etc.). The mounting bracket on the cooling unit for the burner is like the one in the graphic.
It is important that you use the original machine screws that were removed from these holes when replacing the burner.
Using other screws may actually "drill" a hole into the cooling unit, discharging the coolant. In other words, it will make a dangerous, nasty mess and ruin the cooling unit.
Install all the peripherals that you had removed earlier (heat elements, baffle, burners, insulation pack, etc.). The mounting bracket on the cooling unit for the burner is like the one in the graphic.
It is important that you use the original machine screws that were removed from these holes when replacing the burner.
Using other screws may actually "drill" a hole into the cooling unit, discharging the coolant. In other words, it will make a dangerous, nasty mess and ruin the cooling unit.
Once everything on the back of the cooling unit has been installed, set the refrigerator upright. Put mastic on the freezer coils in the freezer and install the freezer plate. Reinstall the thermostat capillary tube to the fins in the lower box.
Installing the Refrigerator
Install the refrigerator back into the RV and make the necessary connections for the electrical and gas. Test for propane leaks at the connections you have made and all gas parts on the refrigerator. The refrigerator should set upright about 30 minutes before being put into operation. If possible, test the refrigerator on 120 volt first, only because there are fewer variables on the electrical side than on propane. You should see signs of cooling in the freezer in 1 to 1½ hours, and an empty box should come down to temperature in six to eight hours.
Thanks to:
Pines RV Refrigeration
(Larry & Lisa Miller)
5930 W 200N
Shipshewana, IN 46565
Web
site Store on eBay
260-768-7990
 Return to the Tip List. Return to the Tip List.
-- Disclaimer --Information on this Web Site is provided by members of the "Aero Cruiser Classics" Motor home Club. All
information on this site is contributed by the club members or outside sources and is believed to be reliable; however,
there is no warranty or guarantee that said information or advice is correct or free of defect. It is
offered on a best effort basis and is to be used at your own risk.

|
Copyright© 1999-2016
Freelance Ink.
All Rights Reserved.
|

|
|