|
Anything you can see, access from or use outside the coach. Propane tank
and pipes, vents and fans, skylights, windows, windshield, antennas, holding tanks and valves, water
pump (even if inside),
water tank and external supply systems, door step, doors and locks, the battery compartment and
batteries, 110 volt generator and compartment, gas tank and the exhaust.
Sub Categories:
Click on the
 to
go to its Sub Category: to
go to its Sub Category: |
|
|
General Information: Covers, cleaning and general maintenance of the
exterior including pant and pointers to web sites for exterior parts.
|
|
|
On the Roof: Coach air-conditioner, vents and fans, skylights, antennas, roof-to-body
molding, solar panels.
|
|
|
On all 4 Sides: Windows, windshield, doors and locks, mirrors, lights, molding, trailer hitch and connector.
|
|
|
Under the Coach or in the Compartments: Holding tanks and valves,
water pump (even if inside), water tank and external supply systems, spare tire, door step, gas
tank & sensor, exhaust system, the battery compartment, batteries and battery isolator, 110 volt docking cord, 110 volt generator and compartment and the access panels for the refrigerator,
hot water heater and forced hot air heater.
|
-- Disclaimer --Information
on this Web Site is provided by members of the "Aero Cruiser Classics" Motor home Club. All
information on this site is contributed by the club members or outside sources and is believed to be reliable; however,
there is no warranty or guarantee that said information or advice is correct or free of defect. It is
offered on a best effort basis and is to be used at your own risk.
Tips:
Subject:
Body Side Molding for the Aero Cruiser
Tip:
There are two types of Body Side Molding used on
our rigs. The older models -- up through 1990 I think -- use a 4.75 inch wide molding on the sides
and a 3.25 inch molding on the front and rear. Both pieces are cut from an 8
inch wide molding strip. Newer models use a thinner, bumper-style molding on the sides.
I don't know source for them; however, I
found far more of the narrow body molding on the Internet than the wide
molding.
The manufacture of the Wide Body Side Molding used on the Aero Cruiser is Dawn
Enterprises, Inc:
Corporate Headquarters:
9155 Sweet Valley Drive
Valley View, OH 44125
Phone: 216-447-1777 or 800-548-4867
Fax: 216-447-6058 |
West Coast Division:
182 Gallagher Crest Road
Henderson, NV 89074
Phone: 702-568-9997 or 800-845-7177
Fax: 702-568-0982
|
Their web site is: http://dawn-ent.com/
E-Mail: customerservice@dawn-ent.com
They don't sell direct but they will provide you with a list of distributors.
The best source I found for the wide molding is JC Whitney's "Ultra-wide Body Molding". It is 8.12 inches
wide by 15 foot long. You trim it into strips approximately 4.75 & 3.25 inches wide for the sides
and ends. You only need to order enough for the sides, as the part you trim off is more than enough
for the front and rear. Go to -- http://www.jcwhitney.com/ -- and search for "ultra-wide molding"
or call (800) 603-4383.
There are 3 colors:
- Black Ultra-wide Body Molding, part number ZX132051W
- Charcoal Ultra-wide Body Molding, part number ZX132052U
- Silver Ultra-wide Body Molding, part number ZX132053B
They come in 15 foot rolls @ $64.99 each in 2004. I used 3 rolls of the
Silver on my 23 footer. On the driver's side I had to splice it under
the refrigerator access panel. When I spliced it I cut a thin aluminum
strip approximately 1/8" by 2" by 22" to fit under the refrigerator access
panel over the fiberglass side panel to fill a rather wide gap between the
bottom access panel and the cutout in the fiberglass. I screwed it in place
and sanded it down so it was not noticeable when finished. This was so the
side molding would have a solid surface to adhere too and not pull apart.
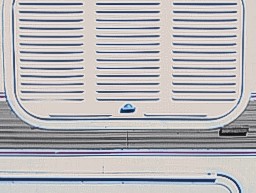
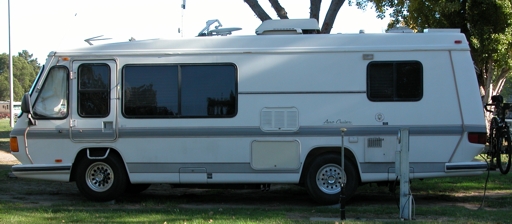
The next image is the finished product with the Silver Body Molding
applied. The picture was taken some three years later, showing that the
splice is holding up quite well. The last image is a recent picture showing the
overall affect of the Silver Body Molding.
Tips on Installation:
To remove the old glue,
buy two 2 inch plastic scrapers and trimmed the edge so you have one scraper to
use above the aluminum strip that won't touch the pen-striping and the second
one for the area below the aluminum strip. I ended up with two scrapers:
one 1 3/4 & one 1 7/16 inches wide for my rig. For stubborn areas
I used a metal 1.5 inch scrapper.
Next use a brush and "Mineral Spirits Paint Thinner" to soften the old
glue and scrape it off by holding the scraper against the aluminum strip so you
don't damage the pen-striping. Working in 3 foot sections seems to work
well. Use a paper towel and a little Paint Thinner to remove any glue residue.
Before you install the new molding you must cut it into strips strips approximately 4.75 & 3.25 inches wide for the sides
and ends. Unroll the new vinyl and lay the strips out in the sun to to
warm them up and get them to lay flat. Then lay then over cardboard and
use a sheetrock-knife (with a new blade) to cut each one along the rib approximately
4.75 inches from the top to make sure you get a good straight cut.
Another tool that comes in handy is a "Wallpaper Joint Roller".
You use it to firmly press the glue strips in place by rolling it down the
strip. It's easer than using a towel to to hand rub against the new vinyl
to make sure you have good adhesion. To install the new
molding cut a strip a few inched longer then you need and start in the
middle. This is important if you want to tuck the ends of the new vinyl
under the vertical screw-covers as the old one was. Make sure the area
under the screw-covers is clean of an old glue or caulking to make it easer
later.
Start by slicing the red tape in the center of the glue-strip. Next peel back
about a foot of the red tape on the top and let it hang down. Do the next
red tape strip a little shorter and let it hang down so when you are done you
have a short section of all the glue-strips exposed and you can tell which is
which from top to bottom by the position of the red-tape (pulled from the
glue-strips) that is hanging down.
Starting in the center place the new vinyl on the side of your rig between the
two pen-stripings in the same area the old one was installed. Remove
a foot or so of the red-tape as you move along and gently press the glue-strip
in place. When you are happy with the alignment then firmly press the glue
strip in place. Stop when you still have about two inched of the red-tape
still covering the glue strip before the screw-covers that you will be tucking
it under . This is Important! Don't
remove all of the red-tape at this time. Next make sure that the red-tape
strips hanging down indicate which is which from top to bottom. Then
attach the top glue-strip to the other half of the new vinyl stopping about 2 inches
before the end. Next you can attach the other glue-strips starting from
the upper most and working your way down. Stop pulling back the red-tape
strip
about 1 inch sooner with each glue strip as you approach the end. Now you can trim the extra vinyl
from the end that will tuck under the screw-cover molding. You want to
leave about 1/4 inch of vinyl to tuck under. Because the red-tape is still
attached you can slide the vinyl in place to test the fit; if you remove the
red-tape, you will never slide it under. Keep trimming until you have a good
fit.
Next peel back the red-tape from the trimmed end that will slide under the
screw-cover about 1 inch and gently put it back over the glue strip. This
is to relieve the bond and make it easer to pull the tape out later. Slide
the end of the vinyl under the screw-cover with the red-tape still attached.
When everything looks good, start with the top strip and gently remove the
red-tape as you press the vinyl in place. If you pealed it back and gently
reattached it to the glue-strip it will come off easily later, if not it will break at
the end under the screw-cover. Do each of the other glue-strips.
When you are done use a "Wallpaper Joint Roller" to firmly roll the
glue strips in place and get really good, tight adhesion.
When you are done, you can recaulk the area by the screw-covers with clear vinyl
calking. As a finishing touch, I like to run a bead of clear Silicone Sealant
along the top and bottom edges it helps keep the moisture out and add years to
the life of the Body Molding.
To help with the installation of the silicon, I use a "Hyde" "Calking Tool" which came as a set
with a "Caulk Removal
Tool" at Home Depot for around $5.00. It sounds complicated but it's not. By leaving the
red-tape in
place and only removing it as you attach the new vinyl you save your self a ton
of headaches as the glue strips are protected and can't stick where you don't
want them to stick as you are working. It lets you gently tack the new
vinyl in place so you can check the alignment, pull it back if you need to, and
then firmly attach it in place when you are happy with the alignment.
Keep on Cruisin' -- Tom Heald
Update: After 5 years the vinyl on the sunny,
western side of my rig was becoming sunburned. It was still tight but the
color was fading fast. The left edge of the rear, southern strip was also
fading, but the really bad area was the front of the rig which was bombarded
with the hottest, direct midday sun.  The shady eastern side however, was still in great shape, tight and not faded at
all.
The shady eastern side however, was still in great shape, tight and not faded at
all. 
I could have avoided this problem if my rig was in a garage or covered, but alias
it was not so I was faced with a dilemma -- to redo or not to redo.  I had plenty of the thin molding I had saved from the original job, so I used it
to redo the front and rear. On the western side I decided to paint the
vinyl strip. I went down to the local paint store and had a pint of Exterior
Latex High Gloss mixed to match the silver-grey color of my Vinyl strip. I
chose a pant by Sherwin Williams that was formulated to use over vinyl as well
as many other surfaces. I cleaned it up, taped it off and applied two
coats. I now have vinyl strips that look the same all around the rig.
I had plenty of the thin molding I had saved from the original job, so I used it
to redo the front and rear. On the western side I decided to paint the
vinyl strip. I went down to the local paint store and had a pint of Exterior
Latex High Gloss mixed to match the silver-grey color of my Vinyl strip. I
chose a pant by Sherwin Williams that was formulated to use over vinyl as well
as many other surfaces. I cleaned it up, taped it off and applied two
coats. I now have vinyl strips that look the same all around the rig. 
Keep on Cruisin' -- Tom Heald
Return to the Tip List.

|
Copyright© 1999-2016
Freelance Ink.
All Rights Reserved.
|

|
|