|
Everything inside the coach: appliances, furniture,
cabinets, electrical, water pipes but not the pump, shower and toilet, everything inside connected to the coach battery,
and anything that runs on 110 AC.
Click on the
 to
go to its Tip: to
go to its Tip: |
|
|
AC Converter, Circuit Breakers and Fuse box
|
|
|
AC 110 Volt Circuit Tester is a MUST
|
|
|
Coach Electrical Box
(off page link)
|
|
|
Dashboard and Instrument panel (off page link)
|
|
|
Dinette and Couch installation
|
|
|
Dinette to Couch conversion
|
|
|
Table replacement -- Table by George
|
|
|
Interior Improvements for the Wright touch
|
|
|
Improvements by Clyde and Vera Davidson
|
|
|
Rick's Fireplace, TV and Basement Fuel Pump Hatch
|
|
|
Refrigerator develops odor in storage
|
|
|
Refrigerators loosing efficiency on hot days. Add a Fan!
|
|
|
Refrigerator not keeping cool
|
|
|
Refrigerator - Dometic Service Manual and Parts
|
|
|
Refrigerator runs fine on AC but not Gas.
|
|
|
Dead Refrigerator! Ah... The smell of Ammonia in the morning.
|
|
|
Changing a Refrigerator Cooling Unit (Article)
Smell of Ammonia in the Refrigerator
|
|
|
Refrigerator, Hot Water & Air Heaters gas burners (See External Tips)
|
|
|
LP Water Heater Electric add-on
|
|
|
Water System Gray Tubing and Fittings Replacement
|
|
|
Water System, access under Shower, Bed & Pump
|
|
|
Molding for the Shower-Stall
|
|
|
Large, Flat Screen TV Installation
|
|
|
Thin-Lite Fluorescent Lights and Wiring
|
|
|
Lighting Upgrade
|
|
|
Window between Kitchen and Bedroom
|
|
|
Engine Cowling Gasket
|
|
|
Satellite Radio (Article)
|
|
|
Navigation System
|
|
|
Magnetek Power Converter and Battery Charger
|
|
|
Magnetek 6300 Power Converter & Distribution (off page link)
|
|
|
AcuGage Holding Tank Monitoring System & Water Pump Switch
|
|
|
How to keep your Clothes on
|
|
|
Furnace Thermostat Cycle Time
|
|
|
How to install a Fan-Tastic Vent Fan in an Aero Cruiser (off page link)
|
|
|
Fan-Tastic Vent® Fan Not Working or Needs Parts
|
|
|
Foot Stool
|
|
|
Driver & Passenger Seats
|
|
|
Shoulder Belts
|
|
|
Weather Strip
|
|
|
Pleated Window Shades
|
|
|
TV Amp "Big Red Switch" next to the TV on the Drivers side.
|
|
|
Rear View Camera (Off page link)
|
|
|
Furnace Installation, Removal & Service manuals
|
|
|
Gas Appliances not Starting
|
-- Disclaimer --Information
on this Web Site is provided by members of the "Aero Cruiser Classics" Motor home Club. All
information on this site is contributed by the club members or outside sources and is believed to be reliable; however,
there is no
warranty or guarantee that said information or advice is correct or free of defect. It is
offered on a best effort basis and is to be used at your own risk.
Tips:
Subject: AC Converter, Circuit Breakers and Fuse box
Tip: The Magnetek
Power Converter has several functions. It distributes AC power within the coach, provides DC power to the
lights etc in the cabin and is a battery charger for both the house and truck batteries.
It is
generally located under the sink in the bathroom area (not an ideal spot for an
electrical distribution panel) and it is always located at the end of
the shore power cord. 
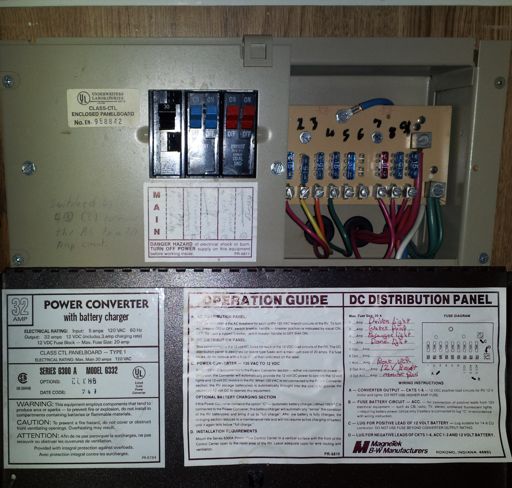
The AC panel supplies all of the 110 volt power inside and outside the
Coach. Not all coaches are wired the same, but it's easy to determine
what's what by turning off a breaker and seeing what is not working. On
my coach the 20 amp rated Air Conditioner was hooked up to a 15 amp breaker as I found out
when I kept popping on a hot day.  The microwave was hooked up to a 20 amp breaker when it was only rated for 15
amps, so I swapped the two circuits.
The microwave was hooked up to a 20 amp breaker when it was only rated for 15
amps, so I swapped the two circuits.  Another problem was the power outlet next to the folding table had reversed
polarity which could be dangerous as that is where I normally hook up my
metal-skinned toaster. So how did I know the
polarity was reversed? I used my handy-dandy 110 Volt Circuit Tester.
They were easy fixes, but did not instill confidence.
Another problem was the power outlet next to the folding table had reversed
polarity which could be dangerous as that is where I normally hook up my
metal-skinned toaster. So how did I know the
polarity was reversed? I used my handy-dandy 110 Volt Circuit Tester.
They were easy fixes, but did not instill confidence.
Here's how the AC Circuit Breakers are wired in my coach after I made the
changes described above:
| |
Main breaker ( shore power) |
30 Amps |
| 1 |
Wall plugs inside and one outside. |
15 Amps |
| 2 |
Microwave and kitchen area |
15 Amps |
| 3 |
Air Conditioner |
20 Amps |
| 4 |
Refrigerator |
20 Amps |
Just like the Circuit Breaker it's easy to identify the DC power circuits, turn all the lights on, pull a fuse and
see what goes off. Or you can label a fuse when you have to replace it
which is what I will do if one ever pops.
Here is how the Fuse Panel is wired in my coach a 1990, 23 footer. Some labels are hard to
read so I may have it wrong and I haven't checked them out. Your coach
may be wired differently.
|
1 |
Drivers side lights |
15 A |
|
2 |
Water Pump |
15 A |
|
3 |
Passenger side lights |
15 A |
|
4 |
Dome Lights |
15 A |
|
5 |
Opt (not used) |
|
|
6 |
Opt (not used) |
|
|
|
1 Acc |
Rear VCR
(over bed) |
10 A |
|
2 Acc |
12 V Receptacle
(by Lavatory) |
15 A |
|
3 Acc |
Monitor Panel, with stove fan & light.
|
15 A |
|
Large Connectors on the right side. (C) High = 12 Volts,
(D) Low = Ground. |
|
There are a total of three Fuse
Panels in the Aero Cruiser including this one. Click
here to see links to each of them.
Return
to the Tip List.
Subject:
AC 110 Volt Circuit Tester is a MUST
Tip:
I keep one plugged into the outlet by my side door. It not only tells me
the power I just plugged into at a campsite is ON, it lets me know if it has any
problems. For under $10 you can pick one up at any hardware store to
test faulty wiring condition in 3-Wire 110-120V AC receptacles.
- GFCI - Outlet Tester on the better models that I have used at home
- Three Color-coded indicator lights tell the story using the
tester's menu
- Simply plug in and view the light pattern on the tester for wiring condition:
- Open Ground
- Open Neutral
- Open Hot
- Hot and Ground reversed
- Hot and Neutral reversed (Reversed Polarity)
- Good Circuit (my personal favorite)
Keep on Cruisin', Tom Heald
Return
to the Tip List.
Subject: Dinette and Couch installation
Question:
Has anyone ever replaced the dinette with a sofa in their cruiser? Was it
difficult and expensive? I have a line on an RV sofa. Not sure if I should try this or not?
Answer:
In theory, it should not be a problem. It is my understanding that the rug and refrigerator wall
were installed before the couch was installed. I know this is true with the couch in my case. I
believe that the dinette is installed the same way. I.e. Screwed to the floor after everything
is finished around it. You should verify this before you start and check the legs on the dinette
table to see if they are installed on top of the rug. Then simply unscrew the dinette segments
and pull them out.
The other concern would be the size of the couch. If it is the same size or
smaller you are ok; otherwise, it will interfere with the drivers seat or the
step coming down from the cowling. Check the dimensions on the base of the couch
to see if it will fit in the area behind the drivers seat. The couch installed in
the Aero Cruiser is mounted on a platform with storage below. If your couch does not
include a platform, you will have to build one. The other consideration is the carpet
and walls. They will be worn and faded around where the dinette was installed. The
couch's footprint is smaller, so you will see a big difference where the dinette was
installed. If you have a Twin Bed model, the dinette provided the only table in the
coach, so you will have to get creative to find room for a table.
I don't know of anybody who has done it before, so all of my assumptions may be wrong. If
you decide to do it, let us know what you run into. Good luck.
Keep on Cruisin', Tom Heald.
Return
to the Tip List.
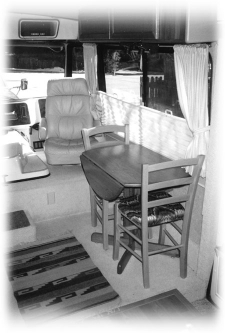
Subject:
Dinette to Couch conversion
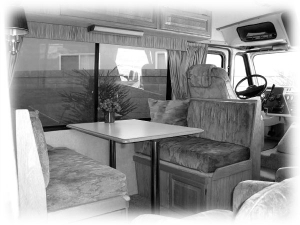
Tip:
Jerry & Kathy show us how changes can be made for a completely new look.
They didnt care much for the dinette they had so
they decided to make a minor change by taking it
out and ... |
|
|
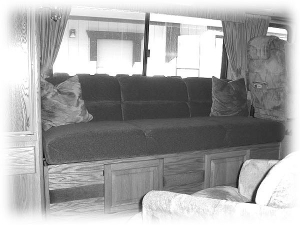
...replacing it with a sofa they bought
at Camping World.
Notice the old cupboard doors from
the dinette set on the front of the
sofa for easy access?
Nice touch!
Return
to the Tip List.
|
|
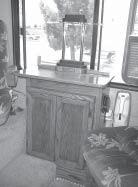
Subject:
Table replacement -- Table by George
Tip:
George Kinnisons handy work.
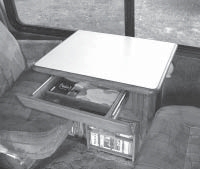
Small table for two while traveling. Notice the convenient drawer. But, thats not all...
|
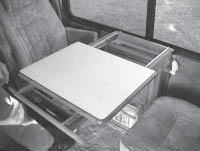
Slide the table top with the drawer forward and remove the extension leaf from the base cabinet storage.
|
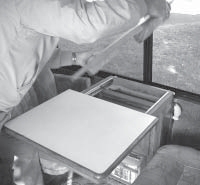
Place the leaf behind the top and push back slightly.
|
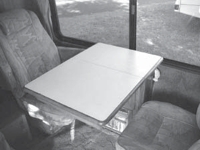
Presto! Extended flat table for two while camping.
|
Thanks George
Return
to the Tip List.
Subject:
Interior Improvements for the Wright touch
Tip: Wright Benson did it
right.
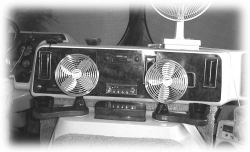
He made fan pedestals that fit into the cup
holders and feature cup holders of their own.
The pedestals swivel to direct the air and in
the center is a jewelry box for odds and ends.
|
Wright shows us that the handle normally mounted outside the door looks great inside as well.
|
Beautiful oak frame accents the mini blinds on the door.
|
And here is the masterpiece! Upgraded table for two with the modern lamp on top, remote
control holster on the side, portable vacuum on the wall and rope floor lights.
|
Thanks Wright
Return
to the Tip List.
Subject:
Improvements by Clyde and Vera Davidson
Tip: Note the blinds, they
all pull up instead of down to provide light and privacy. Below on the the left, the table can
be left as is or moved for all around seating. All of the seats and couch are covered in leather, Also,
they added a built-in vacuum cleaner.
 |
Below, looking back from the cab, they installed a folding door to the bedroom and
a Pergo floor in the Kitchen area.
|
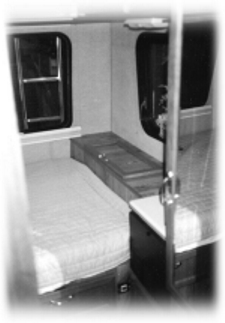
Below, they added storage to the end of the bed.
|
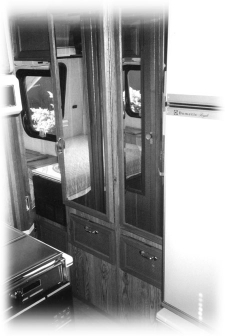 Bottoms
of doors were cut off to make them into regular doors. Bottom panels remove and
are held in place with magnets. Folding door closes to latch between the closet doors. Bottoms
of doors were cut off to make them into regular doors. Bottom panels remove and
are held in place with magnets. Folding door closes to latch between the closet doors.
|
Return
to the Tip List.
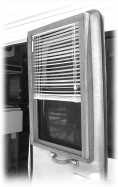
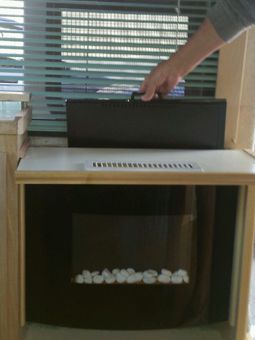
Subject:
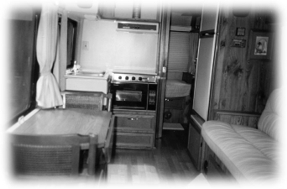
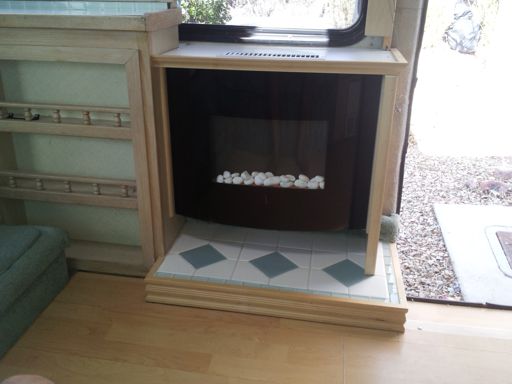
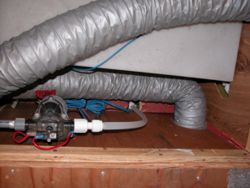
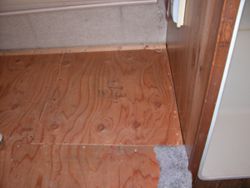
Rick's Fireplace, TV and Basement Fuel Pump Hatch
Tip: Rick's Remodeling!
 |
 |
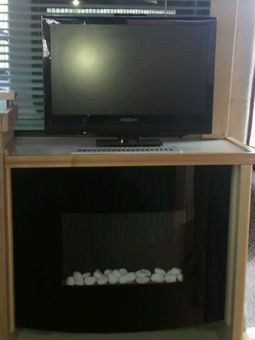 |
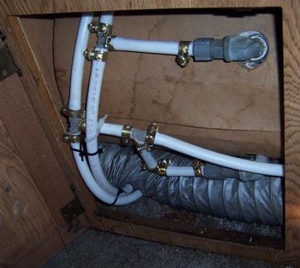
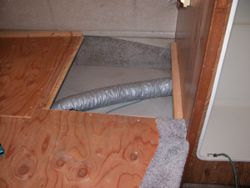
Rick took the chair out, lowered part of the platform to floor level, opened
up a section over the fuel pump so he only need to remove two
sections of the "floating" laminate to access it, installed a
fireplace/heater with a concealed section behind the sliding top to house a
19" TV.
Note: The fuel pump is about 8" from the raised pedestals outside
corner (before Rick cut it back) towards the entry on the left. This
for the 50 gal. tank and may be different on other rigs. |
 |
Kraffty Rick
Return
to the Tip List.
Subject:
Refrigerator develops odor in storage
Tip: Does your refrigerator develop odor while in storage?
Next time, when you come back from the trip, empty
and clean the refrigerators. Place waded up news paper
on each shelf and close the door. When you are ready
to use it again, it will smell fresh.
Baking soda also works.
#203 Loveland
Update: When I return from a trip, I just clean it out and leave the doors open.
The most common reason for the refrigerator failing is the cooling pipes rusting
through. This is often caused by moisture condensing inside the
refrigerator and freezer where the cooling pipes come in contact with the
cooling fins and the freezer tray. So always leave your refrigerator doors
open when not in use.
Tom Heald
Return to the Tip List.
Subject:
Refrigerators loosing efficiency on hot days. Add a Fan!
Tip 1:
Most refrigerators loose some
efficiency in temperatures of 95 degrees F or
higher. If you want to help it, there are fan kits
that you can buy and install below or above
the coils on the backside to move the hot air.
This will help a great deal and can be set up
to come on automatically at certain
temperature or turn it on manually from inside
of the coach.
Tip 2:
You may have heard or read about installing a small DC
fan under the refrigerator coils to increase cooling
efficiency of the refrigerator on hot days. I read about a
great idea for using an AC fan. Purchase a small
portable fan with a large clothespin-style clip used for
clipping to the desk or such. Clip it to a suitable location
under the coils in the refrigerator compartment and plug
it into the same outlet as the refrigerator and turn it on.
This works great when you have hookups but if you
dry-camp most of the time, go with a DC fan.
#212 Petrovich
Return to the Tip List.
Subject:
Refrigerator not keeping cool
Tip:
One of our members reported
that their refrigerator is not
keeping cool on the 12V setting.
The discussion can be
summarized as follows: if you
have a triple-power refrigerator,
leave the setting on auto. The
refrigerators logic will select the most economical
available fuel/power source. Make sure you have a good
door seal, the burner is clean, the ignitor is firing (soot
and rust did not ground it). Also, the ceramic insulator
on the ignitor can get wet from the moisture and ground
itself. If that happens, dry it and it should work.
Return
to the Tip List.
Subject: Refrigerator - Dometic Service Manual
and Parts
Tip: The
following link is to the PDF file for a Dometic Service Manual. This
appears to apply to models very close to the one I have but not exact. Most
information should apply.
http://gasrefrigeration.net/dom_techdata/36044804.PDF
and two more: http://www.pplmotorhomes.com/parts/rv-refrigerators/rv-refrigerator-parts-instr.htm
http://www.dinosaurelectronics.com/MICRO_P-711.htm
Rod Michaelson
Update: In 2009 I installed a "universal" Dometic board
I purchased from
http://www.pplmotorhomes.com/parts/rv-refrigerators/rv-refrigerator-parts-instr.htm
From this site you enter refrigerator then Dometic refrigerator then the model
then burner and controls on the pull down on the left side you get to the
"universal" Dometic board for $128. Or I noticed if you go circuit
boards/testers then dinosaur electronics then Dometic then model you get the
Dinosaur replacement board for $158.
The Dinosaur might be an easier
installation but I don't know.
Rod Michaelson
Return
to the Tip List.
Subject: Refrigerator runs fine on AC but
not Gas.
Tip: My Dometic
Refrigerators ran fine on 110 AC but would not run on gas. It would start, burn
for a short time and then stop. My first step was to collect all the
numbers on my Dometic Refrigerator: Model # RM3601, Prod. # 9266349, Serial #
9170003, so I could look for parts. Therefore the following applies to that model although I assume it will
apply to most of our Dometic Refrigerators.
The first thing I replaced was the Thermocouple (PN 293 03 26 01/8 old, 293
1496 091 new) but it did not help. I still have both of them the way. I
didn't want to mess with the gas, so I brought it in to Mickey's, a local RV
shop, and the first thing they recommended was the thermocouple. I told them I
had replaced it so they escalated to a new electronic gas-valve controlled by
the thermocouple. They could not get one as the whole assembly has been replaced
by a newer model that replaces the valves, circuit board, thermocouple, burner
and all. They used a kit from Dometic, number 3108705.272 for $430 in 2006. They
also found 2 leaks, replaced a hose and checked everything out. Total with
parts, labor and tax was $849.03. It's still working good today. I still have
the manual on/off valve, circuit board and 2 thermocouple which should all be
good.
Keep on Cruisin', Tom Heald.
Return
to the Tip List.
Subject:
Dead Refrigerator! Ah... The smell of Ammonia in the morning.
Tip:
Driven by an inherent frugality, I started checking
around for a cheaper solution than a $1,400 new
refrigerator. This quest started when I opened the
refrigerator door and got a good snort of ammonia. Okay, one dead refrigerator!
Camping World wanted $1,400.
I called George Kinnison and he recommended an RV appliance shop that would install
recharged units. I called Leonard Howell, owner of Howells RV Appliance repair and he
said youre in luck, Im headed for Las Vegas in two hours and Ill throw one on you
can install it yourself in a couple hours. He didnt know that I still use the stick to bring
my recalcitrant solenoid back to life. He dispensed my hesitation by saying Ill bring you
the instructions and give you some tips.
True to his word, he showed up at the Silverton Casinos parking lot with the guts to
my refrigerator. After quickly going through his helpful hints and tossing me the
instructions, he was off to the slots.
Webmaster note:
Click here for Pictures and Instructions.
Saturday was the designated day to do the deed. I got the refrigerator out, laid it on the
floor, and like my radiator project, ole Aero drew first blood as the refrigerator raked my
leg as I was laying it down!
The instructions were explicit and Leonards helpful tips came back to me at the
appropriate times. This is not a simple operation and it
will be helpful if you take pictures
of the way everything looks before you start to dismantle. But, as Bob Miller so
succinctly put it Im not surprised that this change out is possible, what surprises me is
that you would attempt it!! I get no respect!
Anyway, I got everything back together, put the refrigerator back in the hole, tested it on
gas and electric everything was A okay! Well, I did have seven or eight screws left
over, but I think they multiplied in the dish I had them in. Cost $450!
Anybody wanting to attempt this project, give me a call and Ill walk you through it as
long as I can remember Leonards helpful hints. I even have seven or eight screws that Ill
give you if you come up missing any!
Howells RV
11366 N Woodside Ave.
Santee, Ca. 92071
619-449-6231
Rick Krafft
Return
to the Tip List.
Subject:
LP Water Heater Electric add-on
Question: Has anyone used
either the Hott Rod (www.hottrod.
net) or the Lightning Rod (http://www.rvwholes
alers.com/catalog/lightning-rods-09-0193.html) kits to add 120V electric heating to their LP Atwood Water
heaters? Rick
Answer:
I have used a hot rod for several years with no problems. I too added
a switch so I can kill it when plugged in at home. Of course, it
saves propane at RV parks. Works great. Only problem is that now I am
doing almost exclusively dry camping, so it is not so useful. However, since
I have solar panels and 4 golf-cart batteries and inverter, I tried last week
running it off the batteries. It took about 90 minutes to get it from 74 to
102 degrees, running about 38 amps from the batteries. I was headed home the
next day, so it was a good time to try the experiment. I had a good shower at
the expense of the sun.
Frank DeRemer
Return
to the Tip List.
Subject:
Water System Gray Tubing and Fittings Replacement
 Tip 1:
Water line replacement. Tip 1:
Water line replacement.
After buying our '89 23' rear bath we made our first camping trip for the 4th of July weekend. After the first day out I noticed the carpet around the bed was wet. Next morning it was really wet. Looked under the rear sink and asked my wife to turn on the water pump.
At one of the tee fittings water was spraying out. This gray pipe had factory bands clamping it together. The tubing is fine but the fittings used were sub standard.
When we got back home I posted a question about this to the group and after several helpful suggestions I ordered up the parts I was going to need.
This TUBING is ½" high temperature polyethylene. If you are going to do this project, this is what you need. ½" pipe and ½" tubing is not the same size and do not interchange.
The parts were purchased from McMaster Carr online.
http://www.mcmaster.com/
You can enter these part numbers and look at catalog page to see the parts.
* 25' of 51275K81 white ½" polyethylene tubing
* 6 - 53055K119 ½" couplings
5412k73
* 25 - 5412K73 brass tube clamps 5/8"
* 5 - 53055k222 ½" tube coupling to ½" pipe male fitting
* 2 - 53055K242 ½" branch tee tube to ½" pipe male fitting
* 2 - 2857K15 ½" 304 stainless steel braded water supply hose 20"
* 3 - 2857k14 ½" 304 stainless steel braded water supply hose 12"
* 2 - hardware store ½" 304 stainless steel braded water supply hose 6"
* 1 - 53055K174 ½" tubing barbed tee
These parts will do supply line from outside, rear sink and front sink, lines to and from the water heater and the line from water pump.
I would have changed one thing from how I did the job. The tee fittings and lines from the water heater were the hardest part because of getting everything to line up. From and to the water heater I would have used 6" braded water supply hose and tapped into the line with the branch tee with male pipe fitting. This would have made the job much easier.
This project is time intensive, so plan a day.
In a rear bath model, I first disconnected the batteries. I pulled the electrical panel forward from where it sits under the bathroom sink so I could access the screws that hold in the sink. I removed the sink by removing the screws from underneath. This give you room to move around. I replaced the rear faucet while I was in this area with a simple two valve unit from Home Depot.
The tubing and fittings are VERY tight and I used a heat gun to soften the plastic to install. A hair dryer would work. Use a little lube on the fittings such as cooking oil. Press the fittings ALL THE WAY DOWN.
The brass clamps fit tight and you have to take the screw apart to get it to fit. First tighten them lightly. When all the tubing is installed and lined up, tighten fittings securely.
Use the 304 stainless hose with fittings for all pipe couplings and use a male pipe to barbed tube coupler to join either to existing tubing or new tubing.
So far, three trips later, no leaks.
Happy trails, Rod Michaelson
Note: It's normally the original
"clamp-on" aluminum or brass bands that go bad; however, the chlorine
in the water reacts with the Polybutylene fittings and pipe used in our coaches,
eating it from the inside out. So when they start to go bad you should
think about replumbing the whole system with Polyethylene fittings and pipe.
If it is just the bands, the first
thing to try is to replace the original bands with 5/8" stainless steel
screw clamps that you can pick up in any hardware store. These are not as
good as the brass ones Rod used in the picture above but you can try replacing
them on the
road without taking anything apart. It may work in an emergency; however,
Rod tells me that it did not work for him. The brass clamps are a MUCH
tighter clamp than a worm drive clamp and gives a true 360 degree
clamping effort over the barbed end of fitting. By the way the clamp-on bands used in our rigs
and the Polybutylene fittings and pipe were recalled after a law-suit years ago.
Keep on Cruisin', Tom Heald
Tip 2:
If you need the gray tubing for the
water line and can't find it, replacement is white
plastic tubing "Pex Tube" (QB3PS5X) and can be
found in ACE hardware.
The aluminum bands that hold the tubing to
fittings may split. You may want to check the
joints before you spring a leak. If you have brass
band, they last longer.
As a precaution, never leave your coach with the
water pump on or water supply on if you are
hooked up.
Tip 3:
You can replace the fittings with "FlairIt" fittings from Ace Hardware. They
will replace your existing fitting and can be installed on the gray PEX tubing, or the newer
clear Polybutylene tubing with a lower bursting pressure. Note!
If I did it again I would use the white polyethylene tubing with a higher
bursting pressure. I did not know about it when I picked up the
parts.
The gray tubing is normally
good; it's the fittings that
go bad. I re-plumed my Vanity / Hot water heater area with these fitting and
the clear tubing to
fix leaks. I replaced everything except the two check valves by the city water input
and the bottom of the hot water heater. They look like little extensions, but you need
them so... I used the new, more flexible tubing inside the vanity and then
connected everything to the existing gray PEX tubing for the hot and cold
water lines running to the rest of the coach.
I also had to replace another Tee just past the water pump. When it original was installed,
they installed the Tee with a bend in the tubing that put pressure on the coupling and over time it
developed a leak; so I replaces a short piece of tubing and the Tee.
Note: I have a Rear Bath model, so to
get to the pump I cut a trap door in the bed platform with appropriate bracing
etc. See "Water System, Access under Shower, Bed & Pump"
for more information. I normally don't run on City Water. I fill up the tank and use the
pump when I need water then I turn it off and relieve the water pressure by
turning on a faucet and then turning it back off. No more leeks!
Keep on Cruisin', Tom Heald
Return to the Tip List.
Subject: Water System, Access under Shower, Bed
& Pump
Tip:
How to access the water pipes under the bed and the shower.
|
I have a Rear Bath model, so to get to the pump and the piping under the shower
-- after careful measurements -- I cut a trap door in the bed platform and installed
appropriate bracing etc.
I removed the wooden stop holding the fresh water tank in place so I could slide it to the
left for access under the shower. You may also have to remove the water pump pipe and filler pipe or
loosen the straps holding it in place to slide it over.
Later I slid the tank back into place and reinstalled
the brace and anything else I removed.
I cut and removed the paneling on the shower wall below the brace for the plywood
bed platform -- BEING CAREFUL NOT TO CUT THE PIPES THAT RUN UP BEHIND IT -- using a
rotary saw with the blade set to cut 1/16 of an inch deep and then finishing it off
with a sheet rock knife.
Note: Access to the hot and cold water fittings for the shower are located on the
other side of the wall behind the light by the bed.
Snaking the water lines under the shower is easy.
|
|
First disconnect the water line to the toilet and remove the two
nuts on the sides holding it down. Then lift the toilet and place it in the shower
with a towel under it to keep
from scratching the shower. The hot and cold water lines are covered by the
rug behind the toilet. Carefully remove the staples holding the rug in
place and peal it back. The old water lines were clamped down under the
shower so I cut them back and left them in place. I used a metal sewer-snake to pull a cord under
the shower and then used it to pull the new pipes under the shower and over to
the lavatory where the sink and water heater are located.
See "Water System Gray Tubing and Fittings Replacement"
for details. These instructions are for a Rear Bath model
but should be adaptable other models.
Keep on Cruisin', Tom Heald
Question: I understand everything pretty well, except for the step on moving the water
tank. Can you give me more details? Thanks again, dy
Answer: As far as the water tank is concerned, it is held in place by gravity
with brackets to keep it from sliding around. After you empty the tank you must:
- Remove the wooden block screwed to the floor on the left of the tank. You
can get to it through the passenger side rear compartment door.
- Remove the filler hose and the little breather line going into the top of
the water tank.
- Unscrew the clamp and lift the drain hose out of the hole in the floor through which the water drains when
you open the drain valve.
- Unscrew the water line going to the pump from the fitting on the pump.
Now you should be able to slide the tank to the left. It's just a case of looking at it and removing anything that keeps it from moving to the left.
Each Aero Cruiser is a little different so what worked for me may not be the
same on your rig.
Keep on Cruisin', Tom Heald
Return
to the Tip List.
Subject:
Molding for the Shower-Stall
Tip:
I want to reveal my source for attaining new molding for the face of the shower-stall surround opening. Other members may find this helpful for repairs
and remodels also.
Initially I went to RV and trailer dealers; hardware
stores, and cabinet makers with no luck. Then on a recommendation from a
hardware-supply house in Seattle, I went to a marine-supply shop on Lake Union. I
found what I wanted immediately. This is the molding which I think is very
similar to or perhaps exactly the same. It is produced by a company named "TACO".
However; now I know that what I originally bought was rather expensive (compared to what I ultimately bought from another resource),
and it turned out that I realized I needed molding with a wider opening. I then
researched the net, and found the following company, with which I was pleased
with their customer-service and their prices were approximately 30 per cent
lower than a retail marine-supply shop.
Pier Supply: http://piersupply.com/ sales@piersupply.com
Pier
Supply, P.O. Box 6034. Sparta, TN 38583
Ph: 931-303-5277. Fax:
931-303-9686
When on the
PIER SUPPLY Home Page, go to:
Taco RepairParts->
Marine
Accessories->
Rub Rails & Trim->
And finally go to:
Trims
& Mouldings
V30-1005B25
FLEX TRIM: 5/32"x9/16" Black Flexible Vinyl Trim, 25'
Length
$38.99
dy
Return
to the Tip List.
Subject:
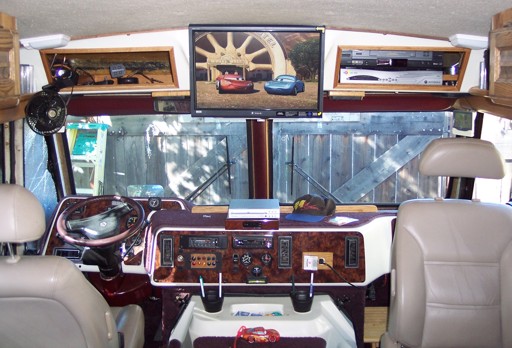
Large, Flat Screen TV Installation
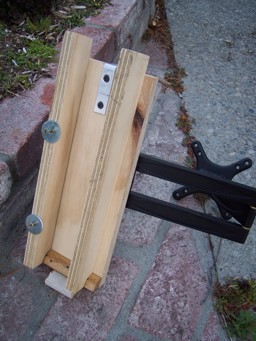
Tip:
I have revised the mounting of my flat TV. The first two pictures show the mount
I made and the articulating arm that supports the TV. The arm cost me about $30
on eBay. I secured the mount at the top to the metal rib supporting the roof
just behind the fiberglass. The two vertical wood supports go behind the rib,
and an aluminum bracket secures the mount to the rib with no need for drilling
into the rib. I added a plywood floor in the bottom of the area where the
original TV was. The bottom of the mount is attached to a quarter-round screwed
into that floor and into the mount bottom. The width of the mount serves to
resist twisting forces.
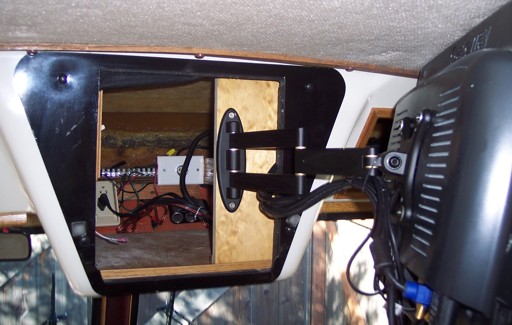
Once I disassembled and re-assembled
the mount in place, the TV can rest against the front of the enclosure, and I
can pull it out about 13 inches and angle it up-down and left-right, for optimal
viewing anywhere in the living room. Of course, it can also be viewed in its
normal resting place. I angled the mount slightly forward so any vibrations
while driving would tend to move the TV back against the enclosure. Of course,
pulling the TV out gives me access into the original enclosure. In it I have an
amplified indoor HDTV antenna (also about $30 on eBay) that is far superior to
the original boomerang antenna, especially because I can aim it at
stations.
Note also that I followed Tom
Healds lead by removing the original fiberglass-insert storage units, widened
the openings and made oak trim edges. Rather than make boxes behind that, I
simply made floors for the two sides, with oak molding to define the internal
boundaries. That gives me much more room and
flexibility.
The TV shown is actually a 21
widescreen computer monitor. It gives me a maximum of screen area because it
has only a ¾ trim around the screen. I have an HDTV tuner and a VCR with
analog tuner supplying signal in the right compartment, and my car radio has a
DVD player in it that can supply signal to the monitor. In all cases, sound
comes through the radio and upgraded Hi-Fi radio
speakers.
A simpler system would be to use an
actual HDTV with built-in HD and analog tuners and DVD player. Costco has one
for about $450 with a 19 widescreen. They have another with a 20 widescreen
and without the built-in DVD player for about $400. Although one can look for
an AC-DC TV or computer monitor, the easier and cheaper solution is to buy a
300-400w inverter for $30 to power it.
I hope others will find my research
and experiments helpful.
--Frank
Return to the Tip List.
Subject: Thin-Lite Fluorescent Lights and
Wiring
Tip:
The dual 8-watt bulb Recessed Thin-Lite fluorescent light fixtures used in our rigs
are very
expensive to replace ($88 at Camping World 10/2007). Whereas
the flush mounted units are less expensive ($44 at Camping World) and can often be found on
sale for much less. The insides
are the same, so
just swap the inner workings and save yourself some time and money. It's fast and
easy.
Update: While working on another project
in my 1990 Rear Bath Cruiser, I found
a makeshift panel in the back, upper left hand corner of the wardrobe covered by a
piece of paneling. The panel is used to distribute the wiring for the three fluorescent dome
lights and the line back to the switch by the side door.
Keep on Cruisin', Tom Heald.
Update:
Don't replace, convert! There are lots of White LED strips that run on
12 volts. Here is one example of a package of 4, enough to do all of
your fluorescent dome
lights and have a spare for $7.00 (or less) in 2015. Or you can use all 4
in one light if you want a brighter light. Just remove the old fluorescent
tubes, disconnect the ballast from the switch and wire in the strips in.
Then pop the cover back on. http://www.amazon.com/Zone-Tech-Flexible-Waterproof-Light/dp/B00EKPOG10
Or do a search for "12 volt white led light strips".
Keep on Cruisin', Tom Heald.
Return to the Tip List.
Subject: Lighting Upgrade
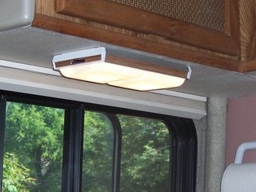 Tip 1:
Lighting in the living room and over the sink in kitchen are now replaced easily
with Progressive Dynamics double high intensity fixtures purchased from
Camping World. Two wires and two screws are all that it takes to install the
new units.
Tip 1:
Lighting in the living room and over the sink in kitchen are now replaced easily
with Progressive Dynamics double high intensity fixtures purchased from
Camping World. Two wires and two screws are all that it takes to install the
new units.
Wanted to keep the basic same look and they fit that well. You
can turn one or both light bulbs on just like the old units. The switches are
easier to operate. I like them!
Thanks and happy trails
Rod
Michaelson
Tip 2: I replaced the Thin-Lite Fluorescent Lights with LED lights from
The LED Light, in Carson City NV, model JW XLLB3 WH,
plus a protective device to limit over-voltage risk, NW RG12A2. Cost of
materials, including shipping, $262.90.
I'll be
pleased to send the Excel file with pictures and instructions to anybody
that asks.
Ray Alden, rayalden2000@yahoo.com
Return
to the Tip List
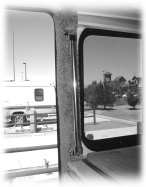
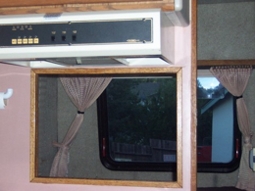
Subject:
Window between Kitchen and Bedroom
Tip:
When driving down the road, Rod didn't like the restricted view out of the
rear window. Solution;  he
opened the wall between the kitchen and bedroom in his rear bath model.
The finished opening in the wall is 14" high and 20" wide. Rod says
that relocating the wiring was the hardest
part of this 20 hour job. he
opened the wall between the kitchen and bedroom in his rear bath model.
The finished opening in the wall is 14" high and 20" wide. Rod says
that relocating the wiring was the hardest
part of this 20 hour job.
 |
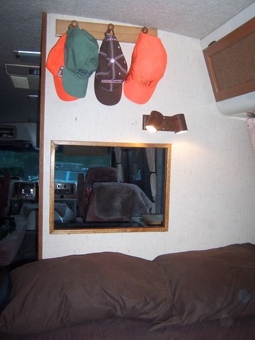 |
 After
finishing the opening between kitchen and bedroom, he found and ordered a pleated shade that would match the other window
shades in the coach. After
finishing the opening between kitchen and bedroom, he found and ordered a pleated shade that would match the other window
shades in the coach.
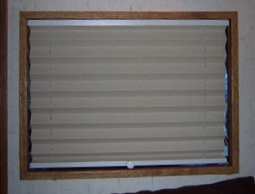
Through Camping World he ordered the pleated shade on
the right. It matches the other window shades perfectly and operates the
same with pull down and push up.
The shades are made by United Shade, LLC and they are of high quality. Took about 5
weeks to arrive after ordering it on-line. A bit pricey but the quality is high and
it fits
very well.
Website: unitedshade.com 
Happy trails,
Rod Michaelson
Return
to the Tip List
Subject:
Engine Cowling Gasket
Tip:
My 91-23 engine cover gasket
is a 14-1/2' long molded rubber
(plastic) component. The gasket
cross/section is a hollow bulb molded to the edge of a rubber
clamping lip. I replaced mine two
years ago with a product from JC
Whitney. I just looked in their
catalog and it is still there as Push
on foam Weather-strip part
no. GM132565, $29.99 for a 25'
roll. I still have 10 1/2 left on my
roll if you want it. It was easy to
install, remove the old gasket
and scrape most of the old silicon
off. I used GE black Silicon,
squeezed it into the clamp lip and
forced it on, used paint thinner
to clean excess silicon.
Return
to the Tip List.
Subject:
Navigation System
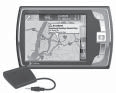
Tip:
Paula Morris endorses this navigation system designed
for computer challenged users. Nav One 4500 is made
by Cobra and sold through Amazon.com. You can buy it
from:
Etien Staroscik
705 5th Ave South
Seattle, WA 98104
Phone 206-266-9331 or
estaros@amazon.com
Incidentally, Etien is Paula & Stans grandchild.
#165 Morris
Return
to the Tip List.
Subject:
Magnetek Power Converter and Battery Charger
Tip:
If your power converter is made by Magnetek (most of
them if not all were) and its humming noise is
annoying you, you may want to upgrade with a new
electronic version. You can choose from three
models but members recommend either model
7345RU (45 amp) or 7355RU (55 amp). The units
can be purchased or ordered from Camping World
and are exact replacements for the original units.
See the article Magnetek 6300 Power Converter & Distribution for more information.
Return
to the Tip List.
Subject: AcuGage Holding Tank Monitoring
System & Water Pump Switch
Tip 1: The AcuGage holding tank monitoring system was manufactures by
Geckotec which has been bought out by Diamond Distribution Ink. The replacement is the I-Series
monitor panel which can be seen at --
http://diamonddistributioninc.com/ -- sells for around $150. They can
be reached at 800-456-4498.
 Back in 1997 I was able to order a
repair kit from
Geckotec complete with a Technical Help
Manual and replacement Copper sensor pads for the system.
I did not order the aluminum tape (that goes on the tanks)
as you can pick that up at any good hardware store.
The cost was about $25 back in 1997 if I remember correctly.
Back in 1997 I was able to order a
repair kit from
Geckotec complete with a Technical Help
Manual and replacement Copper sensor pads for the system.
I did not order the aluminum tape (that goes on the tanks)
as you can pick that up at any good hardware store.
The cost was about $25 back in 1997 if I remember correctly.
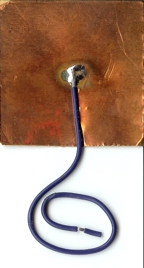
I contacted the new owners and received permission to scan the Technical Help Manual
for our AcuGage system into a PDF File and place it on our web site. Just click on the name
AcuGage.pdf to see
the manual. If you need the copper sensor pads, you can make them by
soldering a wire to a 2 inch square of copper foil as shown to the right. Use copper! Soldering to aluminum will not
work. The wire will fall off in about a week.
Keep on Cruisin', Tom Heald
Question: If someone here has
disassembled the hood over the stove and gained access to the rear of the
monitor panel, I'll appreciate coaching about how to do this without causing
damage in the process. I want to see how much room is available there,
with the thought of improving the instrumentation, starting with a digital
display voltmeter in place of four colored lights.
Thanks for any suggestions, Ray
Tip 2: I just installed a new panel as
mine was melted and "expired"! Simply place a wide flat blade
screwdriver under the bottom lip toward the left side and GENTLY pry outward,
the bottom has tabs the pop out. After the bottom is loose, slide the
assembly DOWN as the top tabs "pinch" the top of the frame. Let
me know what you do, I am always looking to improve the electronics.
Rick
Tip 3: Ray, When I installed the
window opening between the kitchen and bedroom area I removed the hood in our
'89 rear bath. 14 wires ran through the area the window went so I got to know
what went where. The wires for the level indicators are 22 gauge wires that are
wrapped like coaxial cables. The monitor panel has adjustments that basically
give you a low and high ohm reading for from empty to full. Good luck.
Happy trails, Rod Michaelson
Tip 4: Also remember to disconnect your
batteries before you follow Rick's procedure. There are hot wires there to
run the hood light and fan and power everything else.
While you are there, I would recommend you write down the color codes for the
water pump switch and pilot light. The bundle runs down thru the back of
the stove and over behind the counter wastebasket. By removing the waste
basket, you can access them. You may want to follow suit and put another
water pump switch in the bathroom (as I did) and this is the best place to tap
off. I will post a procedure before long. I always forget to turn
the pump on when going to the bathroom.
-=Dale=-
Return
to the Tip List.
Subject:
How to keep your Clothes on
Tip:
If you have trouble keeping your clothes from sliding
back and forth in the closet, here are a couple of tips.
Use an old vacuum cleaner hose over the closet rod or
cover it with foam pipe insulation. Now your hangers
will stay put where you leave them.
#212 Petrovich
Return
to the Tip List.
Subject:
Furnace Thermostat Cycle Time
Tip:
Does your furnace leave you too cold and then gets
you too hot before it turns off?
There is a way to fix that. Take off the cover from your
furnace thermostat and locate a metal strip that has
numbers 1.0 .7 .5 .4 .3 .2 & .1 stamped along side it. I
have a Hydroflame thermostat and this strip is on the
right side in the up and down position. This strip is the
heat anticipator and its job is to tell the furnace how
often to cycle. Moving that slide to a smaller number
will make the furnace come on more often but will not
stay on as long thereby keeping the temperature
closer to your setting. We found that .4 works well for
us.
#212 Petrovich
Return
to the Tip List.
Subject:
Fan-Tastic Vent® Fan Not Working or Needs Parts
Tip:
Did your Fan-Tastic Vent® fan quit working or does it
work intermittently? The problem could be simpler than
you think. Check the fuse first; if it is OK than there is a switch under the dome
that will shut off the fan if you close the dome with your fan on. The connection between the switch
and the wire going to the motor has the tendency to
corrode and lose contact. Remove the switch, clean the
connector and reassemble. Voilà, the problem goes away.
Its important to know that the dome has a lifetime
warranty from Fan-Tastic Vent® Corp. and they may
even give you other replacement parts free. They do
that in stead of advertising thereby spreading their good
name through the word of mouth.
If you have an old style fan (exhaust only) you can
upgrade it by getting the kit No. K1230-80 for $35 in 2002 (they
pay shipping). The kit includes everything you need to
remove and replace.
Call them at 800-521-0298 or check their website at
www.fantasticvent.com. They are wonderful and knowledgeable people.
#212 Petrovich (with some updates by the webmaster; any mistakes are
his.)
Warning:
When changing the setting of the IN/OUT rocker switch make sure the 3-spead switch is off and the fan has stopped
turning before moving the IN/OUT rocker switch. If you don't you will probably
blow
the -- BUS 4 Amp MDL -- or equivalent slow-blow fuse. I have a hand written warning next to the
rocker switch and spare fuses in my tool kit. For more information on the
Fantastic-Fan Operating Instructions with Care and Maintenance
see the 2002 November Newsletter
or check their website at
www.fantasticvent.com.
Keep on Cruisin', Tom Heald
Return
to the Tip List.
Subject:
Foot Stool
Tip:
If you are not handy enough or dont have the time to
make a foot stool for your traveling companion, go to
Camping World and purchase the Foot Valet, catalog
No. 19292 for $17.99 in 2002. Works great and looks great.
#212 Petrovich
Return
to the Tip List.
Subject:
Driver & Passenger Seats
Tip:
Flex-Steel in Riverside, CA is a good source. They advertise in major
magazines. It is recommended that you try the seat
before buying since one size does not fit all.
Return
to the Tip List.
Subject:
Shoulder Belts
Tip:
Some coaches had them installed.
The important thing is that they be properly anchored.
Coaches with the steel frame are more
suitable for this than those with the wood frame.
Return
to the Tip List.
Subject:
Weather Strip
Tip:
If your weather strip around the
doors and engine cover needs to be replaced, a
good source has been found. Trim Lock produces
Ultra Grip. Lon Waterson bought it in bulk and
was sharing it with other members for his cost. If
you need some, contact Lon.
Lon Waterson
Return
to the Tip List.
Subject:
Pleated Window Shades
Question:
Will be replacing our large (72" x 36"+/-) pleated shades. Does anyone have a
reasonable source. Also, how about the exterior windshield sunscreens.. any
source for do-it-yourselfers? Thanks. bb
Tip 1: We found a local blind dealer
who is cleaning and restringing our pleated shades for about 25% of a
replacement of the same type. Save us money to spend somewhere else....like an
awning.
Thanks. bb
Tip 2:
Shade Pro (formerly Best RV) will probably give you the best price. They have
the patterns for A-C and will ship to you, or, if you are in AZ or SoCal they
will install free. Mine was $367.00 but that included an extra for the back
window. All their hardware is Stainless. 800/328-5100
-=Dale=- Tip
3: We replaced all the window shades in our Aero Cruiser.
We found a sale at Home Depot on Bali cellular shades. We ordered blackout
shades for the bedroom area and shades that have no visible cords for the two
large windows by the sofa and dinning table. We also ordered the hold down
brackets to keep the bottom of the shades in place. We ended up using the
ones already in place for the aluminum shades.
We really love the shades with no cords to pull. We just raise or lower the
shade.
We installed them ourselves with no trouble. We kept the same measurements
as the aluminum shades. If we had it to do over we would have ordered a
slightly wider shade for the side bedroom window and we probably would have
ordered the cordless shades for that area as well.
Hope this helps in your decision.
Rita and Lance
1992 23' Aero Cruiser
Tip 4: I haven't replaced any of mine; however, I have replaced the cord in
several. It's a pain but it is easy. I could not find the same woven cord
so I used a nylon twisted cord that works but probably will not last as
long.
Well after several (5?) years I am at it again!
You can get the proper replacement 1.4 mm cord online at -- http://www.blindrepaircord.com/Cord1.4.htm
. I ordered a 100 yard roll for $23.95 + $5.00 shipping in 2010.
Keep on Cruisin', Tom Heald
Return
to the Tip List.
Subject: TV Amp "
Big Red Switch" next to the TV on the Drivers side.
Question:
There is a switch over head on the driver's side that looks lighted, and is near the driver's dome light...have NO idea what it does.
Rick
Answer:
It turns the antenna's TV amp on and off. It should light up when you turn it on to remind you to turn it off when not using it as it will drain the battery.
Mine was not grounded and did not work until I fixed it by soldering a ground
wire to the coaxial cable shield and running it to ground on the 12 volt plug
for the TV.
Keep on Cruisin', Tom Heald
Return
to the Tip List.
Subject: Furnace Installation, Removal
& Service manuals
Tip 1: I've prided myself on
the google web search skills, but no love trying to find a installation manual
for a HydroFlame 8525-II on my 92 AC. When cold, the blower fans sound like
the worst nails on a chalk board, and given time they settle down. Comments
from seemingly smart folks suggest the motor bearings are bad too. I think I
agree, as the sound of the motor isn't whisper smooth.
Not being one to give up, here are the manuals I've found for the HydroFlame
Furnaces:
Hydro Flame Furnaces and
Atwood Furnace Service Manual
Andy
Tip 2: Mine is also hydro flame
Excalibur 8500-II and recently removed it from the
coach to fix a problem that did not exist
but that's another story. Lesson learned,
DO NOT REMOVE THE
FURNACE FROM THE COACH!
It is a big job and not necessary. All parts are accessible from the front of
the furnace. It is not
necessary to disconnect the gas line unless you need to get to the shut off
valves or combustion chamber with associated parts.
Dragi
Return
to the Tip List.
Subject: Gas Appliances not Starting
Tip: When you turn on the
gas valve for a trip, you often will have air in the gas lines and the Hot
Water Heater, Forced Hot Air Heater and the Refrigerator may not start up on
gas. Light a burner on your stove and let it run a bit until you get a clean
flame to purge any air out of the main gas line then try the other appliances.
Typically you will hear the clicking of the igniter and the woosh of the gas
lighting when they are working. If you get clicking but no woosh then you may
not be getting sufficient gas in the feeder line to the appliance. You may have to turn
the appliance off and then back on until the last bit of the air is purged
from the feeder line.
Keep on Cruisin', Tom Heald.
Return
to the Tip List.

|
Copyright© 1999-2016
Freelance Ink.
All Rights Reserved.
|

|
|