Quick Links:
> Members Page
> Organization
> Rally Page
> Picture Page
> News Letters
> Swap Shop
> AC Group
on Google
< Back to the
Club's Public
Page
|
Engine Oil Pan Gasket Removal and Installation
by
Tom Heald
 I remove the Engine Oil Pan to weld a bung adapter into it for an Oil Temperature sensor to feed the gage
I had installed in the Dashboard. My mechanic said it would be 3 hours labor so
I said "Thats not bad, I think Ill do it myself!"
I remove the Engine Oil Pan to weld a bung adapter into it for an Oil Temperature sensor to feed the gage
I had installed in the Dashboard. My mechanic said it would be 3 hours labor so
I said "Thats not bad, I think Ill do it myself!"  It took me
about 8 hours to do it the second time!
It took me
about 8 hours to do it the second time!  Yes, I ended up doing it twice. The
first gasket was made of cork and it split on the end
Yes, I ended up doing it twice. The
first gasket was made of cork and it split on the end  when I torque the bolts.
The specs from Chrysler say 200 inch-lbs. (16.6 foot-lbs) but that is too much
for a cork gasket. It might have worked if I had torque it in stages as
described below; however, I didnt and you have a chance to learn from my
mistake! The original gasket from Chrysler had a metal-core with cork on each
side, but I could not find one for my 1989 Dodge D350 engine. I used the
following parts. Prices are from 2012.
when I torque the bolts.
The specs from Chrysler say 200 inch-lbs. (16.6 foot-lbs) but that is too much
for a cork gasket. It might have worked if I had torque it in stages as
described below; however, I didnt and you have a chance to learn from my
mistake! The original gasket from Chrysler had a metal-core with cork on each
side, but I could not find one for my 1989 Dodge D350 engine. I used the
following parts. Prices are from 2012.
| 1 |
Fel-Pro rubber-coated fiber Oil Pan Gasket |
$20.00 |
| 1 |
3.35 oz tube of Permatex 82180 Ultra Black Maximum Oil
Resistance RTV Silicone Gasket Maker |
$8.00 |
| 4 |
5/16-inch bolts 1.5-inches long to make alignment dowels or
studs for installing the Gaskets. Use one of the oil-pan bolts to
match the thread size. |
$3.00 |
| 1 |
Auto Meter 2260 Weld-In Adapter for 1/8" NPT Universal
bung type for a temperature sensor if you are installing an Oil
Temperature gage. Note: I
also installed a second adaptor in my Transmission pan. |
$12.12
each |
| + |
5+ quarts of oil and 1 Oil filter. |
|
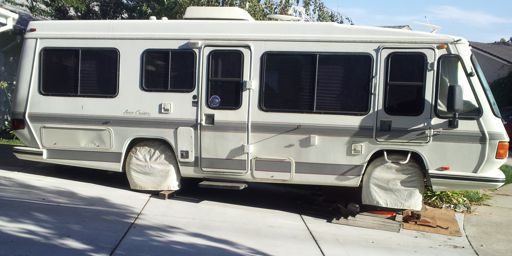
I have ramps to raise the front wheels eight inches to level the coach
so I can work on it inside and out or prep it for a trip.
Oil Pan Removal
- Drive the coach up onto ramps or jack it up to provide room to work
underneath.
- Drain the oil, replace the oil filter and remove the dipstick.
- Disconnect the battery ground from the batteries.
- Remove the 2 engine to transmission support struts.
- Remove the 3 screws from the torque convector inspection cover.
- Remove the starter motor heat shield and then the starter motor held in
place with one bolt and a nut on a stud. Lay it on your chest so you dont
have to disconnect the electrical connections.
- Remove the torque converter inspection cover which is now free and set it
aside.
- Re-hang the starter motor loosely to get it out of the way.
- Remove the oil-pan bolts. Note that the 2 front bolts are different from
the others.
- Remove the oil pan. I used a sheet-rock knife, flat end 1-inch putty knife and
a screwdriver to pry it off being careful not to distort the pan or scratch
any surfaces. With a little patience you can get it loose.
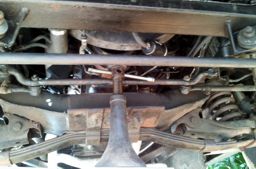 I had to jack the Engine up 2 inches to be able to get the oil pan past the
transmission. My driveway is slanted so I leveled the base with a 2" by
8" by 1.5 foot plank and a board. Next came a stack of 3 pairs of 4 by 4s about a
foot long and an old house jack. Place the jack under the pulleys and
vibration damper with a block of wood between them and the jack. I used a
3/4" by 3" by 5" piece of plywood to straddle the pulleys and
vibration damper to spread the force so nothing would get bent and the wood
would not split. There is not a lot of room between the vibration damper and
the axle which is why I used 3/4 inch plywood.
I had to jack the Engine up 2 inches to be able to get the oil pan past the
transmission. My driveway is slanted so I leveled the base with a 2" by
8" by 1.5 foot plank and a board. Next came a stack of 3 pairs of 4 by 4s about a
foot long and an old house jack. Place the jack under the pulleys and
vibration damper with a block of wood between them and the jack. I used a
3/4" by 3" by 5" piece of plywood to straddle the pulleys and
vibration damper to spread the force so nothing would get bent and the wood
would not split. There is not a lot of room between the vibration damper and
the axle which is why I used 3/4 inch plywood.- Remove the 2 nuts on the bottom of the engine mounts and mark the lower
bracket by the bolt so you can make sure it does not shift when you put it
back.
- Raise the Engine with the jack making sure that the generator (or anything
else) has room above. Keep moving the fan to make sure it doesn't bend a blade
on the shroud.
- Jack the engine up until you have room to remove the oil pan which was 2
full inches for me.
- Clean and degrease the oil pan and the bottom of the engine block. I used a
razor-blade scraper, a flat blade putty knife and a brass brush along with
solvent. Make sure you wear silicon gloves to protect your hands and wear
safety glasses to protect your eyes from the solvent.
If you are installing an oil temperature gage, take the Oil pan to a welding shop
and get the bung adapter welded into the oil pan. Locate a spot on the side of
the oil pan in the deep end below the oil line that will not interfere with the
connecting rods and drill the hole before you take it down to get it welded.
I
also took my Transmission pan down at the same time.
Oil Pan Installation
- Make 4 alignment dowels or studs by cutting the heads from 1.5 inch bolts
and then cutting slots into the top of each one so you can use a screwdriver to
back them out later. Make sure you test that the screwdriver will fit before
you install the studs!
- You should now install the 4 studs into the end holes of the motor block.
They will help align the pan and keep the gaskets in place while you
assemble everything.
- Before applying any seals or gaskets, practice putting the oil pan in
place. You may have to rotate it to the left and right to clear the
connecting rods as you slide it forward. If you dont have enough room for
the pan to slip into place without touching anything, especially the end
seals, crank the engine up more. I cranked my engine up a total of 2 inches.
- Install the End Seals into place. The front end seal has a large hole on
one side and a smaller one on the other side so make sure you push the end
guides through the proper hole. Snip the rubber end guides (where they stick
out of the oil pan) about an 1/8 of an inch or just enough to allow enough
clearance to get a wrench over the two bolts in the front of the engine
block. It is not necessary use any RTV sealant on the end seals. There was
none on the block or pan when I removed it. However, I used a little at the
top of the front end seal because it was not as tight as I thought it should
be.
- With all 4 studs in place it is time to apply the gaskets to the surface
of the engine block. I applied the RTV Ultra Black Silicon Gasket maker to
the gasket and then using latex gloves spread it evenly across the entire
surface of the gasket. Note: the 4 studs will keep the gaskets tight against
the end seals.
- Place each Gasket onto the engine block over the studs and pressed it
into place checking the alignment over the bolt holes.
- Apply a dab (1/8" bead or so) of RTV sealant where the end seals
meet the gasket on the surface of the engine block and the gasket. It is not
necessary to apply RTV sealant to the face of the gasket or the end seals
except on the 4 corners where the end seals meet the side gasket.
- Move the oil pan into place being careful not to disturb the end seals or
the gasket. You may have to rotate it to the left and right to clear the
connecting rods just as you did when you practiced. Slide it up over the 4
studs onto the engine block.
- Important! Make sure the gaskets or end seals did not move when you
installed the pan. If they did, remove the pan and reinstall the seals. I
didnt check and had to remove the bolts to reinstall the front seal!

- Apply the bolts finger tight into the engine block to hold it in place.
Remove the 4 guide studs and install the last 4 bolts. Starting at the ends
and alternating from side-to-side towards the center tighten the bolts until
they are snug where the gasket meets the block. Do not torque them down at
this time. After a half hour or so, starting at the ends again and
alternating side-to-side towards the center, torque the bolts to maximum of
10 foot-lbs. The specs from Chysler say 200 inch-lbs. (16.6 foot-lbs) but
that is too much for a cork or composite gasket. The original gasket had a
metal-core with cork on each side.
- After everything has set for an hour or two after installation you can
add the oil. I let it sit over night just to give it plenty time to dry.
After the RTV sealant has dried, the gasket is less likely to split or
distort.
- If you want to torque the oil pan to a max of 16 ft-lbs, wait 24 hours
until the RTV has set so you wont split or distort the gasket. I
left mine at 10 foot-lbs for the first several short trips.
- Remove the starter motor and lay it on your chest so you dont
have to disconnect the electrical connections.
- Install the torque converter inspection cover loosely with 3 bolts.
- Install the starter motor held in place with one bolt and a nut on a
stud. Then install the heat shield and tighten torque converter inspection
covers 3 bolts.
- Install the 2 engine to transmission support struts.
- Lower the engine with the jack.
- Replace the 2 nuts on the bottom of the engine mounts.
- Connect the battery ground to the batteries.
- Take it out for a run it and get it up to temperature, then check for
leaks. After it cools you should check the torque. You will have to
remove one of the transmission support struts to check the torque.
After several short 25 mile trips I put my rig back up on blocks and checked
the torque. Several bolts had backed off slightly so I brought all of
them down to 15 foot-lbs without any problems.
I could not get the torque wrench onto the four bolts by the front seal --
two on each side -- probably because the engine was no longer jacked up 2
inches. Experimenting with my 5 inch long 1/4 inch drive ratchet
wrench I found that 15 foot-lbs was about all the force I could exert
one-handed lying on my back with that wrench. So I torqued the last
four bolts down by touch.
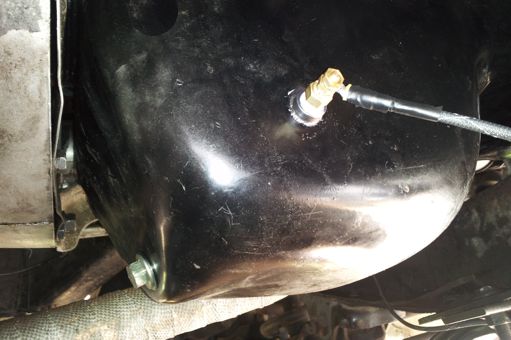
Deep end of the Oil Pan with a Temperature Sensor
installed on its passenger side.
Keep on Cruisin', Tom Heald
 Return
to the Tip List. Return
to the Tip List.
-- Disclaimer --Information
on this Web Site is provided by members of the "Aero Cruiser Classics" Motor home Club. All
information on this site is contributed by the club members or outside sources and is believed to be reliable; however,
there is no warranty or guarantee that said information or advice is correct or free of defect. It is
offered on a best effort basis and is to be used at your own risk.

|
Copyright© 1999-2016
Freelance Ink.
All Rights Reserved.
|

|
|
|
|