!!!
Walter
 Return
to the Tip List.
Return
to the Tip List.
Subject:
Engine Maintenance
Tip: If you have not done maintenance in a while,
following is the list of things to check and service
if needed depending on your engine type:
* Air filter for the computer - check for cleanliness
* In-line fuel filter
* Oxygen sensor
* Vacuum lines (especially to MAP sensor
* PCV valve
* Catalytic converter (should be done by a service shop
* Spark plug wires
* Engine timing (for carbureted engines)
Return to the Tip List.
Subject:
Engine Hoses
Tip:
Check your hoses for deterioration.
Old ones will be brittle and may not hold the pressure.
When replacing them, do not over tighten the clamps.
Return
to the Tip List.
Subject:
Fan Belts
Tip:
Inspect on the inner side for cracking
and replace as necessary. General rules of thumb,
if you have not replaced them in the last three
years, take a real close look.
Return
to the Tip List.
Subject: Replacement Parts Belts, Hoses,
Filters etc.
Tip:
Since I wasn't able to find specific references to replacement belts, hoses,
etc. I thought I'd post what I've found for my newly acquired 1989 A-C. I
believe that the engine is a 1988 model year based upon the following number:
Chrysler LH 360-88-388 located below the Vironex Chassis VIN.
Dual
Alternator/AC (120amp) belts: NAPA (Gates) 7612
Power Steering/Fan belt: NAPA
(Gates) 7450
Air Pump/Fan belt: NAPA (Gates) 7480
Upper Radiator Hose:
Gates GAT 21406
Lower Radiator Hose: Gates GAT 20046
Replacement Fuel
Pump: Airtex 60519
Air Cleaner Element: Franz CA160
Fuel Filter: FRAM
G3499
I'll post any additional replacement items as I come to
them. jwdub1
Return
to the Tip List.
Subject:
Dip Stick
Tip:
Do you have trouble seeing
where the oil is on you dip stick
or better yet, where it should
be? This may help. File a V
notch at the upper and lower oil
mark on your dip stick with a
triangular file about 1/16 to 3/32
deep. Clean the dip stick
carefully and put it back. You
may still have trouble seeing
the oil line but you should have
not trouble finding the
reference points.
#212 Petrovich
Return
to the Tip List.
Subject:
Engine Oil
Tip:
Recommended viscosity of oil
depends on the temperature where the coach
is being operated. With the mild temperatures
of Southern California, straight SAE 30 weight
is fine, but if you expect a significant change in
temperature, stick with SAE 10W-30 which is
good for temperatures above 0° F. Remember
that certain oil viscosities such as SAE
10W-40 and 10W-50 are NOT recommended
in Dodge engines.
Return
to the Tip List.
Subject:
Synthetic Oil vs. Regular Oil
Tip:
It comes down to
personal preference. Some people report engine
running cooler with synthetic oil. If you use regular
oil and you drive in a climate where the temperature
is relatively even, suggestion is that you use a
single grade oil in stead of multigrade due to its
longer life expectancy.
Return
to the Tip List.
Subject:
Oil Leaks
Tip 1:
Lon Waterson cautioned about
assuming that your rear main seal is leaking just
because you have an oil leak on the ground. Check the
oil cover first and engine block to intake manifold
interface. That may be the culprit.
Lon Waterson
Tip 2:
Make sure that the screws holding the
valve cover are snug all around. Rear end of the
covers is especially susceptible to oil leaks. Also,
when changing the engine oil, replace the plastic
washer on the oil pan bolt periodically. The gasket
can get compressed to the point where it no longer
does its job.
Return
to the Tip List.
Subject:
MAP Sensor
Tip:
If Manifold Absolute Pressure sensor
needs to be replaced, make sure you tell your mechanic
or parts person that the engine is 5.9 liter from a D350
Dodge truck.
Return
to the Tip List.
Subject: Relays: Starter, A/C & ASD
Tip:
Automatic Shut Down (ASD) relay failure will stop your engine. It supplies power to the fuel pump, ignition coil,
fuel injectors, and parts of the power module depending on what year your Aero
Cruiser is. The idea is to shut off fuel pressure and the
ignition systems when the key is turned off to prevent fires, dieseling, and other problems.
It is located next to the dashboard
fuse block on the drivers
side and may be interchanged with the Air Conditioning
relay in an emergency even though the one relay has 5
prongs while the other relay has 4.
The starter relay is located under the front hood on the right side. See
"Starter Relay: Trouble Shouting Problems" and "Remote
Starter Switch" for additional information and pictures.
-
A/C Cut Out Relay
12 Volt-30 Amp
Beck Arnley - 203-0012
Fule - Power
(Can also be used for ASD)
-
Starter Relay
AR-201 NAPA Without Bracket
AR-204 NAPA With Bracket
5227300 Mopar
4111971 (hard to read *)
-
ASD - Auto Shut Down Relay
Fuel & Ignition
Mopar - 52331200 (hard to read *)
4443907
From George's Little Black Book
* Note: some of the numbers are hard to read
in George's notes and may not be correct so check them on the relay or a catalog before ordering.
Keep on Cruisin, Tom Heald
Return
to the Tip List.
Subject:
Distributor-Cap Fire
Tip:
Beware! If you buy a distributor
cap and rotor, and the rotor is for a bigger shaft, return both, not just the
rotor, even though the distributor cap looks superficially to be the right
size. I learned the hard way. I only bought another rotor the correct size.
It ran fine for the 20-mile test drive up and down a 1000-foot hill, so I
thought all was well. But a few days later we set out for a local beach. We
only got two miles when it backfired a few times and then quit. I pulled over
and saw smoke coming from under the motor cover. I didn't want to remove the
motor cover because it would feed air to the fire, so I tried aiming the fire
extinguisher through the front wheel well at the back top of the motor where I
could see the flames. I was unable to stop the fire that way, so I went back in
and risked taking the cover off. Then I could see that it was the new
distributor cap burring and aim the fire retardant straight into the
distributor. That put the fire out. Praise God, an off-duty fireman had
stopped and came in at that point. He had already called 911 and he spent my
second extinguisher making sure the fire was out. The fire truck arrived a few
minutes later and the CHP a couple minutes after that. Wow, what a
team!
Two hours later the Aero Cruiser was
loaded on a Landoll trailer and hauled to my mechanic's shop. It took me two
days to find and replace all the burnt wires, vacuum hoses, distributor, cap,
rotor, etc. Now I have another few days work to replace the burnt insulation
and clean up the mess. But we thank God we didn't go the way of the Watersons'
fire!
Frank DeRemer
Return
to the Tip List.
Subject:
Engine Replacement
|
Tip 1:
In August of 2004, after driving all day with our
new Cruiser (we bought a 90/91 model), we
were a quarter mile from home when something
sounded like metal hitting the cooling fan. I stopped
immediately and checked. The fan was just fine. I
then noticed the wing-nut on the air cleaner cover
was going solo. The bolt holding the cover in place
had snapped off and proceeded to find its way
down the carburetor throat into the engine. I guess
the s had hit the fan after all.
Fishing around
through the carb. throat with a magnet didnt
accomplish anything, so after removing the valve
cover and searching further we found damage to
the valves and one piston and cylinder wall. This
engine had been driven 154,000 miles, yet all the
other pistons were still in exceptional condition.
After getting repair estimates, I called George
Kinnison who graciously shared information about
the totally remanufactured engine he had introduced
to our club. Next, through David Cavin at
Chicago Power Systems, Inc., an engine was
shipped to me. After receiving the engine and
inspecting it, Chicago Power accepted my personal
check on Georges word! I have only driven the
Cruiser 350 miles since installation. So far it runs
quietly, smoothly and powerfully.
Here are some stats: LH360 Remanufactured
Chrysler Industrial Stub Engine assy w/increased
cooling water pump.
Price $2375.00
Shipping 345.00
Installation with many new parts (hoses, belts etc.)
Approx. $1,700,00
|
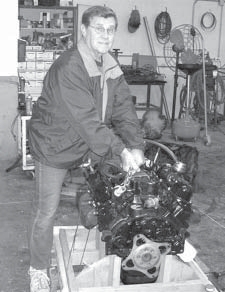 Pete with his new Engine
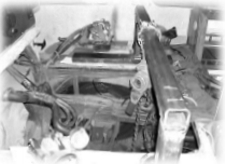 Lowering the Engine
Shot from above
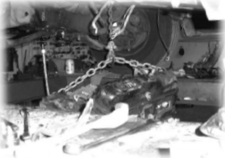 Shot from below Shot from below
|
#441 Pete Mondeel
Update:
Pete gave us an update on his engine. He said the engine runs great and he gets about
12.4 MPG on the flat terrain at 55 MPH and 8 to 8.5 on
the hilly terrain.
#441 Pete Mondeel
Tip 2:
Some of us have accumulated quite a few
miles on our coaches and though no one knows
how long our engines will last, there is a source
where we can buy remanufactured engines. They
are $2,500 plus $500 for shipping. See below for
additional information.
Removal of the engine should not be difficult. There
is a cross-member bolted to the frame that holds the
transmission and the engine. Once this part is
removed along with two engine mounts, the engine
can be removed from the bottom.
Speaking of engine mounts, they are standard
D350, 1-ton truck mounts and should be checked
periodically for condition and separation. Poor
engine mounts can allow engine to sag or twist
under acceleration. 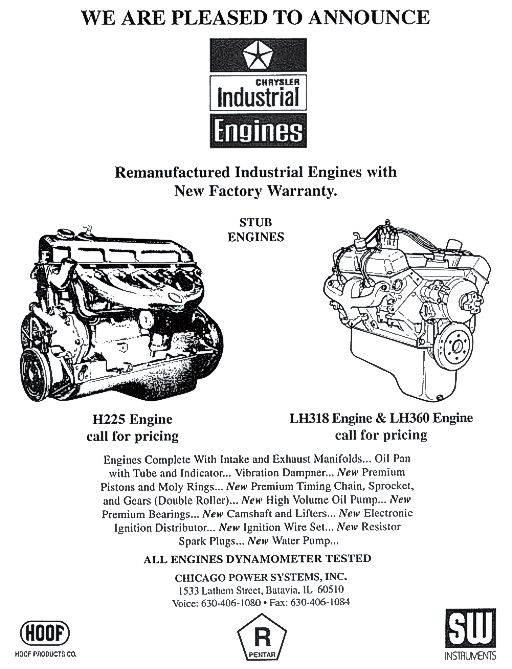
Return
to the Tip List.
Subject:
Alternator Charging System
Tip:
If you should loose your alternator for some reason (it
went bad, belts broke, air conditioner compressor froze,
etc.) keep in mind that you could still drive a long way.
The electrical current needed for your ignition system
will be supplied by your engine battery for a long time
without being recharged. In an emergency, you could
also connect your coach batteries to the engine battery
and have even more current.
#212 Petrovich
Return
to the Tip List.
Subject:
Exhaust Manifold Bolts
Tip 1:
Check your exhaust manifold bolts periodically to make
sure they are still there. The manifold is
secured to the block, metal to metal no gasket,
with a combination of machine screws in some
locations and studs and nuts in other.
These bolts (technically,
machine screws and studs) that hold the exhaust
manifold to the engine head can break off due to
extremes in stress caused by high temperature. Driving
without them for a prolonged period of time can cause
warping of the exhaust manifold and leakage of the
exhaust gases into the engine compartment.
Removing broken studs from the engine head is no easy
task. Common approach is to drill a correct size hole
precisely in the center of the broken stud and clean out
the remaining threads with a tap. Trying to use an
easyout (screw extractor) can be a mistake.
Remember that the easyout is smaller than the screw
your are trying to remove and though it is harder it is
also more brittle and can breake inside the hole
creating a bigger problem. Trust me, Ive been there.
The best thing to do is to take your coach to a
reputable shop capable of performing such a task. If you
insist on doing it yourself, be prepared to eventually
remove the engine head and take it to a shop. On the
plus side, this will give you the opportunity to examine
all components of the engine top side and replace as
needed.
#212 Petrovich
Tip 2:
Bolts and screws that hold
the manifold to the block are grade 5. Suggestion is
to replace them with grade 8 if replacement becomes
necessary. They have been known to brake
from constant expansion and contraction due to
extreme temperatures. Torquing of these fasteners
is also critical since manifold is secured directly to
the block without a gasket between them.
Return
to the Tip List.
Subject:
Broken Stud or Machine Screw
Tip:
If you are faced with a situation where you need to
remove a broken stud or a machine screw, consider
using left hand drill bit. You have to drill a hole into the
remainder of the stud anyway, why not use the drill that
works against the threads in stead of with them?
#409 Royston
Return
to the Tip List.
Subject:
Starter Overheating
Tip:
Cal Harnetiaux reported a problem with
his starter; it wouldnt work. He discovered that the
started was fried by the exhaust system. Its a
good idea to inspect your exhaust system to make
sure that there are no sensitive components too
close that could get damaged by the heat. That
would include such things as: control cables,
wiring, brake-lines, etc. If they are too close and
cant be moved, consider shielding them with heat
resisting materials.
See the tips on: Exhaust System Wrap to cool things down
and
Replacing the Transmission and Throttle Control Cables
at the end of the article.
Return
to the Tip List.
Subject:
Starter Problems -- Diesel
Tip: Diesel Starter
Adventure! If you haven't been there already, you will be.
You go to start your Cruiser and all you get is a depressing click. Your first
thought is that the battery must be dead. No, everything was fine a while ago and
everything else is functioning. Great! The starter died.
When the starter
went bad on my 98 Dodge diesel, the dealer told me I needed a new one. $900
later I have learned a few things. I don't know if the gas Aero Cruiser uses the
same starter, but I learned a lot about the diesel. The dealer wants $600 for
the unit itself and about $300 to install.
The Cummins diesel in the
Dodges use a Nippon Denso starter. Most support groups estimate that the starter
itself is good for about 300K miles. What goes bad is the solenoid. The solenoid
itself is as tough as the starter, but the contacts pit and corrode easily and
12volts can't punch through much corrosion.
To cure this problem, Larry
Buck, up in Tacoma, Washington makes a set of oversized contacts and sells the
kit for $35. He also sells the Nippon Denso starter, brand new, with the beefier contacts
installed for about $400.
contact: www.fostertruck.com
The
whole procedure is about 4 hours or less. The toughest part is getting the
starter in and out. All work must be done underneath, so if you have a lift,
great. If not, any blocking or lifting of the front end will help.
As
with any engine work, disconnect the ground wire on the batteries and set it so
it won't swing back and make contact. If you have a disconnect switch, that is
fine too. Crawl underneath and pull back the rubber boot covering the starter
terminal. Disconnect the starter cable. Remember that this is a copper bolt so
it is soft. Disconnect the solenoid trigger wire. If you get your contacts from
Larry, you might want to invest a couple of extra bucks and get his new copper
bolt kit.
The starter is held in with 3ea 10mm bolts. These are $8 ea
from the dealer so try to be nice to them. These are 'star-head' bolts that have
12 points and mate perfectly to a 12pt, 10mm socket. Nothing else will fit. I
tried. An 11mm, 6 pt will fit but slips under torque. I vowed to replace these
bolts with standard hex heads, but I later found that the star heads were
smaller and clearance wouldn't allow hex heads. The bolt between the starter and
the engine wall has very tight clearance and will give you the most trouble. You
will need a 12in extension to get to it. There is not enough swing room to use a
open/box/ratchet end on any of the bolts. Loosen the top bolt first but leave it
installed. It is the easiest to get to (you can't see it but it is easy to feel
for). It will hold the weight of the starter while you remove the difficult
lower two bolts. Then, holding the weight of the starter with one hand, back out
the top bolt. There are no gaskets involved.
Once you have the starter
on the bench, the rebuild is quick and easy. It just depends on how much time
you want to spend cleaning things. Should take about 20 min. Larry includes good
instructions with the kit. You don't need to open the starter, just the 3 screws
on the solenoid end cap. The contacts are right there. When reassembling,
remember: The bolts are copper and strip easily. Tighten firmly, but don't crank
down.
If you are adventurous, you can bench test the starter. Using
jumper cables, hook it up. Nothing will happen until you trigger the solenoid.
Using a short hunk of 16awg or larger wire, and holding the starter FIRMLY (It's
a torquey little dude), short the positive post to the trigger post. Stay away
from the gear end and try to touch the nuts on the posts. Touching the treads
might arc and mess them up. Just a touch will do. Don't hold it there. If
changing the contacts fixed the problem, you will know.
Putting the
starter back in is an exercise in frustration. That inner bolt is a bear to line
up. Put the top bolt in first and hand insert it but don't seat or tighten. This
will hold the weight but allow the starter to wobble a bit and give you some
play room to get the other 2 gremlins in. This could take the remainder of the
day.
Put the electrics back in in reverse order and you are up. Watch out
for over tightening that copper bolt. This fix is waaay cheaper than
$900.
-=Dale=-
Return
to the Tip List.
Subject: Starter not working. It just clicks!
Question: We
just returned from a trip a while back and are getting ready for another when I
tried to start Aero Cruiser. The ignition switch just clicks the starter. New starter was installed two years ago.
Just read your article on starter by-pass switch. Not sure I can find those
cables/ wires. Any advice? Give us a call.
Marvin & CeCe
Answer: If
it is clicking then the starter by-pass switch will not help. It is used to
bypass the the starter relay to pick the
solenoid on the starter. The clicking you hear is the starter relay or the
solenoid on the starter. It is either your battery being low (most common) or it
is the starter. It may just be the contacts that run the starter motor, the
motor itself or the Bendix gear. There are several tips on the starter motor and heat related
problems from the exhaust. See --
tip-run01.htm#t2002-03-08
& tip-run01.htm#t2009-07-08 --
which is for diesels but it is a good description of starter problems.
To
shoot the bug; crawl under and check the voltage at the Starter motor. If it drops quite a
bit when you try to start the engine then it is probably your battery. If you hear or see
the Solenoid click but not engage then the problem is probably in the starter
motor: either a bad motor or the contacts that cause it to spin. If you
hear the starter spinning but not engaging then it is probably the Bendix gear
that engages with the flywheel to turn the engine over.
If you can't shoot the bug yourself take it to a good mechanic who will
actually look at the starter before replacing it. In any case consider --
tip-ext05.htm#exhaust-w -- "Exhaust System
Wrap" to cool things down and protect the starter and cables.
Keep on Cruisin', Tom Heald
Return
to the Tip List.
Subject: Starter not working. It won't even click!
Question:
Can't start, no crank, nothing... Check and charged batteries, still
nothing. Well I read all the tip sheets about the starter problems,
with overheating and such. I was able to jump the ignition wire to
starter hot cable. And was able to start the coach that way. So I know
the start works now. I think the connections to the starter are a bit
corroded and my next step is to disconnect and clean up wiring and retest.
"Metro"
Answer:
Possible problems are: the starter relay (up front under the hood on the right
side) and the Transmission interlock switch in the starter circuit (found on the
transmission so you can't start it in gear).
See -- Starter Relay: Trouble Shouting Problems -- and
http://aero-cruiser.fl-ink.com/tip-run04-a01.htm
-- for more information and a typical wiring diagram. There is also a "fusible link"
in the circuit as can be seen in the wiring diagram. It looks like any other wire,
except it is designed to melt with high current. If it has melted, you won't start.
It sounds like you tried all of the other common problems found in tip -- http://aero-cruiser.fl-ink.com/tip-run01.htm#t2009-1-22 -- but review it to
make sure. Let us know what you find.
Keep on Cruisin', Tom Heald
Return
to the Tip List.
Subject:
Starter Relay: Trouble Shouting Problems
Tip:
When you try to start the rig and all you get is that sick feeling in your gut; you know you are in trouble. So what do you
do?
When you turn the key to the Ignition position you should see the lights in the dashboard display come on for a short while to test them out.
If not then you most likely have a dead battery or the Ignition circuit or switch is bad or power to it is missing.
The easiest place to test power from the Ignition switch is in the "Coach Electrical
Box". The Ignition relay should pick and provide 12V power to the ignition terminal strip. Generally you will hear the "Air Compressor" running as soon as you turn the Ignition switch to the run position.
When you turn the key to the Start position and it just clicks, then go to the
"Starter not working. It just clicks!" tip.
If nothing happens then go to the "Starter not working. It won't even
click!" Tip.
If you think it might be the "Starter Relay"; you can check it out as follows;
however, it's hard to get a jumper or meter probe on the contacts without
installing test points in the starter relay wiring.
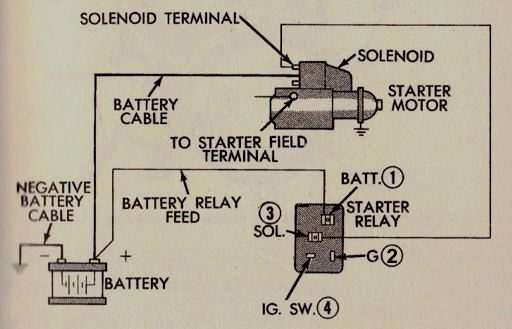
- Using a Volt meter you should see 12 Volts at terminal 1 (yellow 16 gage
wire) from the Battery
or the Ignition
switch in the Run position depending on the year.
- At terminal 4 (red 12 gage wire) you should see 12 Volts when the Ignition is turned to the start position.
- At terminal 3 (brown 14 gage wire) the Solenoid line will have 12 volts when the relay picks.
- Terminal 2 (brown & yellow 18 gage wirers) provides ground to the circuit through the "Transmission interlock switch" found in the transmission. If you don't have a good ground then the shift linkage or the interlock switch is out of
adjustment or bad. It should provide ground when the transmission is in park.
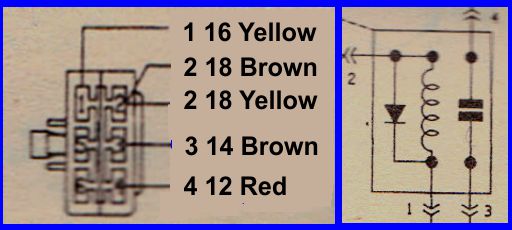
With the ignition switch in the run position test the Starter Relay by
installing a heavy duty jumper from (1) to (4). Note: this bypasses the ignition
start switch. If it cranks then the relay is ok.
If not then install another heavy duty jumper from (2) to ground. If it cranks then the relay is ok and the "Transmission interlock switch" is bad or out of adjustment. If not then the relay is bad and you need to replace it. See
"Relays: Starter, A/C & ASD" for addition information and tips.
You can bypass the relay and start your rig by using a jumper from (4) to (3) to pick the Solenoid on the
Starter. This is what the "Remote Starter Switch / Transmission Interlock Bypass
Switch" does as described in the tip.
Keep on Cruisin' -- Tom Heald
Return
to the Tip List.

|
Copyright© 1999-2016
Freelance Ink.
All Rights Reserved.
|

|