Replacing the Transmission and
Throttle Control Cables
by
Tom Heald
 After
360 miles on the road, Maren and I pulled into the Bolder Creek RV Park in Lone
Pine, CA for the Fathers day rally. It's a nice spot laying in the shadow
of the 14,494 foot high Mt. Whitney. We were hot and dry and ready to meet
all of our fellow cruisers at the rally. However, the transmission would
not shift out of drive! No amount of couching would get it moving. I
finally turned the motor off and called "Good Sam" and asked for a mechanic
to free up the transmission. After
360 miles on the road, Maren and I pulled into the Bolder Creek RV Park in Lone
Pine, CA for the Fathers day rally. It's a nice spot laying in the shadow
of the 14,494 foot high Mt. Whitney. We were hot and dry and ready to meet
all of our fellow cruisers at the rally. However, the transmission would
not shift out of drive! No amount of couching would get it moving. I
finally turned the motor off and called "Good Sam" and asked for a mechanic
to free up the transmission.
An hour or so later they show up. They were pretty sure it was in the steering
column and told me I would have to have it towed in to get the steering wheel
pulled so they could fix the linkage. I was not so sure. I had them pop the
Transmission cable at both ends. It only takes a minute. The connectors
can be popped off with a screwdriver. They are little ball and socket
joints with the ball attached to the control arm and the spring loaded socket
screwed onto the end of the cable. Sure enough the cable was frozen!
I had the mechanic shift the transmission into drive so I could drive it to the camp
site. "Only one problem," he said. "You can't start it in
drive. The interlocks will not let the ignition make contact to pick the starter
relay. You have to shift it into neutral to start it, set the emergency brake, crawl back under the rig and manually shift it into drive with the engine
running."
"No Problem," I said. "I have a remote
starter button installed in the cab that bypasses the interlocks so I can leave
it in drive."
For Information on the "Remote Starter Switch /
Transmission Interlock Bypass Switch" click on the link to go to the
tip in the Shared Knowledge Base.
Note: With the engine cowling
removed, you can use a stick to move the transmission shift lever from neutral
to drive or reverse from inside the cab. This is probably safer than
crawling under the rig with the engine running.
Another alternative is to pick up a remote starter button at any good auto
parts store. I didn't like this because they normally clip onto the
starter directly and are not meant to be driven that way.
To use either form of remote starter button, you must have the ignition in
the run position before you push the button.
Ordering the Cable
That evening in our camp site I went to out club's web site's Shared Knowledge Base and looked up the
company that makes our Control Cables.
(just click on the link go to the tip for part numbers and contact information)
I sent an e-mail to the sales department, told them I was stranded and asked how
soon they could have a replacement transition cable overnighted to me at the RV
park. The next morning I received a reply.
They were closed on the weekends, but they could build one for me on Monday and
have it sent overnight to the RV park. That meant that we would probably
get it on Tuesday, call "Good Sam" to have it installed and then leave
Wednesday for home if everything went optimally, which it seldom does.  Maren and I talked it over and decided we didn't want to
use the motor home to drive around without being able to shift or backup without
crawling under the rig and placing the transmission into gear manually. Instead,
we decided to leave Sunday and drive home.
The Trip Home
We left around eight in the morning and took off to get some gas in Lone
Pine. That's when I found out the mechanic left the transmission in second
and not in drive. I got out, slithered under the drivers side and shifted
into drive, one click to the front I hoped. It was, so we filled up and
header south. The plan was to go up route 58 over the "Tahachapi" pass and
on to Bakersfield. Whenever I approached a steep hill I would speed up and
high-ball it as far as I could in drive. My plan was to keep it in floored
until me speed dropped to 45, then I would pull over and slow down or even stop
if I had to. I knew that when I started again, the transmission
would start in first and then shift to second as I climbed the hill.
Presumable it would stay in second as long as I did not try to go too fast. I
never had to find out. I climbed those hills without any problems.
Down hill was no problem as long as I slowed to 45 at the top of the hill and let it
coast. I only gave it gas when it dropped below 45, and only had to used
the brakes a few times when it reached 50 or so.
We stopped at CoctCo in Bakersfield for a lunch brake and filled up the gas
tank. The next challenge was "Pacheco" pass on Route 152 heading
for home in Gilroy. It was a bit rougher. On the last hill I almost had to stop to get
into a lower gear, but I had an idea. I took my foot of the gas for a
second, then
slammed the gas pedal to the floor causing the transmission to shift into
passing gear. We flew up and over the hill and cruised on into
Gilroy.
Installing the Cables
Monday morning I called up George Kennison and asked him if I should order a
Throttle cable also. He told me they both go out and it would be a good idea
to have both. They normally go out at about 66K miles, but mine gave
up the ghost at 55K miles. I called Control Cables
and ordered a replacement Transmission cable ($59.17)
and Fuel injection Throttle Cable ($55.20) plus $9.44 tax and $11.00 shipping
(2008 prices). The cables arrived on Wednesday. Thursday morning, bright
and early, I drove the Cruiser up onto blocks and started installing the
cable. I removed the front hood and grill so I could reached in and unbolt the cable.
First I removed the cable to the Shift Position Indicator to give me more
working room. At each end of the transmission cables there are little ball and socket joints with
the ball attached to the control arm and the spring loaded socket screwed onto
the end of each cable. They can be popped off with a screwdriver.
Next came the shift cable. When you loosen it there is a rubber dust cover over
the end of the cable that is too big for the nut to fit over. On the new
cable you can slide it down without a problem. However on the old cable I
had to cut it off to slide the nut down. At the end cable there is little
ball-socket joint that screws onto the end of the cable. I had to remove the
ball-socket from the old cable so I
could move it to the new cable later.
I crawl under the rig on my back following the cable back, cutting off
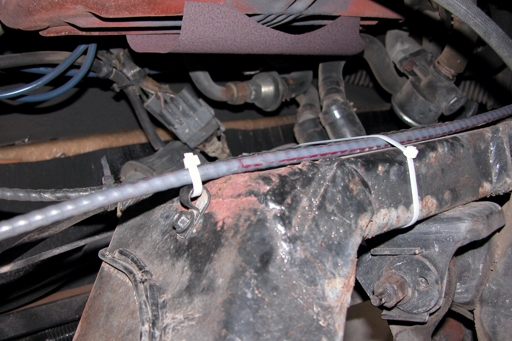
cable ties along the way. There was one spot that had a clamp installed so
I remove it. It was in a bad spot -- a poor choice of engineering -- as it
put a bend in the cable and raised it up off the frame towards the exhaust manifold
by several inches. It was burned and the outer cover melted! After
removing the cable I used a red marker on the new cable corresponding to where the damage had
been done. When I installed the new cable I used the same clamp; however,
I turned it 90 degrees so it pointed up and used it as an anchor point for a cable tie. Then for good measure, I used 3 cable
ties end to end to hold the cable tight to the frame as can be seen in the
picture below. Note the red mark on the cable, that is where the old cable
was cooked!
I wasn't happy with the location, near the exhaust manifold so I decided to order some insulation for the
cables before I installed the throttle cable. After a 505 mile trip over a
long weekend we returned home without incident. There was a package from
Jegs waiting by the door.
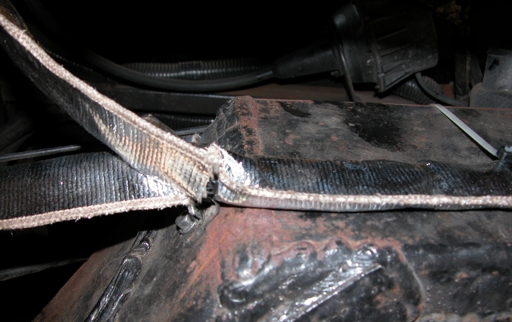
The picture above shows both the transmission and throttle cables attached
to the same anchor point (as seen in the first picture) with Thermo-Sleeves
installed. Thermo-Sleeve is advertised to reflect 90% of radiant heat
up to 2000 degrees.
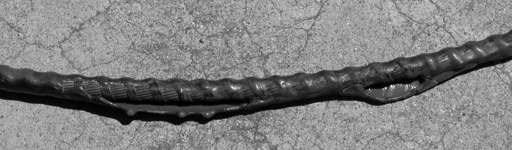
The picture above shows the damage to the the old transmission cable.
Later I cut the cable housing on either side of the damaged area to see if there
was any other damage. The cable on either side of the damaged area was
free and easy to slide.
Installing the Transmission Cable
Installation was easy. I bolted the cable to the mounting bracket by the
end of the shift control arm using the same
relative position as found on the original cable. Then I attached the
ball-socket to the end of the cable, tightened the locking nut and slid
the dust covers back into place. Next I snapped the ball-socket joint onto the ball attached to the control arm
by hand. I then reattached the cable to the Shift Position Indicator which
I had removed earlier. Under the coach I installed a three foot
Thermo-Sleeve over the cable along the frame up to the tie-down as seen it the
first and second pictures. Then I slipped two nine inch sections
of Thermo-Sleeve over the cable. The first section can be seen in the
picture running to the left of the the tie-down. The second I ran to the
end of the cable to protect it from the heat from the exhaust pipes.
At the transmission end I slid the cable through the mounting bracket and finger
tightened the nuts, then installed the ball-socket on the end if the cable and slid
the dust covers back into place. Next I lined up the ball-socket joint over the ball on the
control arm and tightened the locking nuts that secure the cable to the frame
making sure the ball and socket stayed in alignment. Then I snapped the ball-socket
over the ball.
Replacing the Throttle Cable
In a Fuel Injection Engine:
First I pulled the air cleaner housing to expose the throttle. Then I
pulled the throttle forward with one hand and removed the cable with my other
hand. Just rotate the cable back until it will slide out of the slot at the
end. Do this first so you can pull the cable forward at the gas pedal.
Next I went to the gas pedal and pulled the cable forward so I could measure
the distance from pedal to the clamp. Next I removed the set screw clamp
from the cable and pulled the cable out of the sleeve so I could removed the
cable from it's mounting bracket and inspected it for damage. It showed
heat damage in two places, at the top by the exhaust pipes and below where it
turned by the exhaust manifold.
Before installing the new cable I removed the cable from its sleeve and attached the gas pedal end
of the sleeve to
the wall. I then ran the throttle cable along the same path as the
transmission cable and through the three foot section of Thermo-Sleeve.
Next I slipped a 18 inch section of Thermo-Sleeve over the end of the
cable. In the picture this is the section pointing up. Then I installed a
cable-tie to secure both cables to the tie-down and pulled the Thermo-Sleeve
snug against the tie-down.
Next I installed the cable's sleeve at the throttle end and reinserted the cable.
Back at the gas pedal I fed the cable through the pedal arm and finger-tightened
the set screw clamp the same distance as the old cable. Next I slipped the
throttle end of the cable in place and went back to the pedal end. It
seemed a little loose so I loosened the set screw clamp an slid it up a
bit. It's very hard to tighten the set screw clamp using a screwdriver without any slack so I
removed the cable at the throttle end and then tightened the set screw
clamp. Then, for the last time, I reconnected the cable at the throttle
end. The cable by the pedal was a bit long, so I wrapped tape around it to
keep it from fraying, and used an end-nipper to cut it off. What's an
end-nipper?
 Just
Google
"end-nipper" to see a list of them. Just
Google
"end-nipper" to see a list of them.

Next I went back and replaced all of the cable ties
that I had cut off earlier. It took me about five hours total. It
was faster doing it than writing this article.

Thermo-Sleeve by Thermo Tec.
Web site -- http://thermotec.com/
or http://thermotec.com/thermo-sleeve.html
-- to go to the item. I used 2 sections of 3 foot by 1 inch Thermo-Sleeve which
I purchased from -- http://www.jegs.com/
or http://www.jegs.com/i/Thermo%20Tec/893/14010/10002/-1
-- to go to the product. It was $15.99 from Jegs and a few bucks more from
Thermo Tec. Total for both Thermo-Sleeves plus $9.99 for 2ed day FedEx was $44.97 from
Jegs. There is probably a cheaper heat-shield out there some place, so if
you find one, let me know and I will append it to this article.
Tom Heald
 Return
to the Tip List. Return
to the Tip List.
-- Disclaimer --Information
on this Web Site is provided by members of the "Aero Cruiser Classics" Motor home Club. All
information on this site is contributed by the club members or outside sources and is believed to be reliable; however,
there is no warranty or guarantee that said information or advice is correct or free of defect. It is
offered on a best effort basis and is to be used at your own risk.

|
Copyright© 1999-2016
Freelance Ink.
All Rights Reserved.
|

|
|