Aero Cruiser Brakes and
Brake Upgrade
By
George Kinnison
 At the Vegas Rally, (1994) a number of new members expressed concern
about their brakes. Since these new
members had not attended a "Tech Session" they were
not aware of the brake upgrade I have recommended
for sometime. As we continue to receive new members, this will be
a common subject, so I decided to write a paper for distribution. At the Vegas Rally, (1994) a number of new members expressed concern
about their brakes. Since these new
members had not attended a "Tech Session" they were
not aware of the brake upgrade I have recommended
for sometime. As we continue to receive new members, this will be
a common subject, so I decided to write a paper for distribution.
When Gardner Pacific manufactured the Aero Cruiser they had a
subcontractor provide the fames. From
1988 to mid 1990 the frames were made by Vironex, a California
company. From mid 1990 trough 1992
the frames were made by LGS, an Indiana company. Both companies
obtained the front components from
Chrysler (Chrysler warranty did not go aft of the transmission).
Chrysler identifies these parts as a Dodge
350 one ton (4000 pound axle with 12" disc rotors and
5/8" wheel stud bolts in a 8 bolt pattern).
The differential running gear was provided by Spicer and
manufactured by Dana. Identified as a Spicer
H-60 single wheel application (they did not provide the rear brakes). The Spicer H-60 may also be found
on Ford and GM.
The rear brakes were assembled by the frame manufacturers. They
used a standard Budd brake drum
(3-1/8" X 12") but placed only a 2-1/2" brake
shoe positioned by a 7/8" hydraulic brake cylinder. The hub
was fitted with a 8 bolt pattern using only 1/2" wheel
studs (1/2 ton application).
The result was a hybrid system where the front brakes and back
brakes were mismatched. The
proportioning valve, which was furnished by Chrysler for the
front system, would shift the braking load
from the rear brakes to the front too quickly and the back brakes
did not share the proper work load. This
created excessive use of the front brakes and heated them
excessively which eventually warped the rotors.
Another factor was that rear brake automatic adjusting device
does not work very well due to infrequent
backing up and that allows excessive brake shoe clearance. This
aggravates the situation with little or
minimum rear braking at best. The strange thing about this
hybrid system is that all parts are standard
Chrysler parts. It could easily have been a standard system.
A major improvement can be made to your Aero Cruiser braking
system by upgrading to a standard system.
Have the rear brakes match the front brakes. Since the rear
drums will be removed you can also match the
lug bolts and upgrade the 1/2" studs to 5/8" studs
(your lug wrench would then be the same size).
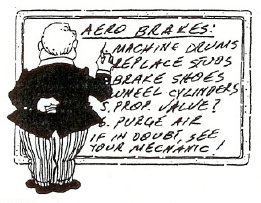 This upgrade consists of the following:
- Remove rear drums and machine out the old 2-1/2" shoe
wear pattern.
- Press out old 1/2" wheel studs, drill out for 5/8"
stud and press new studs in.
Part numbers for 5/8" studs: Dorman -610-20 or NAPA (Balkamp)
641-1297.
Note 1: Don't forget the Lug Nuts. See Lug
Nut Tip for Chrome 5/8-18 RH thread, 7/8, 60 degree nuts for aluminum
wheels.
Note 2: My mechanic says replacing the studs is optional and not really needed.
In fact the 2006 and later Dodge Ram went back to 1/2" nuts and studs except for the
Mega Cab.
Replace 2-1/2" brake shoes with 3" X 12" brake
shoes.
Part numbers: Raybestos 314 (semi-metalic) or NAPA 358R.
Replace 7/8" wheel cylinders with 1 1/8 cylinders.
Part numbers: Raybestos or NAPA 36057 & 36058 (left &
right)
Replace proportioning valve with 1 ton application (if need be)
Part number: Chrysler 4293184
Note 3: I checked with George and he told me that when he upgraded his
brakes he did not replace the proportioning valve at first. After making
several hard stops while test driving, he checked the brakes and found that
the front brakes were much hotter than the rear brakes. He changed the proportioning valve
and test drove it again. This time he was satisfied with the braking front and rear. He told me that our Aero Cruisers have a 3/4 ton
proportioning valve installed in them and it should be replaced with a
1 ton proportioning valve. "They look the same," George said,
"but they aren't".
I checked with the local Chrysler dealer and had them look up the part
number for the proportioning valve used in the 1989 3/4 ton and 1 ton
pickups. They both have the same part number: Chrysler 4293184 which
George says is
the correct one to use. To satisfy my curiosity, we also checked the 1/2
ton pickup and found it uses a different one, the same one used in Dodge
cars.
So do you change it or not? It's list price is $195 but you can normally
get it for $140 to $160 depending on how hard you push the dealer. The
other consideration is the labor costs to change it out and purge the brake
lines again after the initial brake job is done?
My mechanic said it wouldn't make much difference. If we don't change
the proportioning valve, only the rear brakes are involved. If we change
it after, then both the front and rear brakes have to be purged, but that is a
half hour at the most. The cost of swapping the proportioning valve is
the same in any case.
What is a proportioning valve used for? It has 3 basic functions:
- In our rigs it splits the hydraulic pressure 60% to the front
"Disk
brakes" and 40% to the
rear "Drum brakes". Note: The master cylinder has a
part in this also.
- It monitors the hydraulic pressure between the front and rear brake circuits
looking for an imbalance. If an imbalance occurs, the brake light
comes on. This could be because of worn shoes or a loss of hydraulic fluid,
or any number of other reasons.
- It monitors the brake pressure to the rear wheels and relieves
(lowers) the pressure if it gets too high to keep the rear wheels from
locking in a panic stop situation.
For a more detailed explanation do a search for "proportioning valve" on
the Internet. I found several good detailed explanations.
Notes added by Tom Heald
6/09/09
Purge out old hydraulic fluid and fill with new fluid.
These changes will make your Aero Cruiser's brakes the same as the standard Chrysler/Dodge 350 one
ton pickup's braking system. You
will notice considerable reduction in your brake pedal pressure
as well as immediate deceleration as you apply the brakes.
George
Update: Here is a breakdown of the cost for
upgrading the brakes on my 1990 23 foot Rear Bed model in 2009. When
replacing the right rear wheel cylinder with the large 1 1/8" cylinder the mechanic
found the brake line ended up too close to the air bag so he relocated that
brake line. He also remanded that I replace the springs and clips used in
the rear brakes and the rear wheel grease seals for the rear axel, which I
did. I did not replace the proportioning valve or the rear 1/2"
wheel studs which would have added considerably to the total cost.
The List Price in the table below is what you would normally be charged by the mechanic,
the Net Price is the cost if you provide the parts yourself and the mechanic
installs them for you. I found the best overall price at Napa Auto Parts
after shopping around, but that changes all the time. They also charged a
"Core Charge" for the Brake Shoes which I did not include because it
was refunded.
The rear brake shoes were not worn much at all and the wheel drums did not
have to be turned. This is surprising as the coach has 50,000 miles on it!
 I guess the front brakes were doing all the work.
 I hope the new brakes take on their fair share (40%) of the load.
They should, with the new 1 1/8 inch Wheel Cylinders and larger 3" Brake Shoes.
I hope the new brakes take on their fair share (40%) of the load.
They should, with the new 1 1/8 inch Wheel Cylinders and larger 3" Brake Shoes.
| Part Number |
Description |
List Price |
Net Price |
| UP-358R |
12" by 3" Brake Shoes (L&R) |
92.93 |
57.32 |
| 36057 |
1 1/8 Wheel Cylinder (R) |
19.27 |
10.50 |
| 36058 |
1 1/8 Wheel Cylinder (L) |
19.27 |
10.50 |
| 2243 |
Maxi Pack (springs & clips, R&L) |
24.06 |
13.29 |
| 475458 |
Rear Wheel Seals for a Dana 60 rear axel (2) |
69.70 |
53.98 |
| DOT-3 |
Brake Fluid (1 Pint) |
|
4.15 |
| 202X3 |
3/16 Flare Union |
|
2.42 |
| 813-1203 |
Brake Line |
|
3.98 |
| Labor |
Remove and replace rear brake shoes, springs and wheel cylinders. Fabricate
new brake line for right rear cylinder, bleed and adjust rear brakes, road
test. |
|
539.00 |
| Tax |
California 9.5% Sales Tax |
|
66.04 |
| Total |
|
|
$761.18 |
Keep on Cruisin', Tom Heald
Do It Yourself:
Here is a step by step for you to upgrade the brakes yourself:
I just did entire rear brake upgrade today! It took 3 ½ hours per
side. This is what I did:
1) Remove the wheel
2) Remove the 8 nuts and pull the hub out.
3) Find the tab thats keeping the outer hub nut locked and using a
screwdriver and hammer, bend it back out of the way
4) Remove the outer hub nut this is big about 2 ½ diameter. It
didnt require a socket or anything special on the left side I used a pair
of pump pliers, end-on, coz you can only get the tips of the pliers on the nut
and with a little force it turned! On the right side it was tighter, so I
used a steel drift and my hammer and gave it a few persuading blows in the
correct direction at one of the points of the nut and it turned switched to
the pump pliers and it was off easily.
5) Pull out the locking tab washer, revealing the inner nut same size as the
outer one mine was easy t turn on both my both wheels it just took a
little twist with the pump pliers and the inner nut turned.
6) Pull off the brake drum as you do so expect the wheel bearing to plop out
in a big pool of semi-liquid grease, coz it will, so have a pad of newspaper
down on the ground, between you and the axle and the bearing will drop onto
that.
- By the way lots of grease is going to appear from this point on. You need
to have a sheet of cardboard or several pages of newspaper laiddown and youre
going to place the brake drum face-up on that, so that you can see inside the
drum. Grease lots of it will ooze out of the hub onto the newspaper.
7) Now clean all the grease of the stub axle and youll be looking at nice,
shiny steel.
8) TAKE A PHOTOGRAPH NOW BEFORE DISASSEMBLING ANYTHING! using your smart
phone or digital camera. That will be VERY handy later, when you're trying to
remember what it all looked like and where everything goes.
9) Now undo the four nuts holding the brake assembly onto the axle
dead-simple, coz you dont need to be trying to hold the bolts from behind so
they don't turn because Chrysler sis a neat thing they gave the bolts a
single flat side back there, so they don't turn while youre undoing the 4
nuts.
10) Now you can pull the entire brake backplate toward you a couple of inches at
the top its still fully assembled, with brake shoes, springs and all that
stuff and if you look over the top of it at the brake pipe youll see the
brake bleed nipple (3/8 wrench takes that off). Once you have that off you
can get at the brake pipe nut easily and use either a wrench or carefully start
it turning with vise grips, finish off with your 3/8 wrench.
11) Now the entire, fully-assembled brake backplate is almost off you just
need to unclip the handbrake (foot brake) cable takes about a inute and
youll have the entire thing in your hands
- Total time taken to this point = only 30 minutes, including removing the hub
cap and the wheel.
12) Take the brake assembly over to a convenient table or bench and TAKE ANOTHER
PHOTOGRAPH with your smart phone or digital camera!!
13) Now you can do your brake swap without straining your back having to stoop
down it's so much simpler and easier. Once youve removed the springs
about 6 of those, and the shoes, you can flip it over and remove the two ½
bolts and with a little tap, the old slave cylinder pops off.
14) Install your new cylinder and reassemble the whole thing, hang it on the
axle and bleed the brake cylinder right there dead-easy! Do that before you
bolt it onto the axle, so you can easily reach the bleed nipple.
15) Ok now bolt it onto the axle with the 4 bolts, hook up the handbrake
cable again.
- By the way oddly youre going to find a lot more slack in the handbrake
cable ! These new shoes are set somehow differently, so once youre all done
upgrading both sides rear brakes then youll need to take up a whole lot of
slack in the handbrake cable by adjusting it at the front.
16) Now for the brake drum - take a good stiff wire brush and seriously scrub at
the inside of the brake drum. (Make sure you ware a
dust mask to keep the asbestos dust out of your lungs.) the
inner part where the old, narrow brake shoes didnt track. On mine I was
REALLY lucky, coz after wire brushing it and then using 300 grit sandpaper on
it, it was nice and smooth and I crossed over that line, a few times with my
finger nail from the shiny, worn surface to the newly-sanded surface and
back again. There was NO difference in height. In other words my rear brakes
hadnt worn ANY material off the drum. No wonder the rear brakes on mine
hadn't been doing any work! If you do find a difference in height then
youll need to take the drum over to a brake shop and theyll turn it on a
lathe for you and cut the unused ¾ to equal the rest of it - same diameter,
in other words.
IMPORTANT NOTE: between the brake shoe ends, at the bottom is the automatic
brake adjuster. It is a gadget that is a bolt inside a threaded sleeve. Make
sure that when the cable that operates it pulls it, that it does indeed increase
the distance between the shoes. Guess what I found on my rig?!!! the
left one did indeed tighten the brake adjuster by one click every time I pulled
on the cable the right one had been installed backwards and every time you
pulled the cable it LOOSENED the brake!!!!!! The shoes on the right side had
virtually NO WEAR as a result!!.
You know how were supposed to back up and then jam on the brakes, repeat a
few times and thats supposed to adjust up our rear brakes? Well that causes a
pull on this steel cable, which makes a little ratchet assembly unscrew the bolt
from its sleeve a bit and that moves the brake shoes apart.
Not in my case it was doing it the opposite way on my right rear wheel.
Anyway, I hope the above helps you its not hard to do it and Im so
glad I didnt entrust a shop to do it I doubt they would have spotted the
backwards-working brake adjuster and I would have ended up with useless brakes
again after all that work.
Heres a link for a regular Dana 60 brake overhaul it describes everything
but he doesn't remove the backplate, which means his version is much harder on
your back and you knees. Also of course hes not upgrading to wider shoes but
otherwise it's the same.
http://www.boyandjeep.com/tech-articles/ford-dana-60-rear-drums
All the best!
Jeremy MacDonald
 Return to the Tip List.
-- Disclaimer --Information
on this Web Site is provided by members of the "Aero Cruiser Classics" Motor home Club. All
information on this site is contributed by the club members or outside sources and is believed to be reliable; however,
there is no warranty or guarantee that said information or advice is correct or free of defect. It is
offered on a best effort basis and is to be used at your own risk.

|
Copyright© 1999-2016
Freelance Ink.
All Rights Reserved.
|

|
|