|
All other components connected to the Truck Battery like
the Air Pump and Wiring Panel or under the Front Hood and behind the Grill.
Click on the
 to
go to its Tip: to
go to its Tip: |
|
|
Engine Cooling - Air flow to the Radiator
|
|
|
Ram-Air Cooling
|
|
|
Coach Electrical Box
(off page link)
|
|
|
Relays: Starter, A/C & ASD (off page link)
|
|
|
Starter Relay: Trouble Shouting Problems (off page link)
|
|
|
Bad Connection in the Coach Electrical Box
|
|
|
The White Vacuum line inside the Front Compartment
|
|
|
Battery Isolator Sticking
|
|
|
Air Bag Pump / Compressor
|
|
|
Tire-Valve hooked up to the Air Bag Compressor. (off Page Link)
|
-- Disclaimer --Information
on this Web Site is provided by members of the "Aero Cruiser Classics" Motor home Club. All
information on this site is contributed by the club members or outside sources and is believed to be reliable; however,
there is no warranty or guarantee that said information or advice is correct or free of defect. It is
offered on a best effort basis and is to be used at your own risk.
Tips:
Subject:
Engine Cooling - Air flow to the Radiator
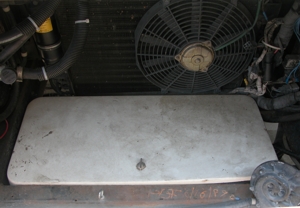 Tip:
Owners who have the "Coach Electrical
Box" (most 1990/91 models) installed in the Front Compartment
under the Hood do not have problems with cooling because the box does not allow the air to be
diverted under the coach, missing the radiator! Tip:
Owners who have the "Coach Electrical
Box" (most 1990/91 models) installed in the Front Compartment
under the Hood do not have problems with cooling because the box does not allow the air to be
diverted under the coach, missing the radiator!  Other coaches that have the "Coach Electrical
Box" installed inside the coach under the Refrigerator or under the interior
Front Step may have a problem
because there is a large open area in front of the radiator that allows the air to be diverted
under the coach, missing the radiator.
Other coaches that have the "Coach Electrical
Box" installed inside the coach under the Refrigerator or under the interior
Front Step may have a problem
because there is a large open area in front of the radiator that allows the air to be diverted
under the coach, missing the radiator. 
Some owners have added extra vents in the front of the coach to improve cooling but the
problem
is not the amount air getting into the front, it is the amount of air
going through the radiator.
 What
you need to do is to put a floor on the frame in front of the radiator. It is a simple, ease fix that
should solve the problem assuming everything else in the cooling system is ok. What
you need to do is to put a floor on the frame in front of the radiator. It is a simple, ease fix that
should solve the problem assuming everything else in the cooling system is ok.
 See Frank DeRemer's tip
on "Ram-Air
Cooling" for more information.
See Frank DeRemer's tip
on "Ram-Air
Cooling" for more information.
Keep on Cruisin', Tom Heald
Return
to the Tip List.
Subject:
Ram-Air Cooling
Tip:
I tried some experiments with air
coming in the grill, as have others in the club. My theory was that the low
pressure under the coach was pulling much of the air down before it could go
through the radiator. So I tried adding a floor and sides in the area in front
of the radiator (not so relevant to the 1992 models, where the radiator is only
inches behind the grill). I even added a small scoop below the front bumper to
provide air going over the added floor and into the radiator. Surprisingly,
although I noticed improved cooling with the floor and sides, I could block the
scoop and see no difference at all. Then I also added a floor behind the
radiator, a wall above most of the radiator (leaving a few square inches open on
each side for some fresh air to the top of the engine), and soft sides
(sound-absorbing, heat reflecting material) along the sides of the motor. This
guides the air coming out of the radiator, and the fresh air above it on each
side, along the exhaust manifolds and prevents the air from diving down before
cooling the manifolds.
This system seems to work well. I
put my outdoor temperature probe at various places under the motor cover and
watched the temperature as I drove. The normal temperature at the rear of the
motor, either side and in the middle at the distributor, seems to be about 100
degrees. The air coming out of the radiator is normally about 140 degrees.
When climbing a hill, the temperature at the back of the engine rises to about
140. Because of the insulation on the underside of the motor cover, the cover
stays cool to the touch even under sustained
power.
Frank DeRemer
Return to the Tip List.
Subject:
Bad Connection in the Coach Electrical Box
Tip:
For several years and on random occasions the electric
step would not function when the coach door was
opened. Then, again on random occasions, the
hydraulic jacks would not operate. Again randomly, the
docking lights did not work.
It took me a while to figure out that the common
electrical connection for the step, jacks and lights was
the upper fuse strip in the electrical box under the
interior step. This strip is only hot when the engine is
running.
The real culprit was the lug on the black cable coming
from the alternator to the start solenoid. The copper
cable inside the lug had corroded and was not making
constant contact.
The solution, replaced the lug and so far it appears that
this problem has been solved.
#215 Stahl
Return
to the Tip List.
Subject: The White Vacuum line inside the Front Compartment
Question:
There was a white either wire or vacuum line (just insulation left)
that ran up the firewall inside the front compartment on the passenger
side, that was completely destroyed. Its just hanging there split in
two and I have no idea what it was.
Answer:
The White Vacuum line is user to control the vacuum solenoid on the
bottom of the Heating and Air Conditioning Blower Assembly, that big
black box on the passenger side with heating and air conditioning hoses
connected to it. When you push the second button from the left (Max A/C)
on the Heating and Air Conditioning control on the dashboard it activates the vacuum
solenoid on the bottom of Blower Assembly. This seals of the external air and
opens the internal air vent inside the passenger compartment.
I ran a new black rubber vacuum line from vacuum solenoid and spliced it to the smaller,
thinner, more rigid white line under the dash.
Keep on Cruisin', Tom Heald
Return to the Tip List.
Subject:
Battery Isolator Sticking
Tip:
Steve suggested checking the ground if you
find your battery isolator solenoid sticking. Or, if
you are like Rick, just hit it with a stick until it
releases (not recommended).
#428 Corey
Update: I have seen this
condition where my batteries were dead because they were no charging, however, I don't understand either comment. The Battery Isolator is
a solid-state device two diodes in a sealed unit. Its job is to allow current to flow from the alternator to each battery while
stopping any
flow between the House Battery and the Truck Battery circuits. There
is nothing to stick and there is no ground except at the batteries.
When I had this problem, I
checked the voltage and had 14 volts coming into the center post; however, the
battery sides showed low voltages -- 10 or so volts indicating a dead battery.
I charged the batteries and they held there charge. I drove it around and
then checked again. Everything worked ok and did no give me any more
problems. My conclusion. There must have a been a bad connection
inside the
Battery Isolator which is a sealed unit. See -- Battery Isolator, Troubleshooting and
Replacement -- for more information.
Keep on Cruisin', Tom Heald
Return
to the Tip List.
Subject: Air Bag Pump / Compressor
Tip 1:
29 coaches have Granning suspension for the tag axle
and they used Thomas compressor part No.
315CDC45/12-276 which can be purchased through a
Firestone dealer.
Rick has a yet to find the air leak which he will tell us
about in the future.
#101 Krafft
Update:
My poor old air bag pump was pooped out.
It blows, and blows but cant get those air bags
up! I feel like that sometimes myself! Anyway, I
digress, I checked with Granning Air Systems
and was told where I could get a new one. The
cost, however, was over $300.00. Being the
frugal person I am, I started looking for a more
economical solution. Pep Boys Auto Supply
had a heavy duty, 12-volt air compressor by
Master Flo, model number MF1050. After
removing the 3 bolts holding the old air
compressor, I mounted the new one. It matched
the existing air tube fittings. Now the new one
will totally inflate the bags and fill the tank in
less than 5 minutes. I also reduced the cut-out
pressure on the pressure switch to shut off the
compressor at 95 psi instead of 110 psi
Granning factory setting. Im sooooo proud of
myself!
#101 Krafft Tip 2: On the 23 coaches,
the Firestone Ride Rite Helper Springs air compressor part number is 21-9004.
Note: Once the pressure reaches 100 psi, the pressure switch will turn the
compressor off. It will not restart until the pressure drops to 70
psi. The compressor requires a 15 amp fuse. Firestone Industrial Products
317/773-0650
J. D. 88-1989-23 foot
Return
to the Tip List.

|
Copyright© 1999-2016
Freelance Ink.
All Rights Reserved.
|

|
|