|
Hubcaps, Wheels, Tires, Brakes, Air Bags, Chassis,
Shocks plus Front and Rear Suspension Tips:
Click on the
 to
go to its Tip: to
go to its Tip: |
|
|
Front and Rear Suspension
|
|
|
Aero Cruiser Chassis and Front and Rear ends
|
|
|
Helper Spring -- Transverse Leaf Spring
|
|
|
Front-end Alignment Specifications
|
|
|
Front and Rear Suspension Improvements
|
|
|
Upper Control Arm, Ball Joint and other Steering linkage
|
|
|
Lower Control Arm Design Problem and how to Fix it
|
|
|
Front Tire Misaligned (Suspension Problems)
|
|
|
Has anybody put Dual Wheels on a 23 footer?
|
|
|
Coil Spring Stabilizer
|
|
|
Coil Springs for the Front Suspension
|
|
|
Shock Absorbers, Front and Rear
|
|
|
Air Bag Pressure
|
|
|
Air Bag Leaks
|
|
|
Replacement Air Bags
|
|
|
Tire Tips
|
|
|
Check your Tires for Cracking
|
|
|
Old Tires can KILL you!
|
|
|
Nitrogen has several major advantages over Air in Tires
|
|
|
New Tires
|
|
|
What is the Tire Air-Valve for under Front Hood?
Flat Tire? Use the Air Bag Compressor to fill it up.
|
|
|
Front Wheel Brake Rotor & Hub assembly
|
|
|
Aero Cruiser Brakes and Brake Upgrade (Article)
|
|
|
Brake Valves - Diagnosing Hydraulic Brake Problems (Article)
|
|
|
Brake Calipers & Pistons
|
|
|
Brake Lines
|
|
|
Brake Pads may fail before they are worn out
|
|
|
Brake Fluid Explained (Article)
|
|
|
Brake Fluid
|
|
|
Brake Fluid Level
|
|
|
Brake Fluid Reservoir
|
|
|
Hot Brakes
|
|
|
Parking Brake
|
|
|
Rear Brake Adjustment
|
|
|
Tow Vehicle Braking System
|
|
|
Lug Nuts
|
|
|
Wheels Lug Studs
|
|
|
Alcoa Aluminum Wheel, Lug Nuts & Studs
|
|
|
Alcola Aluminum Wheel Recall
|
|
|
Alcola Aluminum Wheel Hole size
|
|
|
Aero Cruiser Lug Nut Torque Settings from Chrysler
|
|
|
Torque Settings for Lug Nuts is Critical on Aluminum wheels
|
|
|
How good are Alcola Aluminum Wheels?
|
|
|
Hubcaps
|
|
|
Hubcap -- Check Air-Pressure without removing Hubcaps
|
-- Disclaimer --Information
on this Web Site is provided by members of the "Aero Cruiser Classics" Motor home Club. All
information on this site is contributed by the club members or outside sources and is believed to be reliable; however,
there is no warranty or guarantee that said information or advice is correct or free of defect. It is
offered on a best effort basis and is to be used at your own risk.
Tips:
Subject: Aero Cruiser Front and Rear Suspension
Tip 1:
Everything in the front end is from a D350 Dodge full size pickup
that was extended 8 inches and has a Helper Spring mounted
below the axle. All of the electronics and the components in
the dashboard are also from Dodge full size pickup. The rear
end, axle is a Dana 60 by Spicer. Read through in information on our
web site --
http://aero-cruiser.fl-ink.com/ac-29ft.htm -- for more details.
Keep on Cruisin' -- Tom Heald
Tip 2: A letter from Aero Cruiser, May16,
1990 states: The front
suspension is all Chrysler except for the transverse leaf spring which is a
Hellwig product, The shocks
are Monroe. The rear suspension uses Chevy
P-30 leaf springs, the sway bar is Hellwig and the air bags are
Firestone.
Alignment specs are Toe 1/2 degree, Camber 1/2 degree passenger, 0 degree drivers,
Caster 3 1/2 + both. The springs on my Aero cruiser are under the axel.
J. D.
Return to the Tip List.
Subject:
Aero Cruiser Chassis and Front and Rear ends
Question:
Where is the chassis number, I need it to get the right parts for the
suspension.
Answer: The Aero Cruiser a custom chassis so a chassis number will not help you find parts. The
1988-89 models had a "Vironex" chassis and some had steering or front suspension
problems, so have the front end checked before you buy. The 1990-92 models had a
better "LGS" chassis.
See tip "Aero Cruiser Front and Rear Suspension"
also.
Keep on Cruisin' -- Tom Heald
Return to the Tip List.
Subject:
Helper Spring -- Transverse Leaf Spring
Tip:
The Helper Spring or more properly the Transverse Leaf Spring is mounted
under the front axel to help carry the load. It is not part of the Dodge D350 front
end. It is from
Hellwig, however they don't make
it any longer. If anybody finds a replacement, please let me know so
I can post it here. If you need one the best alternative is to replace
the front coil springs with a pair of Heavy-duty springs. I ASSUME that when the
Aero Cruiser was designed they felt that they needed heaver springs on the front
end, They could have replaced the coil springs in the D350 Dodge full size pickup
front end they purchased from Chrysler, but it was probably cheaper to add the Transverse Leaf Spring
from Hellwig. So I ASSUME that's why they they did it. To pick the right
size coil spring, take your rid to a public scale and weigh the front end with
only the front wheels on the scale. Then you can check for "coil springs"
of the proper size to support the weight.
Keep on Cruisin, Tom Heald
 Return
to the Tip List.
Return
to the Tip List.
Subject:
Coil Springs for the Front Suspension
Question:
The problem, I have uncovered is in the front end. Turns out I need front springs and shocks. The
shocks are easy. The front coil springs are not. We had DODGE deliver front springs for
their 1988 1 ton pick
ups, 1 ton vans, etc. We had a total of 4 different coil spring sets delivered to
the garage so that we could match them up and be sure we had the correct
springs. Every spring from DODGE had 9 coils. The front springs in the AC have
only 8 coils. So, the front coil springs are NOT stock from a 1988 1 ton pick up
and my search for coil springs continues. Toni
Answer:
I called "Betts Springs in San Leandro, CA" and talked to Mark. We do a lot of
work with them. They are one of the largest Spring suppliers in the
West.
Check with your repair shop and see if his B7172SD
8 coil, 14
inches high, .82 diameter wire coil springs should work.
Your cost would
be $110.73 for the set.
510-633-4500
Rod
Return
to the Tip List.
Subject:
Front-end Alignment Specifications
Question:
Does anyone have the alignment specs fro the LGS chassis (1991) I am replacing
all my bushings so will need to re-setup the alignment. Also,
are there better polyurethane style bushings (or a complete kit) for this
suspension?
-- Rick
Tip 1: Assuming my 92 has the same LGS
chassis as a 91, I shortened the radius bars to gain more castor to improve
straight line stability and to heck with tire wear, I have 6.9 degrees left
front and 6.3 right Front of castor. The Dodge B300 specs called for 1.3 to 3.8.
.1 degrees Camber both sides, -.6 to .6 is the Dodge specification
My Tow is is .6 both sides and specs for the Dodge is -.13 to .13
Cross camber is now 0.0 and cross castor is .6
These settings are what a local large chassis Truck expert recommended. Meant to
accommodate Indiana highways that crown quite a bit, and I still have a slight
right pull.
He also advised me that Poly Bushings in the upper and lower a-arms have a
tendency to squeak on heavy vehicles, and advised against them. I do have Poly
bushings on the front and rear sway bars and all of the end links...
--
Andy
Note: See "Aero Cruiser Front and Rear Suspension"
Tip 2 also.
Tip 2: I can confirm that alignment
should start with maximizing castor, per a
so-called expert. On my prior 1990 23-footer, we were able to get about 4 ½
degrees of castor, then set the rest. It drove pretty well.
-- Frank
Tip 3: Read the tip Front and Rear Suspension Improvements
for more info on the suspension and what you can do to improve castor.
Keep on Cruisin', Tom Heald
Return
to the Tip List.
Subject: Front and Rear Suspension Improvements
Tip: These improvements have
been made on a trio of Gardner's best, at George
Digilio's house in Phoenix in early January 2008. George Kinnison (long wheelbase '92)
and myself (short wheelbase '92) paid a visit to Mssr. D's,
where he installed his fine new heavy-duty rear (truck) airbag suspension on
George K's rig (he had done mine a few weeks earlier).
|
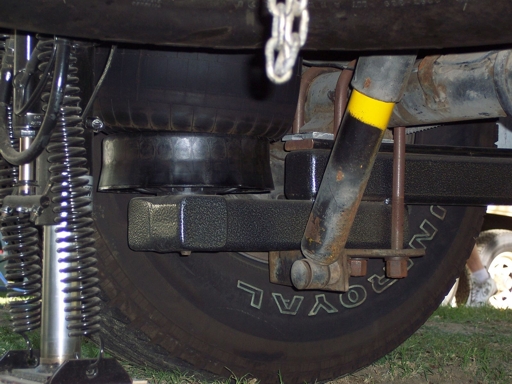
The following picture shows the new airbag suspension which
replaces the original Aero Cruiser rear suspension. Thank to Frank DeRemer for the picture. |
|
Then we both had some EXTENSIVE front suspension work done at PAS in Phoenix - Chris Cross at the
helm of that fine establishment! I had a new Super Steer Bell Crank
installed, along with a new center link, upper/lower ball joints, upper/lower
A-arm bushings, and new set of 3451 lb. Severe Duty front coils. Thanks
to George D, we cut 1/2" out of the front radius rods, which allowed
~4 degrees of castor to be dialed in; the "hot tip" for stable,
on-center steering. From there, it was a fine drive back to SoCal, with
70-80 MPH the whole way - pretty much one hand on the wheel!
Contact Information:
PAS Auto Repair
3142 Grand Ave
Phoenix, AZ 85017-4912
Telephone: 602-254-8521
Contact: Chris Cross
Question:
Could you explain what was cut and where?
Thanks, Herman in Oregon
It's
pretty simple, really - the radius rods which connect the lower A-arms to the
front of the frame are "relieved" of 1/2" of material, then "sleeved" with
some chrome-moly tubing and welded. Really doesn't matter WHERE they're cut,
though we did 'em up near the frame mount(s). This allows the lower A-arms to
be "pulled forward" more
than stock, which in turn allows for bigger castor
#'s (~4 degrees positive) than you could get via turning the cams on the
control arms. Positive castor tends to make the vehicle want to
"self-center" and track dead straight (assuming otherwise good
front/rear suspension components, of course) - I also found that my coach
wants to "self-correct" much more quickly after being hit by the
inevitable crosswinds or the side drafts of passing vehicles...
I DO
think it's critical to make these changes "in concert" - tight front/rear
suspension, a new bell crank, new springs, etc; otherwise, you're just
applying a band-aid...
Joe Ganzler
Update:
I took my 89 A-C to Spectrac in Mesa, AZ yesterday to have all new springs
installed. I'd previously ordered a set of front coil springs from Betts p/n
BC B7172SD based upon a tip in the member's section. It turned out that the
Betts spring was way too light -- smaller wire size that what was already
installed and shorter. Spectrac's owner, Jerry, said he'd worked with a number
of Aero Cruiser owners in the past to develop solutions to various suspension
problems. I ended up with their specially made coil fronts p/n 350-5786SD,
which were two wire sizes up from what was on the coach, and new heavy duty
rear leaf springs p/n 22-617HD. The result was worth the expense with the
coach now riding level and 1 3/4" higher overall with 10# less per side
on the airbags at 20# rather than 30#.
I had hoped for additional reduction in driveline vibration due to the small
increase in angle created with the higher lift given by the new springs.
However, it made matters much worse. AZ Driveshaft had previously installed a
1 1/16" spacer to raise the tailshaft, which did nearly eliminate the
driveline vibration prior to installation of the new springs. Today I had a
local welding shop make two new 1/4" spacers to replace the larger one.
The 9/16" reduction in the spacer height has apparently eliminated the
driveline vibration. I intend to do some more drive tests to confirm this
initial impression.
It's surprising to me how sensitive to angle the driveline system is.
Thanks to all for your suggestions. I did try to contact George Digilio
regarding the trailing arm air bag suspension, but never received a response.
John,
Return
to the Tip List.
Subject:
Upper Control Arm, Ball Joint and other Steering linkage
Tip: The Upper Control Arm from my
1990 23' Rear Bed Aero Cruiser
broke halfway down the Hood Canal in Washington the end of May. The standard Control Arm for the Dodge chassis 1 Ton was not the same as the Control Arm on my rig. Not even a close match.
I had on my own, several people doing research for the part, a mechanic, two auto part stores as well as the Brazel's R.V. repair shop where the rig ended up for better than a month while the search continued. Finally Brazel's RV ordered the part that was suppose to match the year, make, and model. Here is their report.
They found new control arm for 1990 Dodge full size van/pick up. This control arm was the closest that we could find. We removed the bad section of the old control arm and mounted the new section in its place. Then installed Ball Joint into new section of the control arm.
I was in and out of the shop during this time checking on the process. Brazel's is highly recommended for R.V repairs in the Pacific Northwest and feel they went over board in helping me get back on the
road. The Upper Control from Car Parts Warehouse.com Part # 93-00645, Upper Ball joint
Part # 505-1189 from Car Quest.com.
I feel this is important for the Cruiser folks it was reported to me that although rare it was caused by wear.
(should be on the yearly vehicle check out)
-- Sandy
Update:
I found a supplier for replacement of the idler arm/bell crank assembly on
Aero Cruisers and Amera Coachs. As luck would have it, John at Henderson's Line-Up
in Grants Pass Oregon knew just what I was referring to. His sister owned an
Aero Cruiser until just recently (loved it). The P3032 replaces the original one
(original part number: 3941740. Go to -- Henderson's
line up -- for picture and info.
Gregg Patten; 1990 Ameracoach II 23RB.
George, Let me know how this works out. Looking at pictures, I am not
convinced that this will work. I hope I am wrong. Please send me
before and after pictures if you can. Good luck.
Keep on Cruisin', Tom Heald
Picture from Haynes Repair Manual
Also see Front Tire Misaligned (Suspension Problems)
Return
to the Tip List.
Subject:
Lower Control Arm Design Problem and how to Fix it
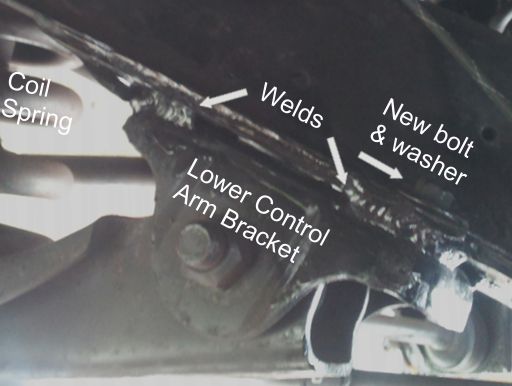
Tip:
Lower Control Arm has a design problem in the way the Hanger Bracket is attached
to the frame. The bracket is riveted to a plate and then that plate is
welded to the frame. It's not strong enough and a crack develops by the
rear rivet as seen below. The crack can be seen below the "Crack
below" label. The first layer below the label is the frame, the
second is the mounting bracket plate and the last layer (below the crack) is the
mounting bracket. You can see some of the broken weld on top of the Lower
Control Arm Bracket below the crack.
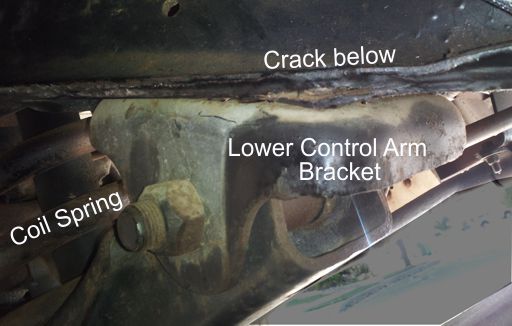
It's not obvious in this picture but the frame is cut out to accommodate
the rivet head. To fix the problem the rivet needs to be drilled out and replaced
with a bolt and a large washer above the frame so the bolt goes through the
"Lower Control Arm Mounting Bracket", the mounting plate and the frame
pulling them back together. Then the cracked area should be welded along
with the other corners of the Lower Control Arm Bracket just to be on the safe
side.
I had the same problem back in 2003 on the other side only I didn't catch it in
time and the Lower Control Arm Bracket broke away from the frame. Go to
the tip Front Tire Misaligned (Suspension Problems)
to see more pictures and how it was fixed on the passenger side.
Keep on Cruisin', Tom Heald
Return
to the Tip List.
Subject:
Front Tire Misaligned (Suspension Problems)
Question:
Just looked at my passenger front wheel and tire. I do not recall it ever being so far toward the rear of the
wheel-well. It will likely rub (and has a little bit) on the back of the wheel opening.
Has anyone seen this before? What should I check....just had the bearings repacked,
but that wouldn't account for this amount of shift.
Thanks,
Rick
Answer: Have
you ever heard a loud bang when you backed up? I did once on July 3 in Needles,
CA. My grandson and I stopped for lunch on our way home from the Grand Canyon.
When we left the restaurant there was a big bang when we backed up. We both jumped out of
the Aero Cruiser and looked around. There was nothing! We didn't hit anything
and could not figure out where the bang came from. 
I drove another 200 miles and
when I stopped for gas I noticed that the left front tire was almost worn out.
Apparently it was misaligned and scuffing.  When I went to change the tire I noticed that the "Lower Control Arm" for the front wheel suspension had pulled lose where it had
been attached to the frame.
When I went to change the tire I noticed that the "Lower Control Arm" for the front wheel suspension had pulled lose where it had
been attached to the frame.  The rivets that hold it to the frame had pulled
out! I found a mechanic to fix it the next day in Majove, CA.
He replace the rivets with bolts and told me he has seen the problem before and
it almost always happens when backing up. The rivets that hold it to the frame had pulled
out! I found a mechanic to fix it the next day in Majove, CA.
He replace the rivets with bolts and told me he has seen the problem before and
it almost always happens when backing up.
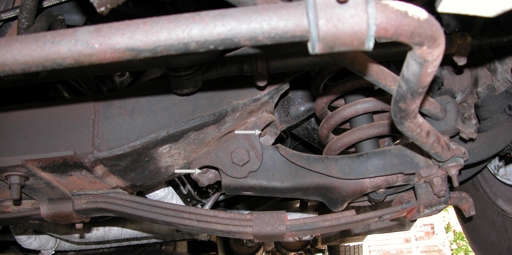
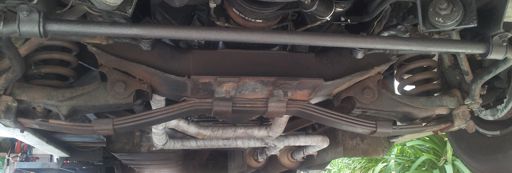
This picture is a 1990, 23 foot Aero Cruiser with a 1989 engine and Chrysler
front-end on a LGS Chassis. To spot the problem look behind the front wheel. The coil spring is mounted
on one end of the "Lower Control Arm". The other end has a pivot point with a
mounting bracket that is riveted to the frame. The arrows point to two of the
four rivets that pulled
loose. It took a few hours and about $200 to fix on the Forth-of-July
Holliday in 2003.  Note the Helper Spring
which runs from side to side under the axel.
Note the Helper Spring
which runs from side to side under the axel.
Note:
Earlier Aero Cruiser models have a Vironex chassis with a front end that
was extended 10 inches. I believe it has the same problem as the later models on a LGS Chassis
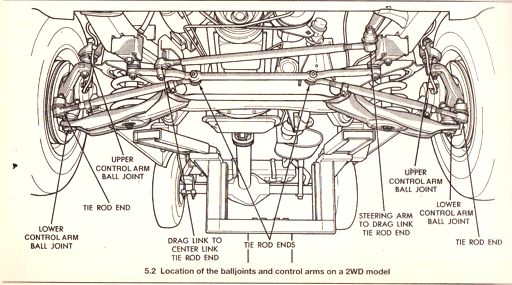
but I don't know for sure. According to the Haynes
Repair Manual that I have, all Dodges from 1974 through 1993 have the same independent suspension
as shown below.
When I arrived home I purchased new tires and had the front end alignment checked.
It was OK  and I haven't had any problems in the
nine years since. and I haven't had any problems in the
nine years since.

Keep on Cruisin', Tom Heald
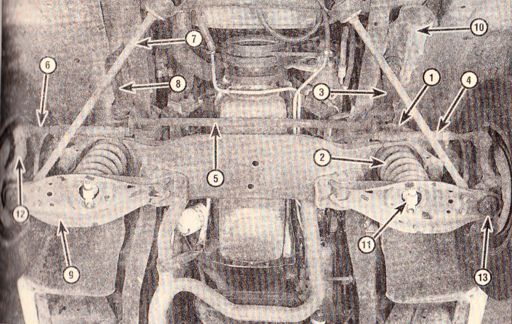 Picture from Haynes Repair Manual
of a typical Dodge D350 suspension found in our Aero Cruisers. Note
the riveted Control Arm mount which is the same as the one shown in the picture above.
Picture from Haynes Repair Manual
of a typical Dodge D350 suspension found in our Aero Cruisers. Note
the riveted Control Arm mount which is the same as the one shown in the picture above.
|
1) Upper control arm
2) Coil Spring
3) Pitman arm
4) Tie-rod adj. tube |
5) Center Link
6) Tie rod
7) Strut Rod
8) Idler Arm
9) Lower Control Arm |
10) Steering gear
11) Shock absorber
12) Steering knuckle
13) Ball joint |
|
Also see Upper Control Arm, Ball Joint and other Steering linkage
Tip 2: As noted by others, my 92 has a
traditional lower control arm from Dodge as opposed to the unit that has the
riveted bracket for the control arm. If I had a unit with this setup, and if the
unit aligns properly and appears to be in the factory location. I think a good
welding shop would be my next visit. I'd secure it's location with a bead weld,
leaving the original rivets in place. Andy
Comment:
Since you and I have the forward axel of the last models, Andy, our setup is
probably not typical of the other A-Cs. And we know that G-P made indiscriminate
changes as production rolled along.
Mine is the diesel and I have a straight axel off a 1-ton GMC 4WD. I have
no A-arms at all and very long leaf springs. Almost dates back to the
horse carriage days.
-=Dale=-
Return
to the Tip List.
Subject:
Has anybody put Dual Wheels on a 23 footer?
Question:
We are in process of making this 89 coach our third
motor home. Do you know of anyone who has put dual wheels on one of these?
If so
what type wheel-set. I just feel a lot safer running duals on the rear, it seems
like they would offer more stability. Would appreciate you answer and
comments, Looking forward to being a club member. Thanks for you site and the
info you provided. Again thanks, Sam
Answer: Dual wheels are not added for stability, they are added for load. Most motor homes with
dual wheels are built on truck chassis. They use 2 smaller tires instead of one larger
tire to give a lower flat-bed for cargo carrying while supporting a given
weight. The result is a higher ground clearance.
The Aero Cruiser is designed as a low profile motor home with a much lower ground clearance and
center of gravity. It's tires are designed to support a certain weight at a
specific tire pressure.
To know what the proper tire pressure is for each wheel, they should be weighed individually. Then
one can look up the proper inflation level in the manufacturer's tire chart based on the wheel supporting
the most weight on a given axle. Wheels on the same axel should always be
inflated to the same pressure. Over inflated tires cause a rough ride and lead to irregular and
premature wear and the tires do not hold the road as well.
On the Aero Cruiser most owners have found that 60 pounds in the front and 75 pounds in the rear work
best for most tire manufactures. If you over-inflate the front tires your rig may tend to wander
on the highway and you may have a tendency to over steer. If you under-inflate, you will get poor
tire wear and you may blow a tire.
Other members have gone to a larger tire size that supports more weight and allows
for a lower tire
pressure giving a softer ride. That's fine as long as you go by the book, the
Tire manufacturer's book that is. Be sure to check if your Aero Cruiser has
large enough wheel wells to allow for larger tires. Most Aero Cruisers don't!
Keep on Cruisin', Tom Heald.
Update: I agree but adding that the extra
wheel in the rear is also a safety factor. It is usually the rear wheel
that catches road debris and goes flat or ruptures.
On the other hand, duals would also require a modification of the wheel wells at
the cost of interior space. Also a dual-wheel rim hub has a 6in or more
negative offset so the two rims can be mated together. That means the
front singles would do the same and you would have a 12" or more narrower
track. A front axel modification would also be needed. Although
spacers are available for that purpose, the bearings are not designed for that
much camber stress.
So in the end, the question is "Why would anyone want to convert to
duals"?
-=Dale=-
Return
to the Tip List.
Subject:
Coil Spring Stabilizer
Tip:
If your front end is sagging
or is not as hard as it used to be (ha-hum), you may
try a ring type nylon-reinforced rubber coil spring
stabilizer sold by J. C. Whitney for $8.98 each. Part
No.84-0661.
Return
to the Tip List.
Subject: Shock Absorbers, Front and Rear
Question:
My coach is in the RV shop and it needs all the shocks replaced. They
know
what to replace the front with but the rear are Brazilian and they cant find a
cross no. Any suggestions would be appreciated.
Thanks- Russ
Answer: The shocks are not necessarily
the same as the ones used on a Dodge D350 full sized Pickup. The shock mounts between axel and
frame and none of the Aero Cruisers used a Dodge frame. There were 4 different
configurations. The Vironex, the
LGS, the 29 Footer with its tag axel and the Diesel with its unique axel.
To further complicate the issue, the Front Suspension from Chrysler changed from
time to time depending on what was available when they built your rig. Maximum extension and minimum compression
are what's important. My diesel has aftermarket KYBs and they work, but I don't
know that they are the right ones. They may be restricting the axel
movement. If anyone has information on Shocks Absorbers for their
particular model, post it online or send the information to Tom Heald Tom@FL-Ink.com
so he can post it here.
-=Dale=- Updates: New Shocks in my '90 coach.
Well they're in. I haven't test driven it yet, but at $350.00 parts and $340.00
labor -- in 2011 -- I will tell myself that it floats. Front-Monroe#911096,
Rear-Monroe#34910. Hope this info comes in handy.
Thanks for the help---Russ
Shocks for my 92 A/C: I believe the fronts are Bilstein AK-1200 available
for $52.00 each at http://www.autopartsdealer.com
The rears for my 92 are B46-0248 available for $60.00 each from same place in
2011.
allthingsitandy Update: OK, just heard
back from Bilstein. Their morothome shock is the B5 series which has a heavier
piston. All of the B5 series require a 3/4in stud mount. I believe the Cruisres
have a 5/8 and I'm not sure about the FMCs. So if you are thinking Bilstein, you
may have to change the stud mounts.
-=Dale=-
Update: As explained in the Answer
above, the shocks listed above may not apply to all coaches. To find the proper
shock for your rig you
need to measure the shock extended and compressed and take into account the
weight on the front and rear ends. A good place to start is
online:
KYB --------------------- http://www.kyb.com/
Monroe ------------------ http://www.monroe.com/
Road King MH shocks ---
http://roadkingshocks.com/shock-absorbers/
motorhomeshocks.html
To name just a few. This is not an endorsement of any specific shock.
Keep on Cruisin', Tom Heald
Return
to the Tip List.
Subject:
Air Bag Pressure
Tip:
Acceptable air loss to leakage is about
10# in two weeks. If you have more than that, you
may have an air leak. Check all fittings to find the
problem. If you need spare parts for the Firestone
system, contact: 3T RV Products, 1055 Empire Rd
in Lake Havasu City, AZ. 520-453-3040 and ask
for Jerry or Rich.
Air pressure should be maintained between 20 and
30# for nominal performance. Frank DeRemer did
experiments and is a good source of specific information.
Return
to the Tip List.
Subject:
Air Bag Leaks
Tip:
If your air bags dont hold pressure, check
fittings for leaks. Lon Waterson is a good source for
information if you have specific questions. Lon recommends that the bags be pressurized to a max
before storage.
Return
to the Tip List.
Subject: Replacement Air Bags
Question:
I blew an Air Bag, where can I get parts?
Hit a big hole in the road and KaPOW! I have no info in my notebook on air bags. Do you know what
kind they are or could you send me to the person who might know. When I called Eric's R.V. today to
talk about them he says crawl under the rig and then let me know what you see as there are 2 kinds
you could use on the Aero Cruiser..... Well, ** whoop dee do.** I can't even find a
name...nuthin' ..help-help... So where can I can get a replacement and should I replace both at the same time?
Thanks for your time, Sandy
Answer:
I thought all the 23 footers had the same ones, but I don't know for sure. I know the 29 footers have a
different system. Look at the two air bag gages on your dash. Mine say "Firestone Ride Rite" on them. Firestone
sells the system as a kit, or they did. I seem to recall that some airbags are difficult to find, but there is a
replacement bag that will work; however, I don't know any details. (? They say it's from a milking machine, but
I think it's for the 29 footer. It is supposed to be as good as the Udder-One. ?) I think replacing both is a
good idea, and I would keep the used one as a spare for you or somebody else in the club. I will post this on
the site and see if anybody can help.
If you go on the web site and search the archives for "Air Bags" you will get 9 hits. They point to some
spares and at lease one person who had the same problem. You might want to contact them.
Update:
From: dalemaggio@yahoo.com
Yes, Lon's son, Arlon, can order them for you. I have lost the number but you can call Lon and get it. It
is the 7" single bellow Firestone bag. The invoice that came with it gave a part number of FT W01-358-7564
STND 1/4"NPT. Oddly enough, the warehouse is right here in Santa Clara, CA.
-=Dale=-
Update:
From: Frank DeRemer wrote:
I believe the Ride Rite version was the only one used on 23-footers. The 29-footer definitely uses a completely
different system, with a much bigger bag. Lon Waterson (see Club Directory) can put you in contact a source of
air bags; Dale Maggio just bought two from that source -- so you can also contact Dale Maggio [dmaggio@pacbell.net].
--Frank
Update: Tom I had paperwork from one
of the air bags that I had ordered, part number is W01-358-7451. The cost for
two (on sale) was $218.18 and $22.67 shipping in 2015. The guy that helped me at
MRO Stop website, was Steve Bell
(866)388-7558 x 7685. Here is a fact sheet on the air bags -- airbags.pdf
-- from Firestone. Hope you both, are having fun, we miss you.
Cruiser's Pam & Dave Royston
Return to the Tip List.
Subject: Tire Tips
Tip: Tires have been the subject of many tech-tips, articles,
and rally discussion. Some of these can be found in
issues Summer 94, November 97, November 98, July
99, etc. but most noteworthy are the articles Weight
Chart, Spring of 94 and Tire Information - General,
March of 96.
Article Tread Safely by Linda Lee Walden and Lynn
Laymon published in December 2004 issue of Highways
goes into considerable detail on this subject and is
recommended reading. They echo what was mentioned
in our news letter over the years and left me with the
following points to remember:
- To get the proper tire inflation each wheel should be
weighed individually (just like Rick said back in 94).
- Tire pressure is critical. Knowing how much weight
each wheel caries can help determine the correct tire
pressure as recommended by the manufacturer. It is
important that all tires on a specific axle be inflated to
the same pressure, so if the loads on individual wheel
positions require different pressures, the higher inflation
pressure should be used for all. Dont be tempted to
automatically inflate your tires to their maximum
pressure regardless of actual load. Overinflated tires
cause a rough ride and lead to irregular and premature
wear, say Toyos Gilbert. Also, overinflated radial tires
do not hold the road as well.
- Tires can last many miles but not many years. In our
case, they may lose their life long before they lose the
tread. Depending on exposure to sunlight and ozone,
the rubber in tires can be expected to last between five
and seven years form the time the tire is put into
service.
In addition to above tips, the article suggests the
following website:
RV Safety Education Foundation
www.rvsafety.org
321-453-7673
From there you can get to various manufacturers web sites and a wealth of information.
#212 Petrovich
Return
to the Tip List.
Subject:
Check your Tires for Cracking
Tip:
End of Summer; check your tires for cracking. George
lost one this Summer. Had 10/32 rubber but were
5-1/2 years old. Check age on casing, next to DOT
stamp. Three digits signify week and year
manufactured. Normal warranty is 4 years.
#102 Kinnison
Return to the Tip List.
Subject:
Old Tires can KILL you!
Tip:
I just blew a beautiful tire with a 1/2 inch of tread on it that looked good
(no cracking on the sides or around the tread) and it was inflated to the proper
air pressure. It was one
of 4 Cooper 235 / 85 R16 10 ply tires I purchased 7 years ago and it only had
15,000 miles on it when went the tread pealed right of the right rear
tire. I was luckily! The tread slapped against the side of my
Aero Cruiser and left tread marks from the side door to the rear access panel
which was also dented.
Others have had the same thing happen; however, the tread took out the Aero Cruiser's
wheel-well and required extensive fiberglass work to repair!
You can check the age of your tires on the casing, next to DOT
stamp. New tires use a 4 digit code where the first 2 digits are for the week and
the last 2 digits are for the year they were manufactured. Old tires before 2000 used
a three digits code for week and year. If you have a 3 digit code, get rid
of them!  The warranty that came with my new BF Goodrich tires said
"Tires that have been used for 5 years or more years should continue to be inspected
by a specialist at least annually". That's legal speak for
"Tires over 5 years old are running on borrower time, and so is the
driver!"
The warranty that came with my new BF Goodrich tires said
"Tires that have been used for 5 years or more years should continue to be inspected
by a specialist at least annually". That's legal speak for
"Tires over 5 years old are running on borrower time, and so is the
driver!"
It's not just the tire industry that says tires over 5 years old are dangerous.
Many other organizations also recommend that tires 5 to 7 years old should be
replaced. Always check the manufacturing date on the side of your tires
before you buy them; because, the clock starts ticking down on tires when they
are manufactured, not when you buy them! If you buy a brand new tire that
was manufactured two year before, you only have 3 years left on that tires
life!
And don't forget your spare! It may be 18 years old! How far do you
think you can drive a 5 ton motor home on an 18 year old tire? 
Keep on Cruisin', Tom Heald
Update:
The critical element is sunshine, rather than either tread wear or age.
My Michelins are 9 and 12 years old, very carefully protected from sun.
They are inspected annually by the shop the sold them to me, and will be
replaced just as soon as they recommend doing so.
Ray
That's the way to do it Ray. I keep my tires covered
also. I also had mine inspected, and they passed! Sun is a factor, but so is moisture
and oxygen on the inside! Even tires kept in a climate
controlled environment will deteriorate over time. Here are some of the
other factors from the Internet.
http://www.rversonline.org/ArtNitrogen.html
I suspect my tire picked up a nail or something, deflated slowly and got hot.
The inside steal belt was slightly rusted from moisture and oxygen inside the tire that was
absorbed and the tread let go! Using nitrogen to inflate tires would have eliminated
any possibility of water and oxygen inside the tire.
By the way, CostCo fills the tires with nitrogen at no extra charge. This
is a big factor in keeping the
tires dry and oxygen free on the inside, thereby slowing down deterioration over time. Plus they will
check your tire pressure before a trip and they have a good road hazard
program. I find their people very knowledgeable and they had the best
price of the 3 places I checked in town.
Nitrogen has several major advantages over air in
tires.
The biggest factors are that it is dry and has no oxygen! If you use air, it is 78% nitrogen,
21% oxygen and some other gases but it also carries a lot of
water vapor along with it. Some tire shops use a compressor that dehumidifies the air which
helps some; however, nitrogen used from a tank has no water vapor or
oxygen. Any water
and oxygen inside a tire will migrate into the body and can cause the tire to
break down and the steal belt to rust, expand and weaken the tire.
Sulfur is also used in the manufacture of tires to give them greater flexibility.
Oxygen and water that migrates into the tire can react with the water-soluble sulfur
causing it to brake down. Water acts as a catalyses for this process
that produces Sulfuric acid.
Another factor is that nitrogen has a larger molecule size and tends not to
migrate into the tire and any that does is inert and will not react to the
components of the tire.
With air in my tires I would typically lose 4 or 5 pounds of pressure when
my Aero Cruiser sat unused for 6 months or more. With nitrogen I have not
lost any pressure but I still check it before any trip.
Also see
Flat Tire? Use the Air Bag Compressor to fill it up,
Flat Tire - How to change it and
Spare Tire - Lowering and Raising.
Keep on Cruisin', Tom Heald
Return to the Tip List.
Subject:
New Tires
Tip 1:
Ken reports that Bridgestone has a new tire that
appears to be replacing the Model 265.
In his discussions with Bridgestone Dealers, the
technology for Model 265 is about ten years old. If
you want all the specifications, go to
www.bridgestone.com
He purchased four new Bridgestone LT235/85/R16,
10 ply, Load Range E, Model R273SWPII at Costco.
Their price was $118.99, plus $9.00 installation and
$1.00 tire disposal.
Total cost per tire was $128.99. Future Service
includes free flat repair, rotation, and rebalance. His
total cost was $499.82.
#215 Stahl
Tip 2:
The general consensus among Aero Cruiser members
is that the Bridgestone R265 (BW) LT235/85R16 Load
Range E, Ten Ply Rated Tire is the optimum choice
for this coach. There is an outlet in Richmond, British
Columbia Canada that markets this tire at a very
attractive price of $112.99 that includes all import fees.
Shipping cost for these tires via UPS ground is
approximately $12 per tire, but there is no sales tax
charged by the vendor. The name of the vendor is:
1010 Tires, and they can be reached at web address:
sales@1010tires.com or by phone at 1-888-825-6247
Allow about one week for delivery. They accept the
usual range of credit cards.
#462 Wachtell
Return
to the Tip List.
Subject: What is the Tire Air-Valve for under Front Hood? -- or --
Flat Tire? Use the Air Bag Compressor to fill it up.
Question:
My air-bag system has the inside gages/controls and air compressor, but also has an air fill (tire chuck if you will)
point under the hood, next to the under hood light. At this point I haven't checked it to see what it does...
Walter
Answer:
My 23' 1990 Aero Cruiser came with a 25 foot air hose that attaches to the air-valve up front under the hood
so you can use it to fill up the tires using the air bag compressor. I have used it
once to add 50 lb to a flat tire when I woke up to a surprise one morning some years back.
It was enough to get me to a shop where I could have the tire fixed.
The original owner said it came with the rig so it may have
been a standard item on some Aero Cruisers.
I have also been told that some early Aero Cruisers did not have an air bag
compressor so you had to fill them up using this valve. In an emergence,
you can always use it to fill the air bags if your compressor is not working.
Also see
Old Tires can KILL you!,
Flat Tire - How to change it and
Spare Tire - Lowering and Raising.
Keep on Cruisin', Tom Heald
Return
to the Tip List.
Subject:
Brake Calipers & Pistons
Tip:
Mark had a recent experience with frozen front brakes.
The pistons in the front calipers are phenolic and should
be replaced with like material not metal. They were
designed that way for a purpose and should be
maintained with original design parts.
#464 Keeler
Return
to the Tip List.
Subject: Front Wheel Brake Rotor & Hub
assembly
Question: Have you or someone else you know ever replaced the front wheel brake rotor & hub assembly? If so do you have a part number or
vehicle identification it came from? Everything I was able to find so far comes with 1/2" studs is stead of 5/8". Dragi
Answer: I did find a Chrysler part number by chance (03637626 HUB and DISC, w/8-5/8" Studs w/4000 lb axle) but no cross-reference to any aftermarket manufacturers. The one I did find asks for $445+, a bit
pricey. So, the search continues. Dragi
Note: For other brake parte numbers see Georges article on Brakes and Brake Upgrade.
Keep on Cruisin' -- Tom Heald
Return
to the Tip List.
Subject:
Brake Lines
Tip:
When performing general inspection,
check the brake lines for corrosion. Stan Morris
reports that his lines that run across the rear axle
corroded through and started to leak. Replacement
lines are straight and can be purchased at any
automotive parts store. Check the length and bend
to contour.
Return
to the Tip List.
Subject:
Brake Pads may fail before they are worn out
Tip:
Even the best brake pads may
fail in service and become inefficient. We had
a chance to see pads that had a lot of
material left but the heat had crystallized
them to the point that the material was
eroding on the outside edges and the edges
of the rivet holes. If this is observed during
the inspection, they should be replaced.
Different grades of pads are identified with
different color codes. Red are top of the line,
blue are mid-grade and green are regular.
Return to the Tip List.
Subject:
Brake Fluid
Tip:
John Donn asked how often
should brake fluid be replaced (lines flushed).
Theoretically, if brakes never overheat and the
system is kept clean, the fluid should not have
to be replaced. However, it may be a good
idea to bleed some of the fluid from a drive
wheel at the time of brake shoe replacement to
check for debris and general cleanliness. If the
fluid is discolored or has debris in it, it may be
a good idea to flush the system.
Return
to the Tip List.
Subject:
Brake Fluid Level
Tip:
If your brake fluid level is low and
you dont have any leaks, chances are your brake
pads may need replacement. Before you top off the
brake fluid reservoir, check your brake lining and
replace if necessary.
Return
to the Tip List.
 Subject:
Brake Fluid Reservoir
Subject:
Brake Fluid Reservoir
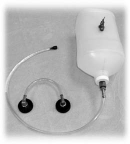
Tip:
Filling the brake fluid reservoir can be difficult due to its
location under the hood but not if you have a device
similar to what Dave has put together. He was still
improving it at its unveiling so call Dave for details.
#409 Royston
Return
to the Tip List.
Subject:
Hot Brakes
Tip:
Your brakes may overheat in stop
and go traffic on a hot day which may cause
them to grab on one side causing your steering
wheel to turn abruptly. If this happens, pull over
and let the brakes cool. If that doesnt cure the
symptom, you may have brake line blockage or
seized brake caliper. The brake piston is made
of phenolic material and should not be replaced
with a metal one. The best thing to do is
to replace the whole caliper assembly with a
rebuilt one.
Return
to the Tip List.
Subject:
Parking Brake
Tip:
Parking brake replacement is typically due
after two to three front brake pad replacements.
Another indication will be how far down
your parking pedal goes.
Return
to the Tip List.
Subject:
Rear Brake Adjustment
Tip:
Because we dont drive
our coaches in reverse enough, our rear brake adjusters
seldom get a chance to work. The recommendation
is that if you have more than 3 clicks
on your parking brake, have the brakes adjusted
manually for proper operation.
Update:
Before I start out on a long trip, I normally back up and stop firmly several
times on a quiet street! I don't stop hard enough
to dislodge anything inside the rig, but firm enough to activate the brake auto-adjustment
mechanism.
Keep on Cruisin' -- Tom Heald
Return
to the Tip List.
Subject:
Tow Vehicle Braking System
Tip:
Frank Fries reports
that he had a Brake Master installed in his tow
vehicle and has already more than gotten his
moneys worth.
Return
to the Tip List.
Subject:
Lug Nuts
Tip:
Ken found a source of lug nuts for the Alcoa wheels in
the Sacramento Area. This nut is different from any of
the ones covered in the Tech Sessions. It is a closed
end - 5/8" x 18 - 60 degree cone with an outside diameter
of 7/8 inch. To provide an adequate 60 degree
cone, it has a bulge on the bottom end so sufficient
cone angle comes in contact with the Alcoa Wheel
when torquing.
Source:
Les Schwab tires, 8124 Auborn Blvd., Citrus Heights,
CA 95610-1456. Part # 00000461
Telephone 916-728-2223
#201 Green
Update: Steel wheels use 5/8-18
RH thread, 7/8, 45 degree nuts. Aluminum wheals use Chrome
5/8-18 RH thread, 7/8, 60 degree nuts. Here are some online sources
for 60 degree nuts:
http://www.prestigewheel.com/
Part Number 5260L
http://www.sfxperformance.com/
Part Number GOR76198-1 or ...-16 for a set
If you get a "Page not found" just go to the main site and search on
the part number.
Keep on Cruisin' -- Tom Heald
Return to the Tip List.
Subject:
Wheels Lug Studs
Tip:
I was coming back from Oregon about 3 weeks ago,
and the rig started acting like it had a flat. Stopped,
checked the tires, no flat, thought maybe I was dragging
something, checked underneath, nope.
Got back in, went about 50 feet more, still not a good
ride. Got out again, did a closer inspection.
Had lost 2 lug nuts on the right rear tire, and the studs
had fallen back into the brake drum, tore it all up, down
to the backing plate.
Whoever setup these rear wheels could have killed
someone. Tacking steal bolts to cast iron drums (any
pipe fitters son can tell you thats just not right) via spot
welder isnt a very good idea. All of them on the
right hand side had broken free, and the mechanic said
thats "probably" why the lugs came off, though they
could have just worked loose on their own. But seeing
as how all the studs had broken their improper welds, he
doubted it. The 299 between Eureka and Redding is a
scary enough ride without that potential, lucky we didnt
go over a cliff!
$1800 and a week later in Willow Creek CA, new rear
hubs and brakes, both sides.
Lesson learned #1, incorporate a lug check into the preflight
checklist.
Lesson learned #2, mickey-mousing it like that can
cost lives.
If anyone in the club is doing this also, it would be in
their best interests to reconsider. Better check your
rig, make sure its safe, the life you save may well be
your very own. WE are lucky to be alive, God was
watching over us.
This letter is from Rich Bland, who does not
appear to be a member of the Aero Cruiser club but
we appreciate his input anyway. He sent this note to
Frank DeRemer and we thought its valuable enough
to be shared with all.
Editors Note:
Aero Cruiser brakes, wheels, tires, and other safety
items have been the subject of many tech sessions
at the rallies, tech notes, and tips in the news letters.
This is something that should be taken seriously and
if you have any doubts about your own ability to fix
things, should be done by a reputable professional.
Unfortunately, what Rich had was done by a
professional who may not have done a good job. At
the very least, check your lug nuts periodically and if
you have aluminum wheels, check them before each
long trip. (see Torque
Settings below)
Return
to the Tip List.
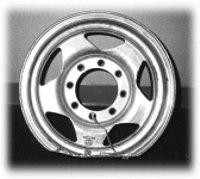
Subject:
Alcoa Aluminum Wheel, Lug Nuts & Studs
Tip:
George explained that the main
motivation for the aluminum wheels was to provide
a better heat sink to accommodate brake
drum and disc cooling.
When he located the Alcoa wheels (the first to
have the proper load rating) he discovered that
they would not fit over the 5/8 studs even though
they were advertised as being able to fit all domestic
manufactures bolt patterns. After consultation
with Alcoa engineering, it was concluded that
the holes could be enlarged to 21/32 to accommodate
the 5/8 studs without degrading structural
integrity of the wheel. If you should buy the Alcoa
wheels and they dont fit your studs after drilling
out to 21/32, chances are the studs are misaligned
and should be brought back into alignment.
The holes in the wheels should not be enlarged
beyond 21/32 diameter.
If you are upgrading rear brakes and change the
studs from the original 9/16 to 5/8, make sure
the installer presses them in square.
George was also the first to purchase Alcoa star
shaped rims, which cracked after several years of
use. See the whole story and how to replace them
in the July 2001 (Report #027) newsletter.
Since steel nuts are used with aluminum wheels, it
is important to use the proper torque values and to
have the nuts in good condition. The torque
should be 150 ft-lb. and should be checked periodically
to make sure they dont loosen. The nuts
should have good plating in the surface mating
area and should they start to flake they should be
replaced. The best nuts found so far are sold by
Les Schwab Tires.
If you would like to purchase a new set of Alcoa
rims, at best price ($120 plus shipping) contact:
Henderson Wheel & Supply Co.
112 W. 34th Street Boise ID 83714
Phone 800 248 3444
FAX 208 336 1296
Update:
Tech session started by George explaining the
Alcoa aluminum wheel recall, which affected only
the spoke wheel design (not the one with round
holes). He also cautioned everyone with Alcoa
aluminum wheels, either design, to use only lug
nuts with a 60-degree cone. Other angles will
result in a mismatch with the hole in the wheel and
will not seat the wheel properly.
Return to the Tip List.
Subject:
Alcola Aluminum Wheel Recall
Tip: Members with Alcoa wheels part No. 167011 (star
pattern) need to know that Alcoa has a recall on these
wheels. Replacement wheel is part No. 167-031.
The following is what you should do to get them
exchanged:
1. Contact Alcoa at 1-888-279-3055 and ask
to talk to Buddy. He will tell you how to
exchange the wheels.
2. Alcoa will ship the wheels to your house
post paid.
3. You take the wheels to your tire dealer to
remove and remount tires. Alcoa will pay for
this charge.
4. Return old wheels in the new wheel boxes.
Alcoa will provide shipping labels for return
postage.
#102 Kinnison
Return to the Tip List.
Subject:
Alcola Aluminum Wheel Hole size
Tip:
Mary Dovico reports that 21/32 drill used to enlarge the lug nut
holes on the aluminum wheels was not big enough and
had to be .017 larger.
Those of you contemplating getting new aluminum
wheels may contact Mary and either borrow or buy the
drill from her.
#253 Dovico
Update: George Kennison also has a
set of drills. This is a common problem with Alcola Aluminum Wheel that are designed
for a 1/2 inch stud. If you are purchasing new wheels,
see what stud sizes they support before plunking down your dollars. Also
consider chrome plated steel wheels, they are much less of a problems when it
comes to maintaining proper torque Settings. (see Torque
Settings below)
Keep on Cruisin', Tom Heald
Return
to the Tip List.
Subject:
Aero Cruiser Lug Nut Torque Settings from Chrysler
Tip: The torque
settings that I found on the Internet are slightly different for the front and rear axels. The front axel is manufactured
by Chrysler corporation from a 1987-92 Dodge Ram 3500 full size pickup. --
http://dodgeram.org/tech/specs/wheel/specs.htm
--
The rear
end is a Dana 60 by Spicer and used in most large Dodge trucks.
-- http://dodgeram.org/tech/specs/axle/248RBI_specs.html
-- I have been told the proper torque depends on the type of wheels
that are installed: Steel or Aluminum. If you have aluminum wheels, follow
the specks for the wheel maker. The maker of my wheels specifies 120 rear
and 140 front; however, Chrysler said 140 all around. All of the wheels are 8 stud single wheels
on both the front and rear axels. When I purchased 4 new tires at CostCo
they wanted manufactures specifications. They
called the local Chrysler dealer for the torque settings for an Aero Cruiser
using the axles described above. They were told that the proper torque procedure
is a three stage process. First torque all lug nuts to 40
ft. lb., then 80 ft. lb. and finish at 140 ft. lb. for the final torque.
The same torque settings should be used for both steel and composite wheels
including aluminum. This is the same for both front and rear lug nuts even
though the front studs are
5/8" while the rear studs are 1/2".
| Aero Cruiser Spec. |
Torque from Internet |
Torque from Chrysler |
| Dodge 1 Ton front Axel |
120-150 ft lbs |
140 ft. lb. |
| Dana 60 rear Axel |
120-140 ft. lbs. |
140 ft. lbs. |
Keep on Cruisin' -- Tom Heald
Return
to the Tip List.
Subject:
Torque Settings for Lug Nuts is Critical on Aluminum wheels
Question:
I could not locate the torque specs. to the Alcoa aluminum wheels with
5/8" X 18 T.P.I. studs. with 60 degree cone lug nuts. So I called George
for the answer. "150 ft. lbs." I didn't ask about the steel wheels, what should I set them too?
Thanks to all of you. Pam & Dave...
Answer:
As for the lug nuts on steel wheels, I always tightened them as tight as I
could using a lug wrench which is wrong. The specs are the same as for all
wheels, 140 ft. lb.
See -- Aero Cruiser Lug Nut Torque Settings from Chrysler
-- With aluminum
wheels over tightening is almost as bad as under tightening. As stated in the
tips for new users under "Manuals, Documentation and Maintenance tips for an
Aero Cruiser"
If you have Aluminum wheels it is imperative that you check
the torque
with a reliable torque wrench often. Check with the manufacturer of the
wheels for the proper torque settings. Each manufacture is different and the
torque is different for the different stud sizes used in the front and rear
wheel drums. Aluminum wheels expand and contract more than steel wheels, and
the lug nuts will loosen and you will lose a wheel if you don't check them
often! If you over torque the lug-nuts you can damage Aluminum wheels.
Steel wheels also need to be checked from time to time but they are not any why
near the problem Aluminum wheels are.
That said: I
have Aluminum wheels from Pacer and they recommend 140 ft. lb. for the larger
5/8" studs in the front and 120 ft. lb. for the smaller 1/2" studs in the
rear. However Chrysler says to use 140 ft.
lb. for all wheels all around. See -- Aero Cruiser Lug Nut Torque Settings from Chrysler
-- torque recommendations.
When George said 150 ft. lb. for the Alcoa aluminum
wheels all around I assume he means with the brake upgrade. That is the
high end of the torque range.
Others
have stated different numbers at rallies when we have discussed it. Some say
I am too high, others too low, so check with the manufacturer of your
wheels.
If you have aluminum wheels and you get new tires, don't let the
shop use an air gun to tighten the lug nuts. The will over tighten
them and may damage the wheels!
If you are considering upgrading to
aluminum wheels I recommend you consider chrome plated steel wheels. They
weigh about the same and they are not as apt to loosen as the aluminum
wheels. Just make sure you are purchasing wheels in the proper weight range
as stamped on the original wheels on the Aero Cruiser.
If you do upgrade to aluminum wheels, they have a
different requirement for the lug nuts. They use 60 degree lug nuts where
the steel wheels us a 45 degree lug nut. So when you upgrade, save
your old lug nuts for your spare tire. You don't want to damage your
60 degree lug nuts by putting them on a wheel that requires 45 degree
nuts.
Keep on Cruisin', Tom Heald
Return
to the Tip List.
Subject:
How good are Alcola Aluminum Wheels?
Tip:
How good are the Alcoa wheels, you ask? Take a
look at this photo!
When Ed Pedersen lost the tire on a recent trip and
locked up the brakes, the coach came to a grinding
halt, literally. You can see the flat spot on the
bottom of the rim but it held together.
Ed Paterson
Return
to the Tip List.
Subject:
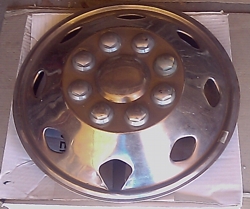
Hubcaps
Tip:
One of the Aero Cruiser owners (not a member of the club) visited our website and
posted this information where he found some attractive hubcaps at
www.hubcapzone.com ($79 for the set). They do not protrude out beyond the tire
edge to get skinned up on high curbs.
Update:
How do you secure the Hub Caps so they wont fall off?
(See the 2002 November newsletter on page 15 for sketch)
Return
to the Tip List.
Subject: Hubcap -- Check Air-Pressure without removing Hubcaps
 Tip:
What a pain, removing the hubcaps to check the tire's air pressure!
I tried extenders, but the tires went flat!
Bigger Pain!
So I decided to get creative and modified one of the vent
holes so it was large enough to check the tire's air pressure or fill it up if
needed without removing the hubcap.
Works good and blends in well enough so you don't really notice it. Tip:
What a pain, removing the hubcaps to check the tire's air pressure!
I tried extenders, but the tires went flat!
Bigger Pain!
So I decided to get creative and modified one of the vent
holes so it was large enough to check the tire's air pressure or fill it up if
needed without removing the hubcap.
Works good and blends in well enough so you don't really notice it.
Some years later I went to Aluminum wheels which works even better.
However, chrome plated steel wheels would have been an even better choice
because they don't expand and contract -- loosening the lug nuts -- nearly as
much.
Keep on Cruisin' Tom Heald
Return
to the Tip List.

|
Copyright© 1999-2016
Freelance Ink.
All Rights Reserved.
|

|
|