|
Everything in the Dashboard Tips:
Truck Air Conditioning, the Truck Electrical System, Fuse block, Switches, Relays
and other dash components from Chrysler and others.
Click on the
 to
go to its Tip: to
go to its Tip: |
|
|
Dashboard Fuse Block, Horn Relay and Flashers
|
|
|
Looking for a Power Drain on a Battery. (off page link)
|
|
|
Battery Boost Switch
|
|
|
Remote Starter Switch / Transmission Interlock Bypass Switch (Article)
|
|
|
Relays: Starter, A/C & ASD (off page link)
|
|
|
Fuel and Temperature Gauges
|
|
|
Dash Panel Lights
|
|
|
Fuel Tank Capacity (Off page link.)
|
|
|
Gas Gauge Accuracy
|
|
|
Fuel Gauge Calibration
|
|
|
Heater & A/C operation and controls
|
|
|
Heating, Ventilation & A/C Switch Assembly
|
|
|
Heating and Air Conditioning Blower Assembly
|
|
|
Insulating the Heating and Air Conditioning Blower Assembly
|
|
|
A/C Control Sensor
|
|
|
Temp Sender/switch parts
|
|
|
A/C-Heater output cutting out -- Vacuum Leak
|
|
|
Air Conditioning Refrigerant
|
|
|
Control Cables Transmission, Shift Position, Throttle (off page link)
|
|
|
Throttle &
Transmission Control Cables Installation (off page link)
|
|
|
Speedometer Erratic or Not Working
|
|
|
Red Lightning Lube for Speedometer etc.
|
|
|
Turn Signals Flasher / Alarm
|
|
|
Gauges and Sensor
|
|
|
Oil & Transmission Temp. Gauges & Sensor (Article)
|
|
|
Oil Temperature light Sensor/Sending unit
|
|
|
Maintenance Light Meaning and How to Reset it
|
|
|
Chrysler "Check Engine" Light Computer Codes (off page link)
|
|
|
Air bag controls on the dash not working correctly.
|
|
|
Dash Electrical Diagram for Add-ons
|
|
|
Cruise Control
|
-- Disclaimer --Information
on this Web Site is provided by members of the "Aero Cruiser Classics" Motor home Club. All
information on this site is contributed by the club members or outside sources and is believed to be reliable; however,
there is no warranty or guarantee that said information or advice is correct or free of defect. It is
offered on a best effort basis and is to be used at your own risk.
Tips:
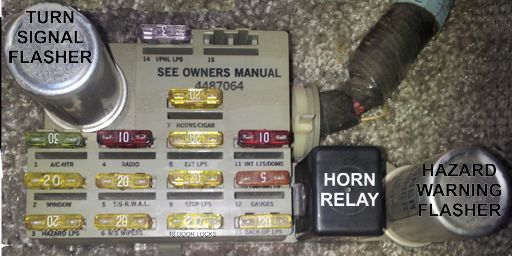
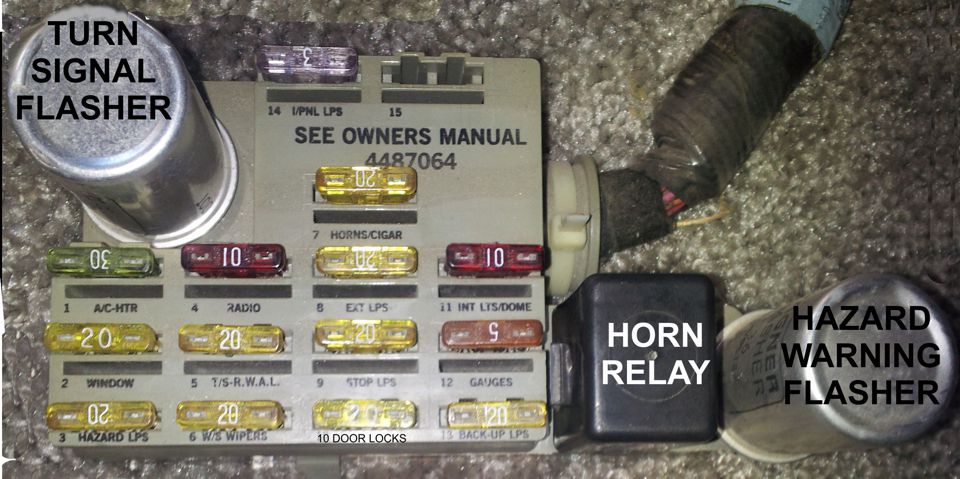
Subject: Dashboard Fuse Block, Horn Relay
and Flashers
Tip: When you lift the dash
board the Fuse Block is just to the right of the drivers area on the ledge below
the dash. The fuses are labeled but
it can be difficult to read them so I took a picture to make it easer for me to
read.
Below the picture is a table of the labels and fuse values. This is for a
1989 Fuel Injection engine in my 1990, 23 foot Aero Cruiser. The 1987/88 carbureted
engine is different. Click here for a full
page version. Make sure you do a Print Preview first and set the
printer to Landscape mode before you print it.
|
1 |
A/C-HTR |
30 A |
|
2 |
WINDOW |
20 A |
|
3 |
HAZARD LPS |
20 A |
|
4 |
RADIO |
10 A |
|
5 |
T/S-R.W.A.L. * |
20 A |
|
6 |
W/S WIPERS |
20 A |
|
7 |
HORNS CIGAR |
20 A |
|
8 |
EXT LPS |
20 A |
|
|
9 |
STOP LPS |
20 A |
|
10 |
DOOR LOCKS |
20 A |
|
11 |
INT LTS/DOME |
20 A |
|
12 |
GAUGES |
5 A |
|
13 |
BACK-UP LPS |
20 A |
|
14 |
I/PNL LPS |
3 A |
|
15 |
NOT USED |
|
| |
|
|
|
I/PNL = Instrument Panel, LPS = Lamps, LTS = lights.
* R.W.A.L. stands for Rear-Wheel Anti-Lock and I believe T/S
stands for Tire/Sensor as the speed of each tire is sensed by a module on the differential.
(1989 engine only)
The Rear-Wheel Anti-Lock brakes were not implemented on the Aero Cruiser.
There are a total of three Fuse Panels in the Aero Cruiser including this
one. Click here to see links to each of them.
Keep on Cruisin' - Tom Heald
Return
to the Tip List.
Subject: Battery Boost Switch
Question: What is the Battery Boost Switch on the left side of the dash?
Answer:
The Battery boost switch simply connects the house battery in
parallel with the truck battery while you hold it down. It
controls the big relay on the right in the coach electrical box under the front
hood or inside the coach. See -- Coach
Electrical Box -- for more information and wiring
diagram.
Keep on Cruisin' - Tom Heald
Return to the Tip List.
Subject:
Fuel and Temperature Gauges
Tip:
When Dale found wrong readings on his fuel and
temperature gauges, it turned out to be a bad
ground under the dash. Aero Cruisers were hand
wired and if yours was done after lunch on Friday,
the connections are flaky.
Installing an new secure solid ground for all the
dash cured both gauge problems.
#490 Magio
Return
to the Tip List.
Subject:
Dash Panel Lights
Tip:
I have re-lamped all the dash guages with leds except the 2 air pressure
guages (which take a bizzare lamp that I can't even read the number on),
and the shift indicator. I can not get to the shift indicator easily.
[The shift indicator, in my case the lamp is on the bottom of the indicator
enclosure mounted in a lamp socket that can be pulled out and pushed in
(not threaded). -- Dragi]
The new cool white LEDs are excellent. No need to dim them and for
the first time all the guages are readable at night. I have also removed the
"Jacks Down" indicator lamp and re-located it just under the shift indicator where
it should have been in the first place, This removal gives me an extra switch
position in the switch cluster area.
My meters are VDO.
All the LEDs came from SuperBrightLEDs. The 1in meters have Osram
bulb with only 12V stamped on them. The replacement SBL number is BA7s. The 3 inch meters
(Speed & tach) take a BA9s.
One thing I forgot to mention in my post: the SBL lamp's bayonet pins at the base do not
protrude out enough to capture in the meter's lamp socket. I had to carefully use
mini vise grips to slightly "out-of-round" the base of the socket to get the LED to stay in.
Part # BA9S CWHP5 UPC # 847781047219 https://www.superbrightleds.com/moreinfo/ba9s-ba7s/ba9s-led-bulb-5-smd-led-tower-ba9s-retrofit-car/2077/4721/
-=Dale=-
Return
to the Tip List.
Subject:
Gas Gauge Accuracy
Question:
My gas gauge is not very accuracy. What gives?
Answer:
Ah yes, the benefits of a nonlinear gas gauge and sensor in a liner tank. The gauge
was designed
for a Dodge truck with -- I assume -- a nonlinear tank hung underneath, fitted around the
frame. The Aero Cruiser has a big rectangular tank hung under the floor. When the
gauge on
my 23 footer reads 3/4 full after the first 100 miles, at 1/2 a tank the trip odometer shows about
190 or so miles, at 7/8 it reads
about 250 and at 300 I am trudgin' down the road saying something like, "Boy, that was a bit
of bad luck." (Not an exact quote!) I always fill up at 250 miles, except when I want to
take a stroll down the highway. And I always reset my trip meter when I fill up so I know how far to my next stroll.
Sometimes the Gas Gauge will fluctuate or stop working and then start again.
This is almost
always a bad ground in the instrument panel. Try running a new ground wire from the instrument panel to the chassis.
Keep on Cruisin' - Tom Heald
Return to the Tip List.
Subject:
Fuel Gauge Calibration
Tip: Some time ago, Frank plotted the reading on his
fuel gauge against the amount of gas he had to
pump. Following are the results which can be helpful
to many of us. Remember that *your mileage will
very.
| Miles |
Gauge Reading |
Gal. to Fill |
|
| 0 |
Upper Rectangle |
0 |
Done + |
| 45 |
(space between) |
4.5 |
More |
| 60 |
Full |
|
|
6 |
Top Off |
| 80 |
|
|
15/16 |
8 |
|
| 100 |
|
7/8 |
|
10 |
|
| 120 |
|
|
13/16 |
12 |
|
| 140 |
|
|
25/32 |
14 |
|
| 160 |
3/4 |
|
|
16 |
|
| 180 |
|
|
11/16 |
18 |
|
| 195 |
|
5/8 |
|
15 |
|
| 220 |
|
|
9/16 |
22 |
|
| 240 |
1/2 |
|
|
24 |
|
| 260 |
|
|
7/16 |
26 |
|
| 275 |
|
3/8 |
|
27.5 |
|
| 290 |
|
|
15/16 |
29 |
|
| 305 |
1/4 |
|
|
30.5 |
|
| 320 |
|
|
3/16 |
32 |
|
| 335 |
|
1/8 |
|
33.5 |
|
| 350 |
|
|
1/16 |
35 |
|
| 365 |
Empty |
(Start walking) |
36.5 --> |
38* |
#375 DeRemer
Return
to the Tip List.
Subject:
Heater & A/C operation and controls
Tip:
This is all from memory as "Fang" has adopted my 1990 23' Aero Cruiser.
To turn your blower on without the A/C, pull-out on the same button you push-in to turn on the
A/C. There is some cryptic writing on the control that implies this but... Everything else is pretty-much self
explanatory; but to see if the buttons are really working you have to lift up
the dash cover to see behind it.
To get behind the dash you unhook the two rubber tie-downs on the side of the top cover. There is a support leg that
unfolds from the bottom portion and swings up to support the top thus exposing Heating and A/C air-valves and the black-air-duct.
Make sure you run your hand over the black-air-duct that runs from the fan to the vents in the dash. I found sever leaks in mine that I had to fix to get proper air flow.
To see if the other controls are working you need to see if the colored vacuum tubes are controlling the valves they are attached to. When you push one of the buttons on the front you should see the corresponding valve work. The white vacuum line runs to the bottom of the Heating and Air Conditioning Blower Assembly located under the outside hood, up front on the passenger side. It closes a gate to cause the air to be recirculated within the interior.
Keep on Cruisin', Tom Heald
Return
to the Tip List.
Subject:
Heating, Ventilation & A/C Switch Assembly
Tip:
The Heating and A/C switch in the dashboard of our Aero Cruisers is from Chrysler, part number 3847742B.
There is information on how it works in the
November 2000 news letter on Page
13. When you bring up the PDF file, press escape to display the PDF
control bar so you can rotate the news letter.
From George Kennison
via Tom Heald, Keep on Cruisin'
Return
to the Tip List.
Subject: Heating and Air Conditioning Blower Assembly
Tip:
The Heating and Air Conditioning Blower Assembly was easy to access from under the front hood on my 1990, 23 foot Aero Cruiser. It's located inside that big black box on the passenger side with heating and air conditioning hoses connected to it. If you don't do the work yourself, give these instructions to your mechanic. It may save you several hours of labor charges. As you know all Aero Cruisers are not created equally, but on mine I follow these steps:
-
Whatever you do don't remove the four hoses connected to the Heating and Air Conditioning cores. If you do you will have to recharge the air conditioning unit and replace any antifreeze you lose.
-
Peel back the black tar-like insulation material sealing the access holes for the Heater and Air Conditioning connecting pipes. You don't need to remove it, just peal it back about 1/2 inch. Note: The tar-like
insulation material is a standard item at most good auto parts shops. It come in a 2" by 20 foot roll for about $20. I used about a foot of it.
-
Remove the two electrical connectors to the temperature sensor centered on the bottom of the front housing.
-
Remove one screw on the bottom of the housing directly beneath the temperature sensor.
-
Remove the four screws from the front cover along the right-hand side of the assembly. The left hand side has studs, not screws, which makes disassembly much easier.
-
Pry the cover forward until it clears the housing lip and slide it to the left.
-
The Heating and Air Conditioning blower assembly is mounted on two bolts in the center of the assembly, one on ether side of the motor.
On the outside of the Heating and Air Conditioning housing in my unit was the following label:
Frigi - Cool, Inc; 1434 Pattion Place; Carrollton, Texas 75007;
Phone # 214-446-9497; Serial # H/C 203 015234
They are out of business. Their phone is disconnected and I found one reference to them on the Internet under a bankruptcy listing for unclaimed funds.
I had to replace two Squirrel Cage Fans, one Housing, and two End Caps which I ordered from Cary Products. (See the separate "Fix up Note" for a complete parts list) Cary sent everything out COD via UPS for a total of $17.58. By the way, that's Check On Delivery, they don't take Cash.
When I found out that the fans were the wrong shaft size they shipped two more at no charge. It took two weeks for the second shipments because they had to make a special run to product the fans. What a deal! What a pleasure to work with a company not trying to rip you off.
Update -- July 2015: Years ago when I repaired mine, I had a hard time locating parts
so I decided to check
around for the blower motors even though I didn't need them at the time. If I had
to do it over again I would junk the motors and Squirrel Cage Fans for 3
heavy duty muffin fans and make a bracket to mount them on. Then wire
them up to the 3 speed fan control on the dash. Just a thought.
Keep on Cruisin' Tom Heald
Second Update -- July 2015:
My 91 Ameri Coach II has one blower motor for heating & AC dash
unit. It is accessible from passenger seat and is easily removed (about
6 screws and two wires). I was lucky to find an exact mach at the
wreckers. It was for a 1995 Chevrolet 1500 pickup. Other years may be
the same.
Garry Kruger
Note: If anybody tries this on an Aero Cruiser, please post your results here
so we can pass the information on to the club. Keep on Cruisin' Tom Heald
Heating and Air Conditioning Blower Assembly Parts:
These parts are for the units manufactured by -- Frigi - Cool, Inc; 1434 Pattion Place; Carrollton, Texas 75007 -- now out of business. (Check the label on the outside of the
housing to see if yours is the same.)
Heater fan motor: (This is just the motor. I am told that either one will do)
EverCo. (1-800-325-8886) Model M3812 $153 at Kragen auto parts.
Fact Air (1-800-433-7508) Model FSE 4SEA / Fact Air 35594 $104 at Kragen
Squirrel Cage Fan Unit Parts: Two fans per assembly.
Squirrel Cage Housing - Part Number 882 (includes 2 halves & clips)
Squirrel Cage Venturi (End Cap) - Part Number 883 (you need 2 per unit)
Squirrel Cage Fan. The fan comes in three shaft sizes:
.250 = 1/4 inch - Part Number 880
.312 ~= 5/16 inch - Part Number 880
.370 ~= 3/8 inch - Part Number 880
The fan part numbers had a suffix stamped on them but they were different on the old fan and the new one. When you order make sure you specify the shaft size. Each fan come with a clip to keep it from moving on the shaft. There were no clips on my old fans which is probable why they went bad.
These parts were manufactured by:
The Cary Products Company, Inc.
P.O. Box 947, 101 Lancaster-Hutchins Rd.
Hutchins, Texas 75141
Phone: 972-225-4271, Fax: 972-225-5052,
Web Site: http://www.caryproducts.com/
The only other part is the plastic plate that the motor and two fans are mounted on; however, I did not find any indication of the manufacture.
-------- Other Parts From https://www.ldvparts.com/ on 8/22/07
------------------
Frigi Cool A/C Parts -- Dryer
"DTAC Receiver Dryer, used in Frigi-cool A/C systems, 8 1/4""length, 2 1/2"" dia., top sight glass, side, switch port, side schrader, inlet 3/8"" MO, outlet 3/8"" MO."
Part# 22020065 - Old Part # (12016 ) $15.95
Frigi Cool A/C Parts -- Motor
"DTAC Motor, Twin Shafts, Evaporator Motor for Frigi-cool A/C systems, 12 Volt, 5/16"" shaft size, Rotation CW-CCW, 3 speed, strap - SH - stud mounted, 4 1/8"" length, 3""
dia."
Keep on Cruisin' - Tom Heald
Return to the Tip List.
Subject: Insulating the Heating and Air Conditioning Blower
Assembly
Tip:
The inside of the Heating and Air Conditioning housing has a 1/4 inch black rubber foam insulation
pad on three sides and the top. That's not much insolation so I went down to Home Depot and picked
up a sheet of 4' by 8' by 3/4" Polyisocyanurate Foam Sheeting called R-Gard for $5.00. It is covered
on both sides with a plastic coating so it should weather well. I cut pieces to fit on the "outside"
of the Heating and Air Conditioning housing, attached them with construction cement (glue), and taped
the seams with duct tape. It took me 2 hours and cost less than $10 for everything. By the way, I
had enough foam left over for about 3 additional Aero Cruisers.
Keep on Cruisin' - Tom Heald
Return to the Tip List.
Subject:
A/C Control Sensor
Tip:
The device that
controls the condenser fan (on the radiator)
and the compressor operation was bypassed
on Charley Morlidges coach (The Riviera
Coach). George explained various functions it
performs so people would know what the
problem is if one of those functions fails. The
sensor was passed around for everyone to
see how it mounts, what it looks like and
where it is mounted. Update: On my 1990
Aero Cruiser the
A/C Control Sensor only monitors the pressure of the Freon in the system and
turns off the A/C Compressor it the pressure is too low.
Tom Heald
Return to the Tip List.
Subject:
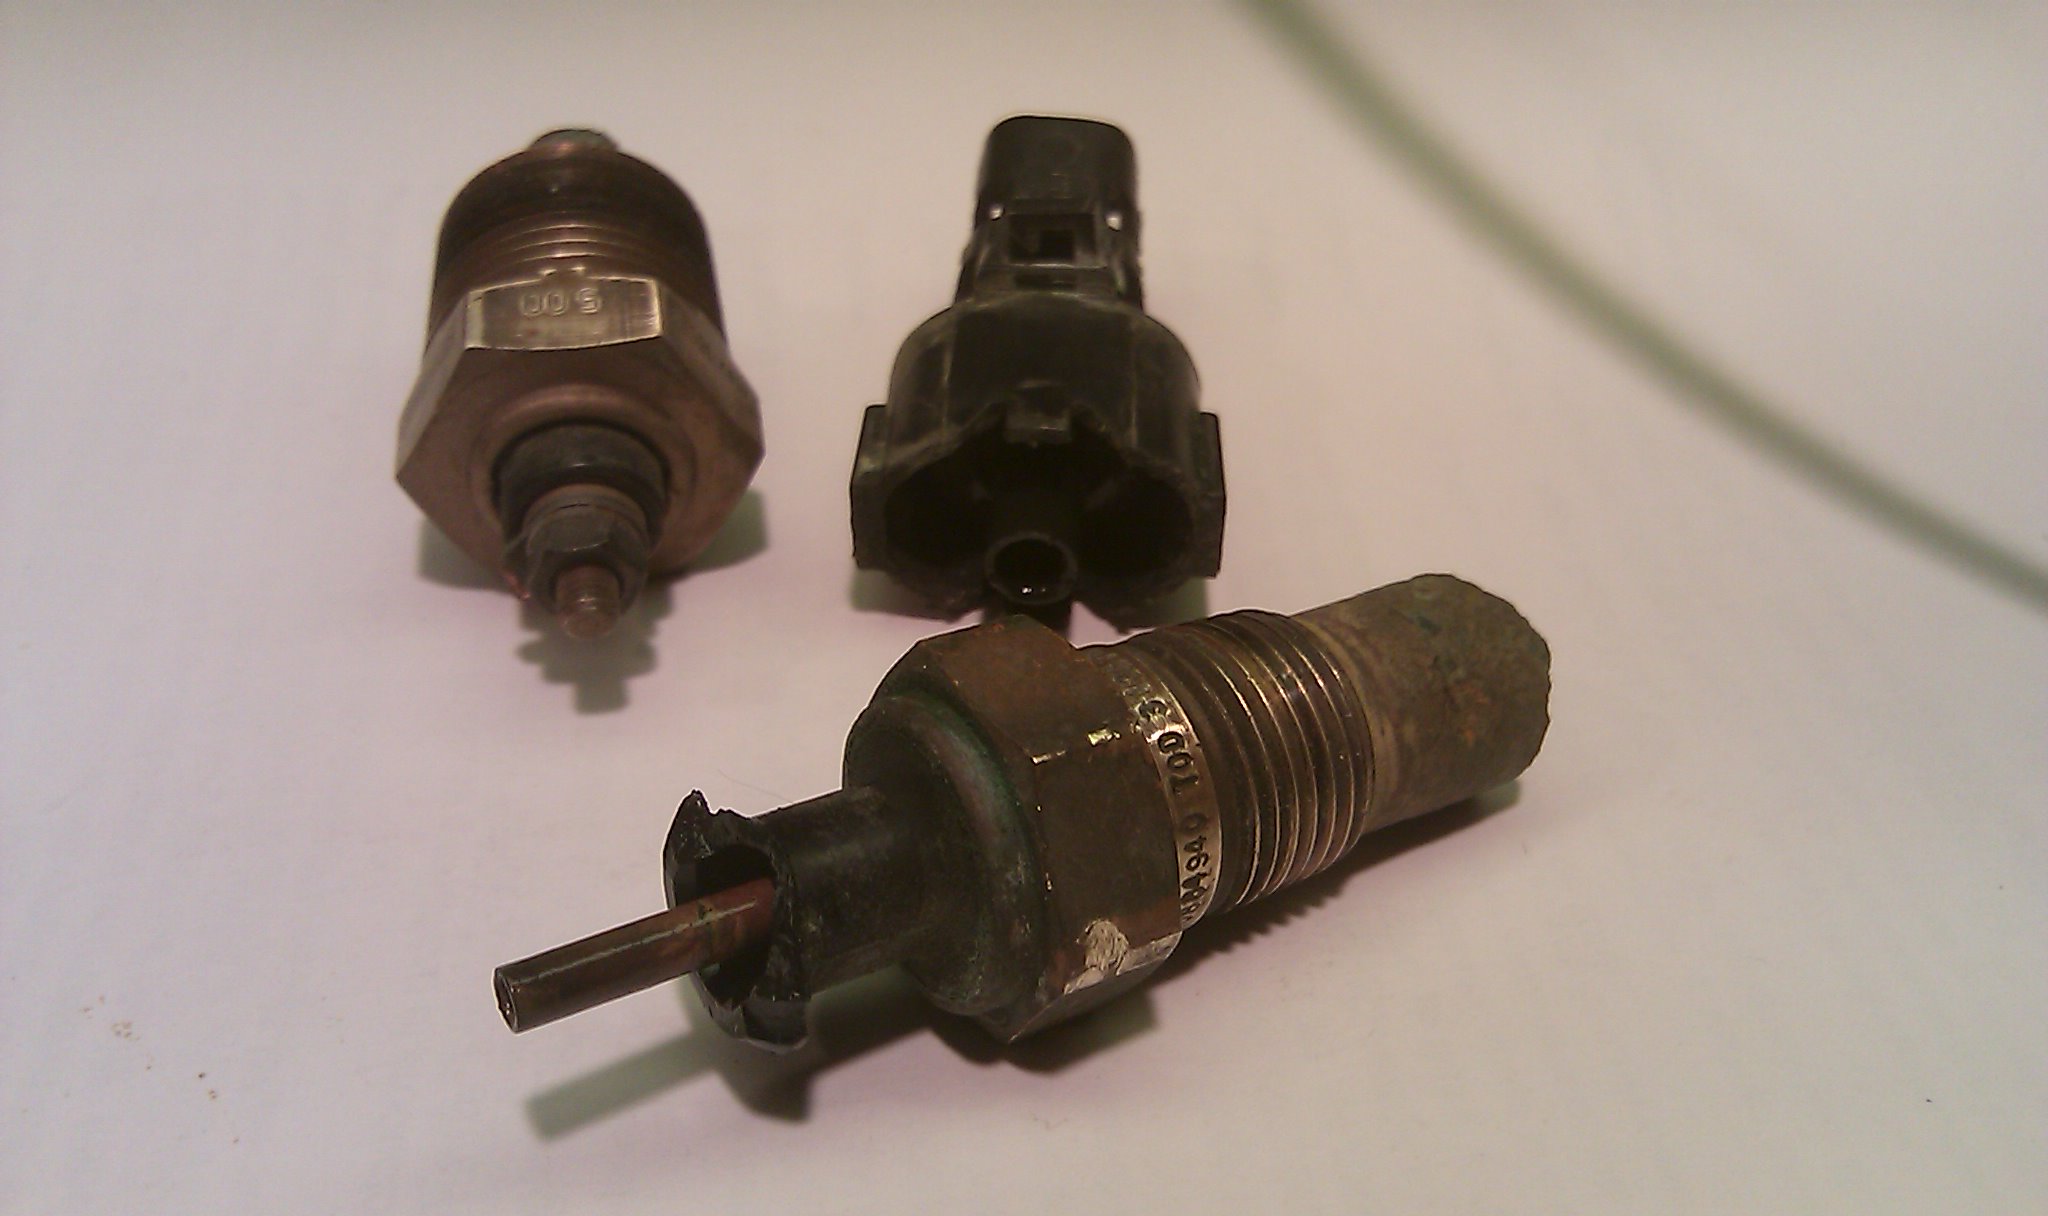
Temp Sender/switch parts
Question:
I have some unidentified temperature senders that I cannot ID.
http://www.starweb.
net/rv/senders.jpg
The
one behind is a VDO unit with a small ring terminal. It's marked "
"VDO 6-24v
801/4/6 max 150deg C Germany"
The other one, and likely more important is
broken. it has a brass shaft that extends up as temperature? and perhaps
pressure builds. It appears to be a single pin plastic connector. The connector
behind it is from the harness and I removed it for illustrative
purposes.
As a quick note, with BOTH of these disconnected I still have a
temperature indication on the gauge. They are both mounted in a metal assembly
attached in-line to the upper radiator hose. there is a small ground wire that
attaches to the housing.
I cannot find this
anyplace. Thanks!
Rick
Answer 1: Hi Rick,
My name is J. D. Whistler. We have the same model Aero Cruiser as yours:
1989 ('88 chassis) 23' Rear Bath bought new.
Last May, I replaced all the engine belts and coolant hoses. When I
removed the carburetor air intake duct, I discovered the same temperature
switch with the plastic male electrical connector as on yours, same switch
was
broken. Maybe I broke it or it was 'age and heat', probably both, but
pulling the air duct across the connector didn't help.
The two switches you speak of are very important as they help
control engine coolant (also known as engine operating temperature) and A/C
condenser temperatures. There are other components that also control the coolant
temperature, such as the thermostat, water pump, A/C controls (which cycles
the condenser fan off and on), and the fluid fan drive. The fan RPM varies
with the coolant temperature. The two "temperature senders" are
not senders;
they are "temperature switches." These switches turn off and on
the
condenser fan mounted in front of the radiator and condenser.
Your switch with the broken female connector ((0884940 TOD
310316742) should have a gray wire with a male squeeze-type connector. The
brass
shaft you spoke of looks like it has been pulled out. It is supposed to be
flush
with the top of plastic female connector and it does not move. The
electrode in the male connector fits inside of the brass tube (shaft) when
connected. After hot running your Aero Cruiser, turn your ignition switch
to 'accessories'. The condenser fan will run in this mode. The switch I bought closes
at 224 deg F and opens at 212 deg F. I don't know if these are the exact
temperatures but is the only one I could find nearest to the closing
temperature of the other temperature switch. NAPA Part No. FS110 (Bar code
707390830360) $11.05. The male connector is also available, if needed.
I always do his after I drive our Aero Cruiser and when the fan shuts off, I turn the
key to the "off" position since I could leave an accessory 'on' and run
the battery down. This switch must have been installed when the chassis was
built since the switch is not on the FRIGI-COOL (Supplier of A/C) wiring diagram.
I believe if they had, both switches would be the same
The marking on your other switch looks like "max 150 deg C" but
150 deg C = 302 deg F, which will not work since Antifreeze boils @ 265 deg F @
15 psi. The normal operating temperature goals of the coolant at 100 deg
ambient is 225 deg F to 255 deg F depending on speed and driving
conditions.
This temperature switch is identified on the Wiring Diagram as an
Optional Temperature Switch. It has a green wire with a screw-type
connector. The Condenser Fan will come on automatically when driving and the coolant
reaches 220 deg F (switch closes). I don't know at what temperature it
opens. The 220 deg was provided in a Tech Tip July 2005, Page 12, Chrysler Part
No. 7226374. I called several Chrysler dealers but they couldn't tell me the
on/off temperature values. The ground wire is the common ground for both
switches since they are both mounted in a copper tube. The temperature - sending unit for the dash gauge is at the front of
the engine.
J.D. Member # 224 (1993)
Answer 2:
Rod, The main control for the condenser fan is included in the A/C system control. The A/C system is controlled by a "trinary switch." It has three
functions:
1. Prevents the compressor from operating if system charge is
lost
or ambient temperature is too low.
2. Stops compressor if head
pressure increases to unsafe levels. It
automatically resets when pressure
drops back to normal.
3. A fan override switch that keeps head pressure
within normal range
by operating condenser fan to increase air flow across condenser
when head
pressure rises above set value.
The other two
temperature switches that operate the fan are located
in the upper radiator
hose (mounted in the copper tube hose extension). Their
operation is
dependent upon the coolant temperature.
The A/C system in the Dodge Service
Manual has a damped pressure
cycling switch instead of the trinary switch
and doesn't have a condenser fan.
The expansion value is also a different
type.
Hope this clarifies the A/C systems.
J.D.
Answer 3:
See also Temperature Switches Manifold (Upper engine coolant hose)
Return
to the Tip List.
Subject: A/C-Heater output cutting
out -- Vacuum Leak
Tip: If your A/C-heater output on the dashboard slows down
and stops during acceleration or going up hill and starts
up again when you let up on the gas, chances are you
have a vacuum line leak. Start by checking the line at
vacuum accumulator (black plastic ball-like thing under
the dash in front of the engine).
#212 Petrovich Update:
If you don't have a vacuum leak, you can fix the problem by
installing an Inline Vacuum Check Valve in the hose leading into the
vacuum accumulator. The accumulator probably has one built in
but over time it may go bad. Rather than replacing the
vacuum accumulator for big bucks, you can pick up an Inline Vacuum Check Valve
at any auto parts store for a few bucks.
Tom Heald
Return to the Tip List.
Subject:
Air Conditioning Refrigerant
Tip:
A new refrigerant, Freeze 12 is on the market and has
similar cooling characteristics to R-12 but is readily
available and much cheaper. So, if you are thinking
about retrofitting your dash air conditioning to R-134,
you may reconsider and go with Freeze 12.
#433 Di Gilio
Return
to the Tip List.
Subject: Speedometer Erratic or Not Working
Tip 1:
It may be the cable or the signal generator in the Transmission or Gear vendor if you have one.
According to George -- our retired Tech. Master -- it's probably not the cable. You can test
it out by removing the cable at the transmission end, putting an electric drill on the end of
the cable and seeing if the speedometer works. If it's ok, then the problem is in the signal
generator coming out of the transmission or the Gear Vendor. There is a gear inside that
sometimes goes bad, especially on older Gear Vendors that have a plastic gear. The newer
Gear Vendors have a metal gear.
If the Speedometer will not work with the drill hooked up, disconnect it at
the speedometer end and see if the cable turns with the drill. If not you
can have a new cable made by any shop that services speedometers. An auto
parts store or your mechanic should be able to recommend a shop that can do
the work. Take the old cable with you as the shop will need to know the length
and the type of couplers on the ends of the cable.
If it's not the cable, then ask the shop about servicing the speedometer
which according to Frank DeRemer is not a standard Chrysler part. He found
a replacement for his 23 footer buy searching for the name he found on the
speedometer on the Internet.
My speedometer needle was fluttering some years back so I removed the cable from
the back of the speedometer and squirted some oil into it. I used standard
10W30 motor oil, but in colder climates you might want to use a graphite or
lithium based lubricant
made for speedometer cables. It only took me about 15 minutes and it's
still working flutter-free for me.
Keep on Cruisin', Tom Heald
Tip 2:
When I brought my coach back from Arkansas I noticed that at low
speeds (5 - 35 mph) the speedometer was erratic. As you moved above 35
mph it smoothed out. I went to United Speedometer in Riverside, CA and had
the cable replaced. In that process, the mechanic provided some interesting
information regarding speedometer cable characteristics and maintenance.
- The shorter a speedometer cable is, the better, because torque lash is proportional to length.
However don't compromise the bending radius.
- Ideally, a cable housing should have a large bending radius when practicable to minimize
any tendency for the cable to bind in the housing.
- As speedometer cables get longish, ideally their dimension should increase to counteract
increased torque lash but because of industry standards, this is not practical. Aero Cruiser
speedometer cables are quite long by industry standards.
- The best cable lubricants are those in the Lithium family because they have excellent
adhesion properties that inhibit throw-off plus a stable viscosity through wide temperature
excursions.
- Lubricating the cable in an Aero Cruiser is a simple process because the dashboard termination is easily
accessed under the dashboard. Remove the cable, slush it with lubricant and push it back
into the housing. When you feel the cable hit bottom, slowly turn the cable by hand until you
feel it drop into the keyway. Reattach it at the speedometer end and you are in business.
- If the cable runs very long without sufficient lubrication it will be permanently deformed
and will exhibit low speed lash even after it is serviced. Better too early than too late.
Eventually, this lash could increase to the point that it over-torques or over-speeds the
speedometer head, which could damage it. Cables are cheap. Speedometer heads are
expensive! This is of particular concern to owners of coaches, which have speedometer
heads previous to the VDO speedometers installed in later model year coaches because
these older speedometer heads are not readily available.
- If you remove the cable, measure its length for your records. If
you subsequently require a cable replacement, you can have it made up without bringing
the coach to the speedometer shop.
- Its not a bad idea to make up a tachometer vs. speed table for second and third gears so
that in the event you lose your speedometer on the road you still have a useful speed
indicator that will keep you out of the clutches of the highway patrol and local gendarmes.
Bruce Wachtell
Return
to the Tip List.
Subject:
Red Lightning Lube for Speedometer etc.
Tip:
All purpose lithium lubricant from United Speedometer
& Instrument that will hold up under more stress,
maintain viscosity at colder temperatures and hotter
temperatures. It wont throw out of high speed bearing
and wont settle out or migrate in low speed
applications. It stand up against gasoline and water.
And it virtually doesnt corrode or dry out so you can
use Red Lightning on all kinds of applications.
Contact United Speedometer & Instrument, Inc.
2431 University Ave.
Riverside, CA 92507-4296
Phone 1-800-854-4798 in California 1-800-442-4801 or
web site at www.speedometershop.com
#462 Wachtell
Return
to the Tip List.
Subject:
Turn Signals Flasher / Alarm
Tip:
If you are concerned or embarrassed with the possibility
of driving down the road with your turn signals on, Paula
suggest Turn-Alarm® flasher replacement. Replacement
is easy, just unplug the existing flasher and plug in the
new one. Paula bought model #552 from:
DAECO
P.O. BOX 148
VALLEY SPRINGS, CA 95252-0148
(209) 772-0923
www.turnalarm.com email: turnalarm@caltel.com
#165 Morris
Return
to the Tip List.
Subject: Gauges and Sensor
Tip:
If you have Teleflex instruments, characterized by
orange and yellow colors on black background, Dave
found a new source for us.
Custom Instrument Panel
1537 E Del Amo Blvd.
Carson, CA 90746
Phone 310-515-4947 or
800-462-7635 FAX 310-635-9804 http://www.custominstrumentpanels.com
Teleflex part numbers are:
Water temperature gauge
160 - 3000 F part No. I015.60
140 - 2800 F part No. I015.40
Original sensor part No. 96046 was for gauge I015.60
and had a range of 160 - 3000 F
New sensor part No. 52320-006 has a range of
140 - 3200 F and can be used for either gauge.
Both sensors have 1/8 NPT thread.
Custom Instrument Panel sells the sensor under their
part No. SND52320-006 for $11.08 plus shipping and
handling.
If you need to talk to anyone at Teleflex, call their
technical advisor Joe in Florida at 941-907-1000.
Note:
Summer of 94 issue of the newsletter on page 11
shows Seaward Products as a source for these
instruments. Though they are still in the RV business,
they have moved and cut back on dealing with
instruments. Even they send their customers to Custom
Instrument Panel.
#409 Royston
Return
to the Tip List.
Subject: Oil Temperature light Sensor/Sending unit
Question: The Oil Temperature light is on solid on my rig. I know it is a false reading
because an inferred thermometer pointed at the oil pan reads about the same as
the water temperature. I can't seem to find the sensor/sending unit. Any suggestions?
Answer: The Internet tells me it's on the passenger side of the engine beside the
distributor on the back of the engine. There are two oil sensors, the
lower one with a pressure bulb is for the oil pressure gauge and the other one
with two wires is the temperature sensor.
Keep on Cruisin, Tom Heald
Return
to the Tip List.
Subject: Maintenance Light Meaning and How
to Reset it
Question:
The "Maintenance" light not the "Check Engine" light came on in my Aero
Cruiser. Have any of you had any luck resetting it. I called the local
dealership and they were no help. The Interned has no helpful information.
One entry says a special tool is required another says to disconnect the
computer. My mechanic says to take the light out! Any suggestions?
Answer: The light comes on for various
mileage and/or time service intervals. You need an Chrysler style OBD1
diagnostic computer. The stock one from Chrysler was called DRM. I have an
aftermarket one that simply plugs into the engine bay connector and reads all
the SBEC parameters. There is a maintenance light reset built in. Most likely
you need to replace the O2 sensor. Mine came on around 80k miles.
Rich
Update: Any good mechanic will have a
diagnostic computer and can reset it once they understand what it is for. I believe that on an America Coach it
an EUL (Extended Useful Life) light and is triggered by mileage. On an Aero Cruiser it is a
Maintenance light as explained above.
Keep on Cruisin' Tom Heald
From the Internet:
Maintenance Light meaning for a 1990 Dodge D350 Pickup 5.9 V8 GAS
This Emission Maintenance Reminder System (Maintenance Required Lamp) is incorporated into the engine
controller. The controller stores vehicle mileage into its memory every eight miles, then at 60,000,
82,500 or 120,000 miles it will light the EMR (Maintenance Required) lamp. When the indicated mileage
is reached or the EMR lamp is on at all times, the following components must be replaced and the EMR
lamp reset:
At 60,00 miles, proceed as follows:
- Replace EGR valve.
- Clean EGR passage.
- Replace PCV valve.
At 82,500 miles, replace oxygen sensor. (mine was replaced at 50K miles)
At 120,000 miles, proceed as ... They want you to buy their book at... http://www.automotix.net/autorepair/diy/1990-dodge-d350_pickup-procedure_mlr.html
Keep on Cruisin' -- Tom Heald
Return
to the Tip List.
Subject:
Air bag controls on the dash not working correctly.
Question:
Driving my "new rig" back from Clovis the air compressor kept coming on
and the two gauges were way too high. The right was at 130 and the
left was at 70. Couldn't figure out how to change them and there is nothing in the
paperwork I have.
Answer:
In principal they are pretty simple on the 23 footer. The 29 footer uses a
totally different system; see "Running Gear", "Front Hood, "Air
Bag Pump" for air pump part numbers for both the 23 & 29 footers.
On the 23', you push the up air valve to increase the air pressure and the down
air valve to lower it. The up and down air-valves are connected by air-lines to the air compressor up front under the hood, and then
air-lines back to the air-bags in the rear.
The Air Bags should be maintained at 40 pounds each. (I have been told that the air bags are not part of the suspension, they are there to help with body sway especially in high winds.)
Use too much pressure and you risk turn the rear-end into a catapult
 .
Some people like to adjust the downwind side higher when driving with a strong crosswind. .
Some people like to adjust the downwind side higher when driving with a strong crosswind.
It sounds like your up air valves on the dash are stuck open or leaking. The compressor should only come on when there is demand for more air; i.e. you press the up valve.
The first step in diagnosing the problem is to take the key out of the ignition
so the air pump will not come on. If the pressure drops or goes to zero,
you probably have one or more bad air valves. If the pressure is high, press the down button to bleed off pressure.
If you can get the pressure to 40 lb.
in each bag and it holds then you may have a bad "Pressure Sensing Switch" on the compressor. To get around the problem, you can disconnect the pump by pulling the electrical contact off
it until you can get it fixed. It's not a good idea to run a long distance
with the air bags deflated, as they will tend to chafe. For information on the "Air Bags" themselves check the "Shared Knowledge Base" under "Running Gear",
"Wheels and Chassis".
Keep on Cruisin', Tom Heald
Return
to the Tip List.
Subject:
Dash Electrical Diagram for Add-ons
Tip:
A frequently asked question is how to add electrical devices to the dash
wiring. Over the years people have asked
George how he wired the equipment he added to
the coach. In answer, George prepared the following diagram that shows how he added
an auxiliary fuse block and how he connected
various instruments and devices. Because the page is large it has been added as a separate page so that it can
be viewed at a higher resolution or printed on a single page in landscape mode. Click
here to see George's Diagram. Hint: Use
"Print Preview" to make sure you are in landscape mode before you
print and only print the first page to skip the ads.
For information on the
Standard Wiring Diagram from
Dodge just click on the link shown.
Keep on Cruisin' - Tom Heald
Return
to the Tip List.
Subject:
Cruise Control
Tip:
I came across a link that you might want to keep in your Aero Cruiser
folder. http://www.cruisecontrolking.com/
These
guys build the heavy duty ones for the big rigs and focus on diesel, but they
work well with older gas motors that are 'mechanical'..... that's is,
engines that are not computer controlled. It is the until that came with the FMC
coaches back in the 70s and, lo and behold, those FMCs used a Chrysler 440
marine engine. Fancy that! Every bit of data helps.
-=Dale=-
Return
to the Tip List.

|
Copyright© 1999-2016
Freelance Ink.
All Rights Reserved.
|

|
|