|

Changing the Oil in Your Gear Vendors
by
Dragi Petrovich
 |
Note from the Author: The following instructions are for the GV with deep oil
sump. Shallow ones will most likely need less oil but all the parts should be the same.
Have you ever considered changing your own oil in
the Gear Vendors (GV)? If its not convenient for you to
go to the manufacturer or the authorized dealer, doing it
yourself is not that hard. All you need are the parts that
can be mailed to you from GV and one quart of gear oil
that you can buy locally. |
Heres what you need:
Call Gear Vendors and tell them you need one each
of the following parts (they are also listed in your GV
manual):
|
Part No. |
Part Name |
Price |
|
1G0013 |
Gasket, Deep Sump |
$8.01 |
|
1D0016 |
Seal, Drain/Filler Plug |
$2.50 |
|
1D0039 |
Washer, Pressure Filter |
$1.00 |
|
1S0031 |
O-Ring 200-132 (optional) |
? |
You will also need one quart of Syntorq LT, SAE
75W-85 API GL-4 synthetic manual transmission fluid.
GV no longer recommends Dextron II or Mercon automatic
transmission fluids since they were found to be too
light for this application. Unfortunately, Syntorq may be
hard to find and it is expensive. If GV will sell you a quart
for less than $20, take it. Otherwise, go to a GM dealer
and ask for part No. 12346190 and be prepared to pay
over $20 for a quart. Dodge dealers also sell it under their
part No. 4874459 but Im not aware of anyone else
selling it in small quantities.
Start by cleaning the outside of the GV
unit. Its important that no dirt gets inside.
Remove the Drain Plug1 and drain the oil.
Note1: For pictures
locating the drain plugs and additional information see GearVendor.pdf
Remove six sump bolts; remove the sump and
the gasket. (See Note2 below)
Note2: According to Mike McCarthy if your doing a
regular service and
having no problems, just drain and fill is good. You don't need to
open it and clean the internal filter.
Mike McCarthy
Customer Service
Gear Vendors, Inc.
1717 N. Magnolia Ave
El Cajon, CA 92020
1-619-562-0060 Ext. 115 1-800-999-9555
Ext. 115
www.gearvendors.com
|
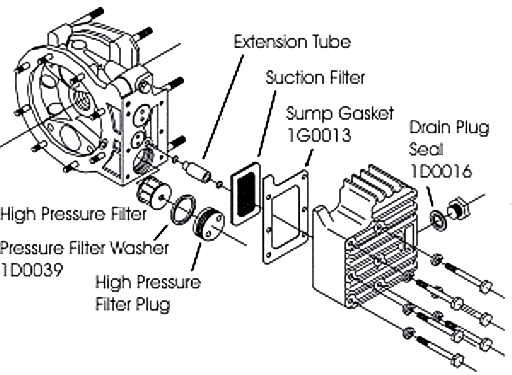
With sump removed, pull straight down on
suction filter to remove. Wash screen and air
dry.
To clean the high pressure filter, remove the
plug which is located on the passengers side
of the unit when facing forward. This is the
largest of the three plugs with two holes each
where the spanner wrench fits. GV recommends
using Blue Point tool part # AFS-482
but since I couldnt find one, I used needle
nose pliers and a screw driver. Insert the jaws of
the pliers into the blind holes and with the screw
driver between the jaws turn counterclockwise and
you are there. Remove the paper gasket between
the plug and the filter and remove the filter.
Wash the filter in solvent and air dry.
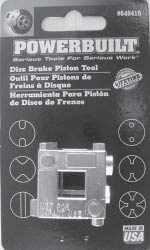 NOTE: Prior to reassembly, I bought a disk brake
piston tool Powerbuilt® part # 648410 at a local
auto parts store. None of my disk brakes ever
needed a tool like this but it was great for installing
the high pressure filter plug. The nubs on the tool
didnt fit the existing holes in the plug so I drilled
two new matching blind holes opposite of the
existing ones which made the installation a snap
and future removal as well.
NOTE: Prior to reassembly, I bought a disk brake
piston tool Powerbuilt® part # 648410 at a local
auto parts store. None of my disk brakes ever
needed a tool like this but it was great for installing
the high pressure filter plug. The nubs on the tool
didnt fit the existing holes in the plug so I drilled
two new matching blind holes opposite of the
existing ones which made the installation a snap
and future removal as well.
Install filter, washer, and filter plug. (Tighten to
16 ft-lb which is a little more than hand tight)
Install suction filter and press-in to seat.
Install gasket and sump
and secure with six bolts
previously removed.
(Tighten to 5-7 ft- lb. which
is just enough to prevent the
leaks.) Dont over tighten.
Body is soft aluminum.
Add 1 quart of Syntorque
fluid and check level
per manual instruction. One
inch below oil fill hole.
 Return to the Tip List.
-- Disclaimer --Information
on this Web Site is provided by members of the "Aero Cruiser Classics" Motor home Club. All
information on this site is contributed by the club members or outside sources and is believed to be reliable; however,
there is no warranty or guarantee that said information or advice is correct or free of defect. It is
offered on a best effort basis and is to be used at your own risk.

|
Copyright© 1999-2016
Freelance Ink.
All Rights Reserved.
|

|
|