Engine's Fuel / Air System Tips:
Carburetor, Fuel Injectors, Pressure Regulator, Air Cleaner.
Click on the
 to
go to its Tip: to
go to its Tip: |
 |
Air Cleaner & Smog Test
|
 |
Gas Lines will Crack
|
 |
Fuel Injector Troubleshooting & Part Numbers (off page link)
|
 |
Fuel Injector
|
 |
Fuel Injector Nozzle Drip
|
 |
Carburetor
|
 |
Ignition
|
 |
Throttle Control Cable (off page link)
|
 |
Throttle Control Cable Replacement (off page link)
|
 |
Fuel Pressure Regulator
|
 |
Pat Mogan's "Mini-Blower"
|
 |
Gas Mileage from Pat Mogan's "Mini-Blower"
|
 |
Tom's version of Pat's "Mini-Blower"
|
 |
Updated Gas Mileage from several "Mini-Blower" Installations
|
-- Disclaimer --Information
on this Web Site is provided by members of the "Aero Cruiser Classics" Motor home Club. All
information on this site is contributed by the club members or outside sources and is believed to be reliable; however,
there is no warranty or guarantee that said information or advice is correct or free of defect. It is
offered on a best effort basis and is to be used at your own risk.
Tips:
Subject:
Air Cleaner & Smog Test
Tip:
Word of caution,
if you live in California, any modifications to
the emission control system, particularly to the air
cleaner, will fail you at the smog test facility. So,
be prudent about what you do.
In California the Smog Information sticker is located on the original air cleaner and
it must be retained.
 Return
to the Tip List. Return
to the Tip List.
Subject:
Gas Lines will Crack
Tip:
A number of members have had to replace the gas lines. As our
coaches get older the gas line get brittle and have a tendency to crack.
This results in hard starting and sometimes the smell of gas in the coach.
It can also cause you to fail a smog test in California where they sometimes pressure
test the gas tank and associated lines including lines to all of the pollution
control equipment. For more information, check out the following tips:
Gas Tank and Gas Lines,
Generator Fuel Line and
Honda Generator Won't Start.
Keep on Cruisin', Tom Heald
 Return
to the Tip List. Return
to the Tip List.
Subject:
Fuel Injector
Tip:
Tom Heald had a problem that was in the
making for a long time when his engine starting running on 4 cylinders just
outside of Death Valley. The electrical prong on the
Fuel Injector was not seated properly in the the mating socket (it was just touching the side)
and after working for many years, failed without warning. Follow the link to read about
Diagnosing Tom's Injector Problem.
If you need to
replace the injectors, make sure you replace them as a
pair and that they are the same color code. “O” ring is
critical and has to be the correct one for the injectors.
Also, they are controlled in two ways; by vacuum and
electrical input from the on-board computer.
 Return
to the Tip List. Return
to the Tip List.
Subject:
Fuel Injector Nozzle Drip
Tip:
If your engine is fuel injected, it is
prone to what’s commonly referred to as the “nozzle
drip”. That is the situation where the gasoline will drip
in the throttle body uncontrollably as the result of film
buildup in the injectors. The cure for this phenomenon
is the fuel injector cleaner that can be purchased at any
automotive store but the best prices have been found
at Wal-Mart and Costco. Make sure you follow
manufacturer’s direction since some formulation
caution you not to use it more frequently than every
40,000 miles. It’s not clear what would happen if you
did use it more frequently.
 Return
to the Tip List. Return
to the Tip List.
Subject: Carburetor
Tip:
Frank DeRemer reported that Paul Reimer
merely had his carburetor tuned and improved the gas mileage by 2-3 MPG.
 Return
to the Tip List. Return
to the Tip List.
Subject:
Ignition
Tip:
If you have a carbureted engine and would like a little
more power, you may look into installing Jacobs ignition.
To find more on the subject, go the Jacobs Electronics
web site at http://www.jacobselectronics.com
#441 Mondeel
 Return
to the Tip List. Return
to the Tip List.
Subject:
Fuel Pressure Regulator
Tip:
Everyone was surprised to see
George Kinnison show up
without his Aero Cruiser.
Apparently, every time George
came to a stop, his engine
would stop as well. He was
still trying to identify the
problem but in the process he did discover that the fuel
pressure regulator went out. Replacement part from
Chrysler is part No. 4095704.
 Return
to the Tip List. Return
to the Tip List.
Subject:
Pat Mogan's "Mini-Blower"
Tip:
Pat Mogan installed a fan in the air
cleaner intake (carbureted engine but it works for fuel injection also) and reported
increase in mileage by about 3 MPG. He could have used
either 3” or 4” boat bilge pump but choose 4”.
|
Pat showed off his innovation
for engine power increase.
As you can see on the left, he secured
a house heating vent to the
grille and connected the air intake
hose (purchased extra length) to the
vent with a PVC fitting...
|
|
A marine blower was installed between
the extra length of hose and
the original air intake hose.
The motor is controlled by a switch
on the dashboard. That way when
extra power is needed, such as going
up hill, he turns on the blower.
|
|
|
Pat calls his innovation “A poor
man’s turbo charger” and reports noticeable
increase in power and gas mileage.
|
Pat Mogan
 Return
to the Tip List. Return
to the Tip List.
Subject:
Gas Mileage from Pat Mogan's "Mini-Blower".
Tip:
At the Zion Rally last
May, Pat Mogan reported that he had added a bilge blower fan to his Aero
Cruiser. It blows into the air intake. He reported significant increases in
power and gas mileage -- from 6-something MPG to 8-something MPG. Having tried
such things in the past that did not do much good, I was skeptical. Still, it
only required about a $35 investment and a half hour of labor, so I thought I
would try it. So, on the way back I stopped in Las Vegas, bought such a fan at a boat store,
and installed it. Wow, am I glad I did. It has long since paid for itself in
saved gas on my 29 footer. (Thanks, Pat!) Here are some
statistics:
On the way from
Bakersfield to Las Vegas, I had gotten 9.27 MPG. On the return trip, after adding the blower, I
got 11.89. That seems to be a 28%
increase! My prior all-time-high mileage
measurement was 10.47 MPG. Even that
indicates a 14% increase. Of course it IS
about 2000’ downhill from Las Vegas to
Bakersfield. Nawh, I don't believe it, so here's more
data.
Counting from Santa Cruz to and back
to Las Vegas on
that same trip, I got 9.19 MPG. In returning
from Las Vegas, I took a round-about trip through the mountains (Lake Isabella
above Bakersfield, over a 6000' pass, then down to 500', then up to 7000' and on
to the very bottom of King's Canyon National Park at 3000', and back to 7000'
and on home through Fresno); even with all those ups and downs and 12 days of
camping, I got 9.33
MPG. That's only a 1.5% increase but the two
legs of the trip were quite incomparable: the return leg was much worse driving
conditions -- I would have previously expected low 8's MPG or
worse.
Prior to the blower, I
was getting 9.3-9.5
MPG on unimpeded trips from Santa Cruz to the LA area
down Hwy 101. On a round trip in 2004 to Quartzite I got 9.2 MPG.
On my trip to the Gold Beach, OR, Rally in 2004, I got 9.07
MPG. Now I am getting better than that on trips
involving many steep, windy, slow roads.
Next trip was for the
Pismo Beach Rally. I took the coast route (Hwy 1) from Santa Cruz
to Pismo, then slow, windy 101-58-229-41-198 to
Visalia. I got 8.78 MPG for that leg. Then I went through Sequoia
National Park up 7000' on a slow, windy road not recommended for vehicles over
22' (mine is 29') to Kings Canyon National Park (staying at 7000' for another 5
days this time) and returning to Santa Cruz again through Fresno. On that leg I
got 8.99 MPG. Again I don't have a comparable trip before the
blower with which to compare, but I might have expected low 8's
MPG.
Funny, isn't it, how
the first trip after a change seems to indicate a great increase in gas
mileage!  I doubt I am getting 28% better MPG, but it
seems clear I am getting at least a 1 MPG improvement, perhaps 10%-15%.
That is a little more than I got when I changed my 4.10 rear end to a 4.88, and
that cost me $800. I highly recommend the blower (see the July 2006 Aero Cruise
News) for increased gas mileage.
By the way, the
tailpipe is cleaner with the blower, seemingly indicating a leaner gas mixture.
Also the sparkplugs look very clean. Finally, I computed that a 360 engine
takes in 240 CFM of air at about 2300 RPM, and that is just what the fan
generates. Obviously the fan is not strong enough to force air into the motor,
as a real blower (supercharger) does, but is does seem to help the engine breath
just enough to help.
Happy Aero Cruizin', --Frank DeRemer
Update: After further measurements, Frank reports that he is seeing maybe one-half a MPG improvement
in gas mileage; however, he has seen a noticeable increase in power on hills and when passing.
 Return to the Tip List.
Subject:
Tom's version of Pat's "Mini-Blower"
Tip:
I did not want to reroute the engine's air intake into the engine
compartment behind the grill where it is crowded and the air get hot.
I decided to leave the air intake in the same general location as the original intake,
under the drivers compartment where the air is cooler.
The original "Ram Air Scoop" performs two functions:
It provides "Ram" air to the carburetor and provides cooling for the Engine Computer. The addition of the "Marine Blower"
enhances the air flow into the engine, letting it breath better and increases
cooling flow over the engine computer. Overall, it should improve engine efficiency
and give you better mileage on the road. In-fact later measurements
(see below) showed a disappointing 0.45 MPG improvement in gas
mileage  ;
however, there is a noticeable improvement in power going up hills and when
passing ;
however, there is a noticeable improvement in power going up hills and when
passing  . .
I wired the blower
to a new switch that I installed to the left of the steering column and ran the wires
down to ground and the ignition side of the Coach
Electrical Box. Position 20 and 21 are normally free.
|
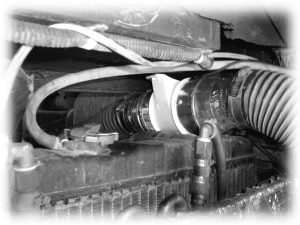
To mount the
4 inch Marine blower I used a 2x4 about 10 inches long. I cut the top side at a
15 degree angle and
mounted the blower on the bottom, left end so the input side was lower than the
output. I attached the original 4"
air hose to the output of the blower and mounted the 2x4
to the floor of the drivers compartment -- cantilever style -- with 2 lug bolts as
seen in Picture 1.
To the input end of the blower I attached a short piece of 4" air hose and ran it
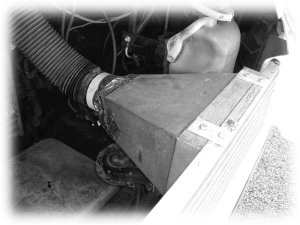
to the original "Ram Scoop". To attach the "Scoop" to
the body, I ran an aluminum
strap from the 2x4 the "Scoop" was original attached to, down to the
mounting fixture on the scoop. This is the end that was original attached to the wheel
well and can be seen on the side opposite the smaller hose that goes to the "Engine Computer" to draw
air through it and provide cooling as seen in Picture 2.
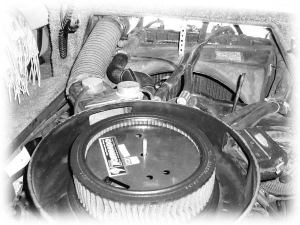
I covered the air intake end of the scoop with a quarter inch square galvanized
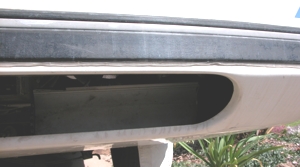
mesh to keep any rocks out of it. Then routed it beside the steering-gear housing to an area behind the front bumper. Just to the right of the opening
seen in Picture 3. I was concerned that the input scoop
might be in an eddy and not get enough air so I installed an "Air Dam"
behind the opening below the fender to divert air to the scoop.
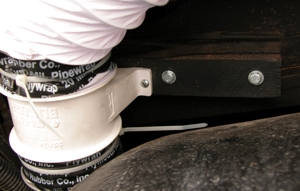
The input
"Scoop" can be seen in Picture 4 on the right behind the
bumper. The "Air Dam" can be seen to its left and from the
outside in Picture 3.
|
 Picture 1

Picture 2
Picture 3

Picture 4
|
Update: I will
experience a back-fire if I turn the engine off with my blower running.  I assume it is the extra air / fuel mix in the manifold.
If I turn the blower off before the ignition, I don't get any back-fires.
I don't want to blow a gasket, so I always try to remember to turn the blower off before the engine.
If I don't remember, it reminds me with a bang!
Keep on Cruisin', Tom Heald
 Return
to the Tip List. Return
to the Tip List.
Subject: Updated Gas Mileage from several "Mini-Blower"
Installations
Tip: I have spoken with
several club members who have installed marine blower on the intake line to the
air filter. All report very little up to maybe one-half a MPG improvement
in gas mileage. However, all report a significant increase in power going
up hills and when passing. Personally I have driven over the "Tejon
pass and the Grapevine on US 5", Tehachapi pass on CA 58, and Pacheco pass
on CA 152 all of which have caused me to go into second gear in the past.
With the blower installed, I have driven all of them without having to downshift
my 1990 23 foot Aero Cruiser with a standard drive train without a Gear Vender
or rear end change.
I log the odometer reading, gallons pumped and cost every time I fill up so I
have a complete history of my mileage from when I purchased it in July of
1996. Going back 1057.0 miles just before I installed the Mini-Blower I
averaged 9.49 MPG. After the installation, I averaged 9.94 MPG over 1138.3
miles. So I have seen a 0.45 MPG improvement driving over similar roads
and conditions. In both case the majority of the miles were on the highway
driving around 60 MPH. Both the before and after numbers include trips
over all of the passes listed above.
Keep on Cruisin', Tom Heald
 Return
to the Tip List. Return
to the Tip List.

|
Copyright© 1999-2016
Freelance Ink.
All Rights Reserved.
|

|
|
